

Note: This is a reverse chronologic blog, with the newest entries at the top.
See the Blind Lemon robot page for more info.
- Video1: Y-Bridge motor driver test
- Video 2: Function test
Update 2011-07-10
I was asked to bring Blind Lemon along to appear with me on Make: Live this coming Wednesday. Poor BL had been sitting in a box, and was a bit worse for wear from my kids playing with him.
He got fresh batteries. I reinforced some of the cardboard at the bottom edge with super glue, because it was becoming frayed. His drum stick motors needed to be remounted because they were loose or were falling off.
The biggest change was that relocated his power switch from his waist to the top of his head. I had a bit of a misadventure with that. While glueing the switch in place, I managed to super glue the switch into the on position. Have you ever taken a mini DPDT switch apart and reassembled it? I have. It's lots of fun at 2:00 AM.
He's looking good now. I might tune up his code a bit before the show if I have time.
Update 2010-03-05
I have taught Blind Lemon to dance!
Some code optimization gave me the room in memory I needed to add some new features. Now the little guy plays drums, then does a little dance before moving on. I posted the updated code to the robot page and will upload a new video soon.
Update 2010-02-15
Blind Lemon got some new wheels, and I must say he is stylin'! He's the bot what's got the tread with some cred. No more DIY ghetto wheels, these slick black rollers look smoooooth!
I used some hubs from a Tamiya track set that happened to have the same 8mm outer bore as the wheels. The inner bore of the hubs was about 3mm, which was small enough for me to use some 2mm bolts that have been lying around in my workshop forever to attach them directly to the motor shafts. Some 2-part epoxy secured the hubs to the wheels.
Since the new wheels are smaller in diameter than the original wheels, I had to lower the motors and make a bunch of minor adjustments. Surgery included some little mistakes (like slicing through a motor wire with a utility knife), but all is well now.
The only downside is they are a little smaller diameter, so Blind Lemon is a tinsy bit slower than he used to be. I need to tweak his programming so when he does his back-up and turn maneuver he keeps his motors on a little longer.
Update 2010-02-10
I got a lot done on BL today and last night!
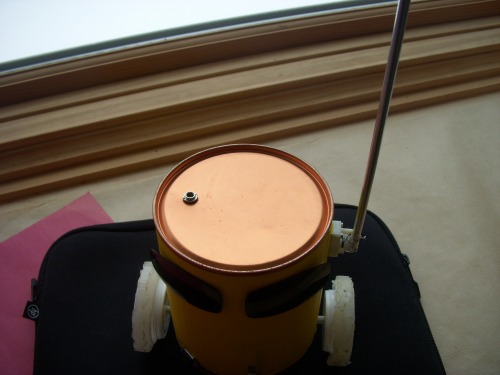
First off,who couldn't use an extra hole in their head? I added this hole so I can remote the programming coax audio plug. This way, I don't have to uncover BL everytime I need to program him. Since this is a Picaxe-08M, which shares the programming interface with Output 0, I had already added a switch to the jumper pins that let you program it. Now I have complete access to programming without spilling BL's guts everywhere.
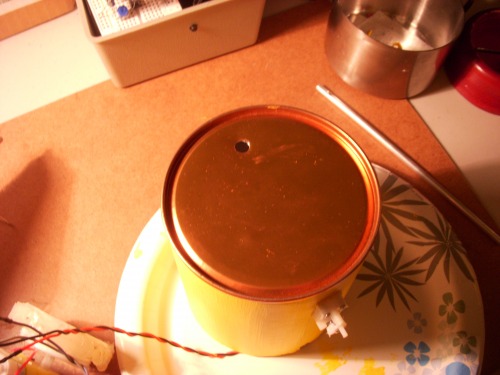
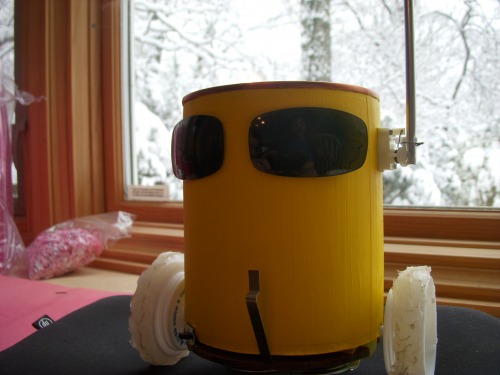
Also, Blind Lemon finally gets a color that matches his name.
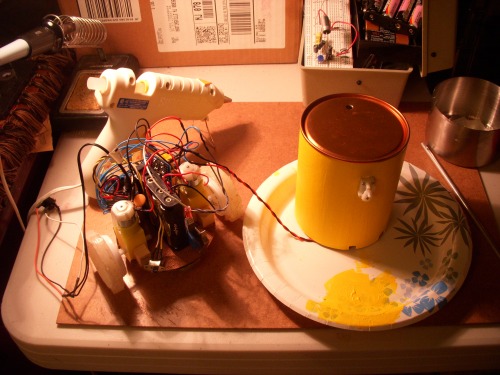
Here you can see the relay (even BL's motors and relay are yellow!) on the aux board. The relay allows me to use three output pins from the Picaxe for two different purposes. You may also be able to make out that I've used header pins to connect all those wire to the aux board, so I can remove it for servicing. Or maybe you cannot, but I did.
Also, near the switch by the bottom of the aux board, are the header pins I had to bend upwards so I could fit the rat's nest of wires under the cover more neatly. The word "neat" is used here as a relative term.

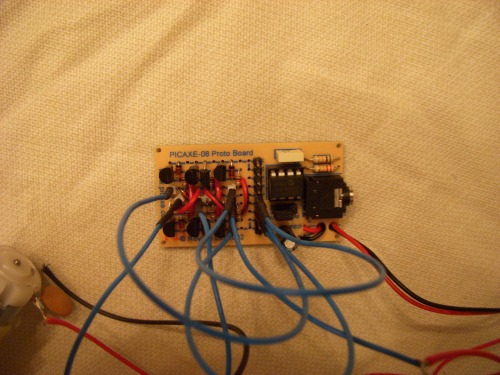
Here's BL's other side, with the Picaxe-08 Protoboard showing. The transistors on the board are part of the dual Y-Bridge motor driver that runs the yellow motors and the drum motors.
You can also make out in this picture a black audio cable plugged into the Picaxe programming port. The other end is a jack that gets installed in the hole at the top of BL's head.

Here's a good look at BL's bass drum thumper.
OK, here's Blind Lemon complete with obligatory dark blues shades.
Finally, at the top of his head, you can see the installed programming jack.
I updated his programming. Now he can play three beats. I am really tight on memory. I had to eliminate a couple of subroutines so I could fit the third beat. I have to experiment with adding back in speaker beeps and clicks to enhance the beats. I'll upload code on the robot page when I'm done tweaking.
Also check back on this page or the robot page for video... once the epoxy holding on the drumsticks dries.
Update 2010-02-09
I "cleaned up" the wiring so the cover fits better by the simple expedient of bending up some header pins so the wires are no longer in the way of the cover closing.
Next, I added an audio style jack to remote the programming port of the Picaxe to the cover. This will make it a lot easier to program, because I don't have to haul the cover off every time. There will be less stress on the chassis and wiring each time.
I think my next step is paint!
Update 2010-02-07
Hurah! Blind Lemon completed basic function testing. All the circuitry is done and now I can reveal what I've been intending for Blind Lemon all along. He is now a drum bot!

Using only a tiny Picaxe-08M, I now have a bot with basic navigation, collision detection, sound and two drum sticks. Of course he is alot more simple than the YDM, but the point was to see how much I could do with very little. Consider him a mix between Little 8 and the YDM. I want to thank Frits for creating such inspiring robots!
The two keys to squeezing more from less in Blind Lemon are 1) the dual Y-Bridge motor controller already discussed, and 2) a 4PDT relay controlled by one of the Picaxe-08M output pins. By sacrafing one pin, I got to double the use of the other four!
At the moment, I am only using the relay to switch three functions, but all the wiring is in place to switch four if I need it later.
Pin0 provides the control signal for the relay.
With the relay in its normally connected (powered off) state:
- Pin1 makes the right motor (M1) go forward
- Pin 2 makes both M1 and M2 go in reverse
- Pin 3 is the bumper switch input
- Pin 4 makes the left motor (M2) go forward
With the relay powered (Pin0 high):
- Pin1 makes the motor for the bass drum beat
- Pin 2 is the output for the speaker
- Pin 3 is the bumper switch input (unchanged)
- Pin 4 makes the motor for the high hat drum beat
There's still some work to do on the chassis:
- The drum sticks are only temporarily attached with hot glue
- All the wiring needs to be cleaned up; at the moment, I can barely fit the cover on.
- I want to add a jack so I can program him without opening the cover
- He needs a paint job
I also need to do more programming:
- Right now he only plays one song
- I want to make it so if he doesn't run into anything for a while, he stops and plays a song
- I think I may need to increase the pause when the relay switches: it is only 100ms and I think it may need to be longer. (You can see in the 2nd video that one time he hits a box but doesn't play his song.)
That's all for now, but I'm really happy with how Blind Lemon is coming along!
Update 2010-01-26
I have big plans for little Blind Lemon! I want to squeeze as much capability out of the Picaxe-08M as possible. So far I am using 4 out of 5 of the I/O pins. I have a hopefully clever plan to make much more efficient use out of the I/O.
Motor Control
The first step was implementing my dual Y-Bridge motor control circuit on the Picaxe-08 Protoboard. I came up with the Y-Bridge concept to allow me to control two DC motors in forward and reverse with only three control signals. A traditional dual H-Bridge requires four control signals. I had significant design assistance from TeleFox, for which I am very grateful.
The final schematic and logic for how this circuit works is availble at the the link above.
Here's a picture of the completed circuit.
Making the Wheels
The wheels for Blind Lemon are made from prescription pill bottle caps. The tires of layers of built up hot glue, which I smoothed out using the side of the glue gun nozzle.
They are not perfect, but they get the job done. They have decent traction and work well on hard flat surfaces and OK on carpet. The wheels are only a bit tacky, and are holding up OK so far.
As many of you may know, finding the exact center of a circle to make a hole can be a bit tricky. Here's the method I used for Blind Lemon.
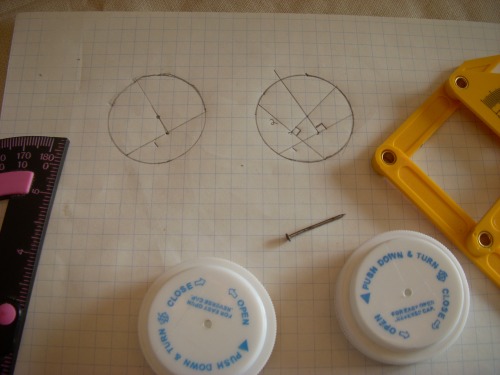
In the picture above, the circle on the left has a chord labeled "1" drawn through it. (A chord is just a line through any two points of a circle.) Then you use a protractor to draw a line perpendicular to the chord.
Add a second chord, labeled "2" in the right hand circle, and draw another line perpendicular to chord 2. Where those two lines meet is the center of the circle.
To mark the bottle caps, I used the point of a nail to scratch the marks in the surface. It's a little tricky to get correctly in practice. I managed to get very close to center, though not perfectly.
Mounting the Wheels
Next, I mounted the wheels to two DAGU 3V gear motors. I tapped the gear motor shafts using a 4-40 tap and then just screwed the wheels in place.
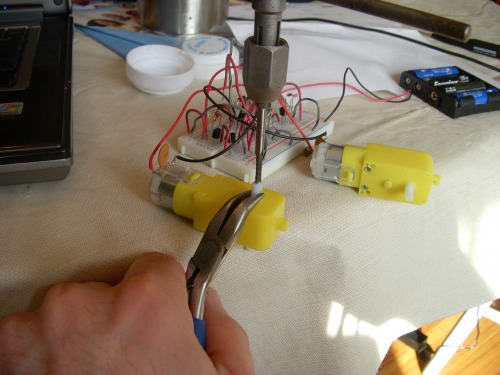
If you've never used a tap before, the key is to go slowly and for each full turn, back the tap out 1/4 turn. This allows the material you have cut to clear out of the tap. If you don't do this, it will get harder and harder to turn the tap, and you may damage the tap or the piece you are working on.
Building the Base
I made the base out of 1/8 inch fiberboard. I don't know if that's the right name for it. It's the same material they use for making peg boards so you can hang tools and stuff.
I picked the size based on the diameter of a cylinder that will be the cover for Blind Lemon. I cut out a square piece with the sides the same size as the diameter I wanted. I traced a circle on the board, and then used my table saw to carefully cut off the material around the corners until I had a near perfect circle. I had to check against my cylinder and trim off a bit at a time to get it close.
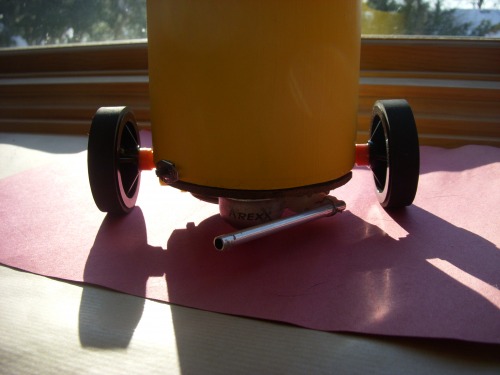
I carefully measured and then cut out square notches to fit the two motors. The fit was snug enough to hold the motors in place for a few tests. I hot glued two Arexx rollers bought from DAGU to the bottom, and set the motors so that they extended just a bit lower than the rollers. This provides stability but ensures the drive wheels are always in contact with the floor.
With the motor/wheel height determined, I cut little square blocks of wood and used them to hot glue the motors to the base so they wouldn't shift.
I hot glued a 4xAA battery holder in the center of the base, where the weight would be distributed.
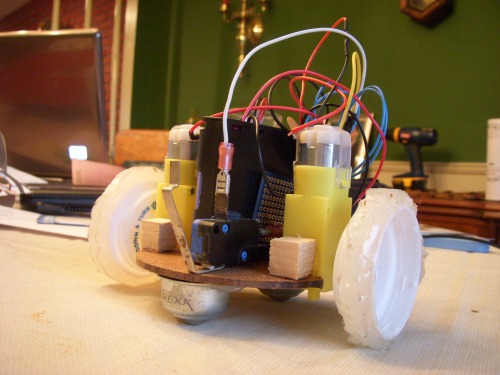
Bumper Switch
I had a nice little bumper switch lying around, so I hot glued it vertically to the battery box, extending beyond the base at the front of the robot.
Circuit Boards
In addition to the Picaxe-08 Protoboard, which is completely taken up by the Y-Bridge, I included an auxilliary circuit board. This board currently has the interface circuitry for the bumper switch, but I will add more later.
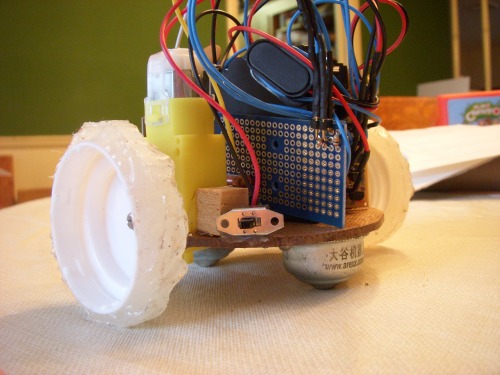
There's also a small power switch hot glued to the base. A similar switch on the front lets me select 'Program' or 'Output' for Pin0 on the Picaxe-08 protoboard. I got tired of having to move the jumper on the board itself.
Adding Sound
I hot glued a small speaker from a broken toy to the bottom, and ran the wires up through a hole I drilled in the base. Adding a non-polarized capacitor to the auxilliary board, I now have sound for my litle bot.
More to Come
I have more in mind for Blind Lemon, but I need to order some parts. Stay tuned.
https://www.youtube.com/watch?v=Q3FziKCAZ_4