


(I will be updating this page as I make progress on my printer)
Finally Moving!
Hello LMR,
Since this past fall, when I went to Maker Faire, met everyone at the Let's Make Robots table and posted my first robot, Brut Bot here on LMR, I took a (long) break from documenting my adventures here. Between all of the activities I participate in, along with high school that ends at 4:00, I have had issues finding time for lots of things that I used to do. Anyway, a few weeks after posting Brut Bot here, I received my Solidoodle 2 3D printer that I ordered in July. It was a few more solid weeks of printing before I could tear myself away from the machine for things other than eating or sleeping. By December, I ran into my first problem: my hot end clogged. After struggling at length to fix the problem, I decided that I would order a new hot end, and after a few weeks of waiting, I received the new part. It was not long before I had another clog. Fortunately, a 2 day soak in acetone solved my problems. After these failures, I needed to find a way to stay up and running even when the printer developed (yet another) problem, so I decided to build another 3D printer.

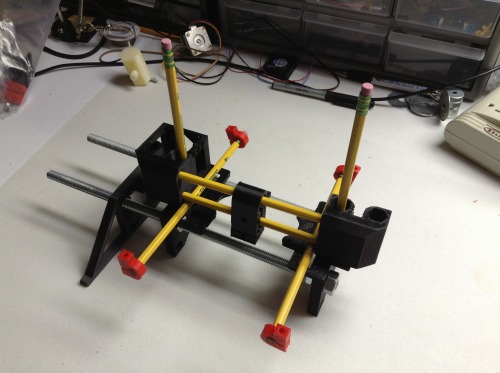
After some searching on Thingiverse, I decided on the Printrbot design, by Brook Drumm. Before I ordered Solidoodle, I was originally going to order a Printrbot, so it was an easy decision. I have always liked Brook's design and meeting him at Maker Faire, so I printed out a set of parts and started ordering vitamins for my project. Originally, I was going to follow the original Printrbot instructions, but I decided to take on the challenge of engineering a dual extruder, 12" x 12" x 12" print area. I got to ordering some of the basic parts, and while I was waiting for my linear rods and bearings to arrive, I mocked up the "pencilbot" to explain to my family how it would work.
The Plan: I will be building and documenting my build of a customized Printrbot 3D printer. In the end, it should have a build area of 12" x 12" x 12" (or somewhere around 12"). I plan to add dual extruders in a Bowden configuration, meaning that the "cold end" of the extruder is separated from the "hot end" but connected through a Bowden cable, usually made of PFTE (Teflon). This reduces weight on the axis and space taken up by the carriage. I printed parts for 2 "Airtripper's Bowden Extruder V3 w/ pushfit adaptor" (http://www.thingiverse.com/thing:44049), however I still need to find where to mount them on the basically frameless printer. I plan to replace the thinner 5/16" rods with more sturdy, thick 3/8" rods. Hopefully this will improve the stability of the wider printer and reduce any wobble that may have occurred with thin rods.
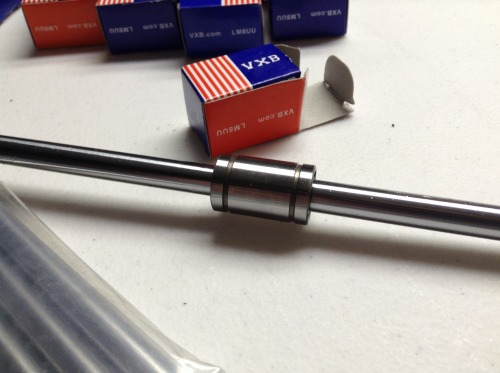
I bought 6 8mm x ~16" hardened steel rods, 12 lm8uu bearings, and 8 608zz bearings, all for about $120.
Next, I looked at electronics. My birthday was a few weekends ago on March 2, so I got a RAMPS 1.4 board with and Arduino Mega clone, and the next day I ordered 5 Panucatt SureStepr SD8825 stepper drivers, as well as 6 stepper motors and 2 hot ends. All together, the electronics and motors cost me about $330.

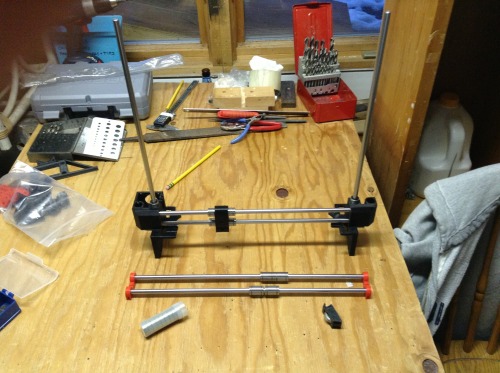
I received these parts on 3/14/13 - Happy Pi Day! I still needed metric hardware (cap screws, nuts, etc.) from Fastenal, but I started assembly and some calibration of the frame so it is nice and square and exact. You may have noticed that the table that I'm working on changed in the pictures. the original plywood that I was working on was not even close to flat or level, making it hard to make anything flat or level on top of it, so I found this perfectly sized piece of corian countertop that was (almost) perfectly flat and put it on top of a larger coffee table top of tempered glass. Now I can really start building :)

My dad got 4 3/8" x 24" threaded rods and 32 nuts for the base, and 2 5/16" threaded rods for the z axis.
I also picked up an assortment of #6-32 nuts and bolts from Home Depot and started screwing and bolting everything together.
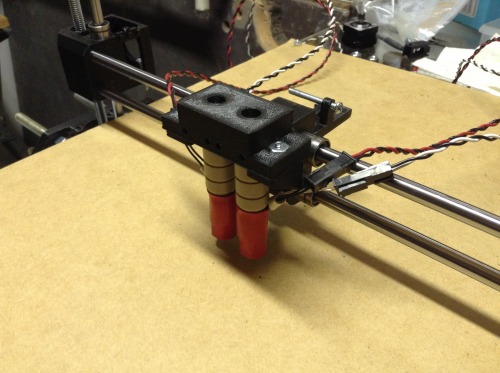
The dual ubis hot end setup (http://www.thingiverse.com/thing:26963)
I might end up designing a new one, but this mount should be fine for now.
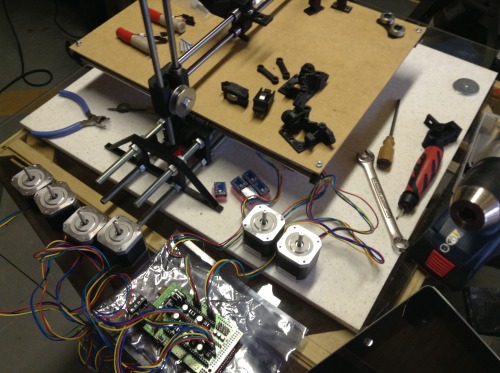
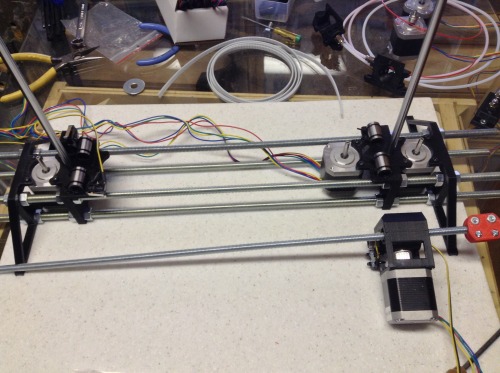
(3/15/13) today I got “the rest” of my printrbot parts (there will probably be more in the near future) and finished the mechanical assembly in a few hours.
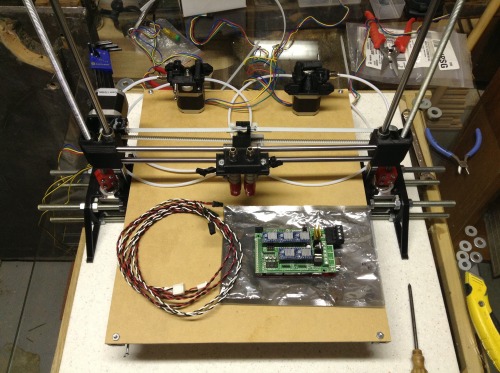
above: Printrbot (mostly assembled) 2 airtripper extruders with Bowden cables, RAMPS 1.4 with installed drivers, 2 hot ends & sets of hot end cables
Now, I have lots of work ahead modifying code, wiring the printer, testing, testing, and testing!
3/17/13 Before finishing up my homework this weekend, I attempted to work on the firmware for the printer. I have marlin running on my solidoodle, but I couldn't find anything about dual extruder support for it. From what I can gather online, there isn't much demand for that functionality yet, but I did some "firmware shopping" and decided on Repetier. I already use Repetier Host to run my printer, and I read that the pair have some nice features when paired up. I modified "Configuration.h" set up my printer which was over relatively quickly and painlessly (I just need to do a little more research on the printrbot hot end thermistors). Although steps per mm, etc. need calibrating, hopefully it will work well enough to get some videos of it jogging!
3/18/13 Today my printer had its first movements! (even though they weren't exactly the right ones). I got home and came downstairs to my lair where I got to work. I wired up the printer without releasing any magic smoke (so proud) and uploaded the first revision of the configured firmware. I really wasn't sure what was going to happen with my first attempt at working with firmware, but after borrowing my solidoodle power supply and hooking it up to the Arduino/ RAMPS board, it easily connected to Repetier Host. When I tried to make it move, however, a 100mm travel command made it move a few millimeters at best extremely slow. Not only that, but the x and y axes would not move independently. (see first video)
As you can see (maybe) from the video, it doesn't move as it should. Each individual movement was me hitting the"100mm" button in Repetier Host
3/19/13 Today in study hall, one of my friends who happens to be a programming genius (these are the perks of going to an engineering/ STEM school) looked at the firmware and helped me make some changes to the configuration, and when I got home, the printer moved normal distances at normal speed! I still had the problem of the x and y axes moving together, though. It took me some time to figure it out, but it turns out I made a dumb mistake and didn't notice "Drive_System 0", which is exactly what I needed to solve my problem. Again, I need to update steps/mm and the max travel for each axis, and then I can start working on my hot ends and the overall extruder control, so hopefully I can be printing soon.
P.S. Sorry for the messy work table, it's just a folding table in the basement. It's a temporary fix while my dad and I work on my "real" workshop in the other room with lots of counter space for my equipment (and junk).
That's all for now! more updates to come. :)
https://www.youtube.com/watch?v=eKfMUBFctfQ