

Who's Barking? BBB Meets h-nanoGSM. [BeagleBone Black GSM How To]

- BeagleBone Black
- h-nanoGSM - GSM shield [nano] or
- any other ITBP modular modem,
- 1pcs. one cell LiPo battery [3.7V, > 250mA], or
- 1pcs super-capacitor bigger than 1F rated for more than 5V and having ERS lower than 250mOhm[we've tested SCMT22C505MRBA0 from AVX and PM-5R0H105-1 from POWERSTOR/EATON
- BeagleBone Black previous experience is quite welcome,
- some entry level Python and Linux knowledge are required,
- soldering
 Some hardware hints
The BBB board it's really a quite powerful engine embedded in a small format. Having 5 UART ports gave us lot of alternatives for interfacing.
Some hardware hints
The BBB board it's really a quite powerful engine embedded in a small format. Having 5 UART ports gave us lot of alternatives for interfacing.
 Keep in mind that almost all BBB logic pin have several functions accessible trough the PinMUX [mode0 ==> mode7]. Take a look in following pdfs [very important resources]:
BBB P9 pins table [pdf] and BBB P8 pins table [pdf]
In our example, we will use the BBB UART1 for data interfacing with the modem and P9_14[EHRPWM1A], P9_16[EHRPWM1B] and P9_18[I2C1_SDA] as modem control interface [CONTROL].
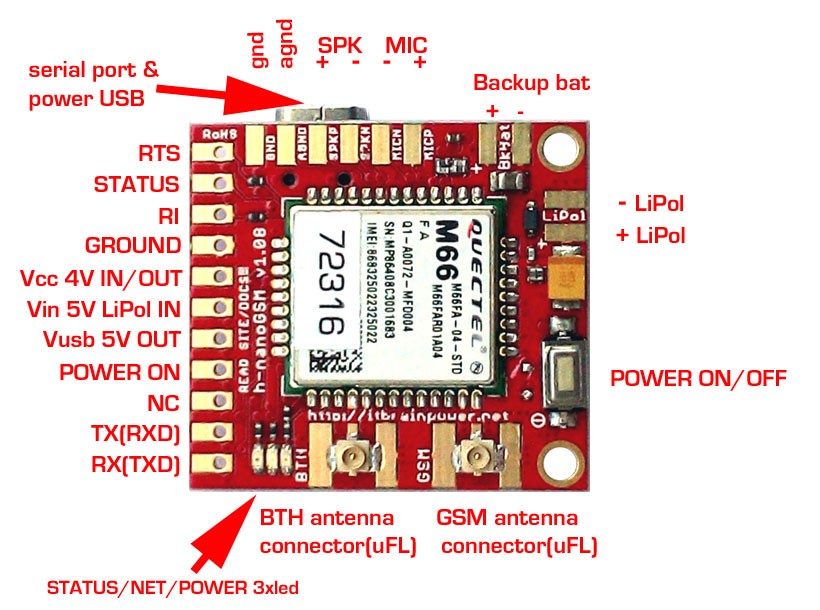
Prepare your h-nanoGSM shield. Solder the pinheader; see how here. Connect the LiPo battery [take care at polarity!] or the super-capacitor, the antenna to the GSM uFL connector. Insert the SIM card [remove PIN code checking before].
Keep in mind that almost all BBB logic pin have several functions accessible trough the PinMUX [mode0 ==> mode7]. Take a look in following pdfs [very important resources]:
BBB P9 pins table [pdf] and BBB P8 pins table [pdf]
In our example, we will use the BBB UART1 for data interfacing with the modem and P9_14[EHRPWM1A], P9_16[EHRPWM1B] and P9_18[I2C1_SDA] as modem control interface [CONTROL].
Prepare your h-nanoGSM shield. Solder the pinheader; see how here. Connect the LiPo battery [take care at polarity!] or the super-capacitor, the antenna to the GSM uFL connector. Insert the SIM card [remove PIN code checking before].
Hardware connections
In the picture bellow you can observe all the needed connections.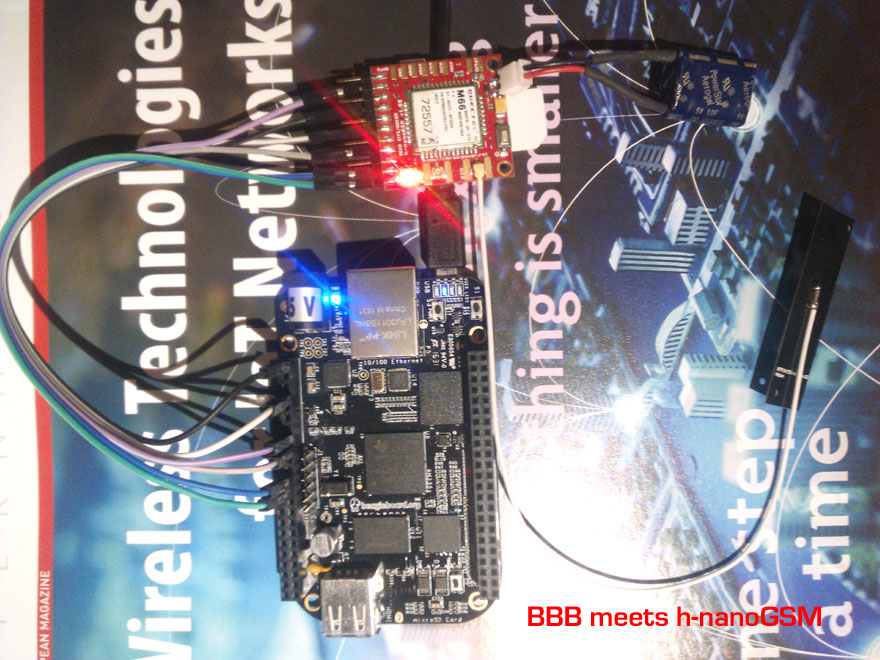 3G GSM Beaglebone Black howto
 Above, the h-nanoGSM shield is powered in the "WITH Lithium Polymer" configuration [powered from 5V], but using one 1F super-capacitor instead the LiPo battery [LiPo battery can be used as well].
IMPORTANT:
In our tests, the BBB was powered from the USB. In this case the h-nanoGSM powering was made connecting the BBB SYS_5V with the modem Vin[5V] pin!
Anyway, the BBB recommended powering powering option is via the 5V barrel connector. In this case, we recommend to you to power the modem from the BBB VDD_5V [wire the BBB VDD_5V with the modem Vin[5V] pin].
For other h-nanoGSM shield [or other ITBP modular modems] powering options, read c-uGSM, h-nanoGSM and d-u3G how to start.
Let's do the magic [Software]
SOFTWARE ASSUMPTIONS
The real target it is to prepare the BeagleBone Black to be compatible with our RPI support files for h-nanoGSM[code examples] and with the PPP examples, making as little changes as possible.
BBB Debian distribution is used in this how to. We assume you will start from a out of the box BBB [if you used your BBB before, some steps may be skipped].
BBB SETUP TASKS
Connect the BBB to the USB. Download the BBB USB driver from http://beagleboard.org/getting-started. Follow the instructions found on that page and install the USB driver. Connect to the BBB using SSH service [initial username is root, no password].
DEBIAN SETUP [MAINLY BBB PORTS CONFIGURATION, BUT GATHERING SOME PACKAGES TOO]
a. Connect the BBB ethernet port to your LAN. Check the connectivity to the internet. Enter following commands to the shell:
apt-get update
apt-get install python-serial
and, optional:
apt-get install mc
b. Using your preferred editor [I like mcedit, this is the reason I've installed the mc package, but you may use vi, vim...] edit the /etc/rc.local file:
mcedit /etc/rc.local
and insert following lines at the bottom, but before exit 0:
/etc/rc.config-itbp-modem > /dev/null 2>&1
Save.
c. Copy the following script as /etc/rc.config-itbp-modem [right click & save as]
Make it executable:
chmod 777 /etc/rc.config-itbp-modem
We are almost there...this was the Linux part. Just reboot your BBB [shutdown now -r or reboot will do this job].
PYTHON ITBP MODEM AND PPP SUPPORT FILES
a. Keep in mind that Python ITBP modem and PPP support files was written to compatible with the RPI and Debian distribution. There are three major differences when porting the code to the BBB [Debian]:
a1. The serial port names, /dev/ttyAMA0 for the RPI and /dev/ttyO1 for the BBB [we assumed that UART1 will be used]. We will address this later.
a2. The RPI.GPIO python class it is not present and compatible with BBB python. We will address this later.
a3. The BBB port addressing it is different from the RPI port addressing under python.
For all a1, a2 and a3 will apply some simple patches, later.
b. Download the h-nanoGSM python and PPP support files from the download page. You will need to register using your name, email address and with the IMEI of your h-nanoGSM [the IMEI can be found on the top of the M66FA chip, or you may find using AT+CIMI command].
c. Decompress the archives. This archives contains, along with other files, the following files: "hnanoGSM1_08_hw_control.py", "hnanoGSM_Serial_Lib.py" and "globalParVar.py", related to python modem control and serial communication.
d. Copy following file: ITBP_gpioBBB.py [or, right click & save as] in the very same folder where the "mdmname_ver_hw_control.py" [in this case "hnanoGSM1_08_hw_control.py"] it is located.
e. Fixing a1, a2 and a3 differences:
Above, the h-nanoGSM shield is powered in the "WITH Lithium Polymer" configuration [powered from 5V], but using one 1F super-capacitor instead the LiPo battery [LiPo battery can be used as well].
IMPORTANT:
In our tests, the BBB was powered from the USB. In this case the h-nanoGSM powering was made connecting the BBB SYS_5V with the modem Vin[5V] pin!
Anyway, the BBB recommended powering powering option is via the 5V barrel connector. In this case, we recommend to you to power the modem from the BBB VDD_5V [wire the BBB VDD_5V with the modem Vin[5V] pin].
For other h-nanoGSM shield [or other ITBP modular modems] powering options, read c-uGSM, h-nanoGSM and d-u3G how to start.
Let's do the magic [Software]
SOFTWARE ASSUMPTIONS
The real target it is to prepare the BeagleBone Black to be compatible with our RPI support files for h-nanoGSM[code examples] and with the PPP examples, making as little changes as possible.
BBB Debian distribution is used in this how to. We assume you will start from a out of the box BBB [if you used your BBB before, some steps may be skipped].
BBB SETUP TASKS
Connect the BBB to the USB. Download the BBB USB driver from http://beagleboard.org/getting-started. Follow the instructions found on that page and install the USB driver. Connect to the BBB using SSH service [initial username is root, no password].
DEBIAN SETUP [MAINLY BBB PORTS CONFIGURATION, BUT GATHERING SOME PACKAGES TOO]
a. Connect the BBB ethernet port to your LAN. Check the connectivity to the internet. Enter following commands to the shell:
apt-get update
apt-get install python-serial
and, optional:
apt-get install mc
b. Using your preferred editor [I like mcedit, this is the reason I've installed the mc package, but you may use vi, vim...] edit the /etc/rc.local file:
mcedit /etc/rc.local
and insert following lines at the bottom, but before exit 0:
/etc/rc.config-itbp-modem > /dev/null 2>&1
Save.
c. Copy the following script as /etc/rc.config-itbp-modem [right click & save as]
Make it executable:
chmod 777 /etc/rc.config-itbp-modem
We are almost there...this was the Linux part. Just reboot your BBB [shutdown now -r or reboot will do this job].
PYTHON ITBP MODEM AND PPP SUPPORT FILES
a. Keep in mind that Python ITBP modem and PPP support files was written to compatible with the RPI and Debian distribution. There are three major differences when porting the code to the BBB [Debian]:
a1. The serial port names, /dev/ttyAMA0 for the RPI and /dev/ttyO1 for the BBB [we assumed that UART1 will be used]. We will address this later.
a2. The RPI.GPIO python class it is not present and compatible with BBB python. We will address this later.
a3. The BBB port addressing it is different from the RPI port addressing under python.
For all a1, a2 and a3 will apply some simple patches, later.
b. Download the h-nanoGSM python and PPP support files from the download page. You will need to register using your name, email address and with the IMEI of your h-nanoGSM [the IMEI can be found on the top of the M66FA chip, or you may find using AT+CIMI command].
c. Decompress the archives. This archives contains, along with other files, the following files: "hnanoGSM1_08_hw_control.py", "hnanoGSM_Serial_Lib.py" and "globalParVar.py", related to python modem control and serial communication.
d. Copy following file: ITBP_gpioBBB.py [or, right click & save as] in the very same folder where the "mdmname_ver_hw_control.py" [in this case "hnanoGSM1_08_hw_control.py"] it is located.
e. Fixing a1, a2 and a3 differences:
e1. Edit the "hnanoGSM1_08_hw_control.py" file [mcedit hnanoGSM1_08_hw_control.py] and replace the line 17": import RPi.GPIO as GPIO with: import ITBP_gpioBBB as GPIO
e2. Edit the "hnanoGSM_Serial_Lib.py" file [mcedit hnanoGSM_Serial_Lib.py] and replace the line 40": agsm = serial.Serial("/dev/ttyAMA0", serialSpeed, timeout=1) with: agsm = serial.Serial("/dev/ttyO1", serialSpeed, timeout=1)
e3. Edit the "globalParVar.py" file [mcedit globalParVar.py] and set the "CONTROL interface for the ITBP modular modems" as bellow: RESET = "P9_14" POWER = "P9_16" STATUS = "P9_18"
TEST THE SETUP You may run any ITBP modem python example file [Eg. python sendSMS.py]. Ready. Enjoy! VARIANTS. REFERENCES. You may try the setup using other UART ports as /dev/ttyO2 or /dev/ttyO4, or using other BBB I/O pins for modem CONTROL. First of all, check the pins are free [config-pin utility can gave you valuable information], but guide after following references: - https://github.com/cdsteinkuehler/beaglebone-universal-io - http://www.armhf.com/using-beaglebone-black-gpios/ - http://derekmolloy.ie/gpios-on-the-beaglebone-black-using-device-tree-overlays/ - CAPE, what's about: http://elinux.org/Capemgr - BBB pins definition: https://github.com/jadonk/bonescript/blob/master/src/bone.js - and last, but not least http://www.ti.com/product/am3359 Keep calm, understand what's under the BBB blanket and write your own cape [best approach]....and share with us. TUTORIAL & SOFTWARE ARE PROVIDED WITHOUT ANY WARRANTY!!! USE IT AT YOUR OWN RISK!!!! Originally published by Dragos Iosub on itbrainpower.netThanks for helping to keep our community civil!
This post is an advertisement, or vandalism. It is not useful or relevant to the current topic.
You flagged this as spam. Undo flag.Flag Post
Your post is currently under review by our moderation team. The review process usually takes up to 48 business hours.
You can track your post's status in the "My Content" section of your profile. Once approved, it will be published and visible to others.

Thank you for contributing to our community!