Arduino Temperature SMS Alarm - 3G GSM Thermal Supervisor System

About This Tutorial
Build yourself your own Arduino temperature SMS alarm - thermal monitoring system having MAXIMUM and MINIMUM temperature thresholds, keep alive messages and (oldies but goldies as) SMS paging and remote ARM/DISARM system. You can supervise one or more 1WIRE temperature sensor(s) and page via SMS the "heating and chilling events" and keep alive messages, including last temperature. You can ENABLE/DISABLE the alarm system from remote via single SMS. This project uses for SMS integration, the pin to pin compatible GSM shield (c-uGSM) or 3G shield (d-u3G).Needed Parts
- Arduino UNO (North America / Europe)
- c-uGSM - dual SIM GSM shield [micro] or d-u3G - 3G/UMTS shield [micro] (North America / Europe)
- 1WIRE temperature sensor(s) - I use DS18B20 on TO220 packaging (here and here), but other encapsulation and break-boards are available
- 2.2 kΩ resistor
- Some connecting wires
- Power source(s)
Credits
Inside this project we used for 1WIRE temperature the "Dallas Temperature Control Library" developed by Miles Burton & Tim Newsome >> Arduino Library for Dallas Temperature ICs reference here. Thank you guys! Well done!About c-uGSM (GSM only) and d-u3G (3G/UMTS) Shields
Those are pin 2 pin compatible shields, the first one, c-uGSM shield, is quad-band GSM only (worldwide compatible) and has support for 2 SIMs and the second one, d-u3G shield, is SINGLE SIM 3G only (North American version) or 3G+GSM (European and rest of the world version). Those shields are compact at 1.25"x1.57"(31.75x39.88mm) / 1.35"x1.57"(34.29x39.88mm), weigh less than 10 g, have USB support (communication and powering), auto level 3.3 - 5 V digital interfaces and LiPo charger integrated.About DS18B20 temperature sensor
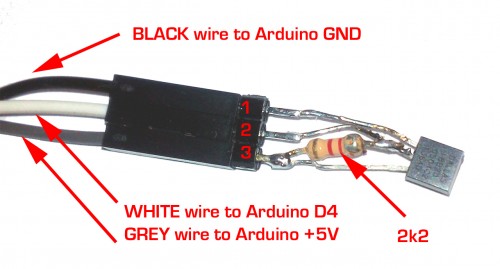
Solder the 2.2 kΩ resistor between DS18B20 Vdd pin(3) and DS18B20 DQ pin(2). DS18B20 Vdd pin(3) must be wired to Arduino 5V, DS18B20 DQ pin(2) to Arduino D4 and DS18B20 GND pin(1) to Arduino GND. See details below. DS18B20 reference here.Hardware wiring
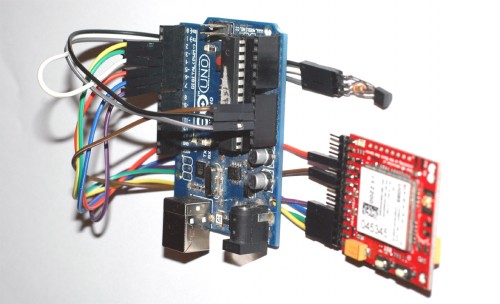
In the picture below (d-u3G - 3G shield wiring example) you can observe all the logical connections (wiring). For c-uGSM shield (GSM only version) usage: just connect the wires to the very same pins to the GSM shield. Brief 3G / GSM shield wiring (power):- "Without Lithium Polymer configuration" configuration >> connect +4V power supply (g-SPS 4V [DDRV] recommended) to the 3G/GSM shield "Vcc 4V" pin.
- "With Lithium Polymer" configuration >> connect +5V power supply (g-SPS 5V [LiPOL] recommended) to the 3G/GSM shield "Vin 5V" pin. Connect the Lithium Polymer battery to the Lithium Polymer pads/connector.
Temperature Supervisor Arduino Software
a. We use version Dallas Temperature library 3.7.2 beta. Download from here: Miles Burton Dallas Temperature library v 3.72 beta. b. Install this library >> how to install here. c. Make a folder named "SMS_THERMAL_alarm_supervisor". d. Then download the "c-uGSM kickstart for Arduino" from c-uGSM CODE SAMPLES and UTILITIES, or "d-u3G kickstart for Arduino" from d-u3G CODE SAMPLES and UTILITIES if you use the d-u3G shield. Product IMEI(*) and your email address are required in order to perform the download.*IMEI can be found on the top of the GSM/3G module present on your itbrainpower.net GSM/3G shield, or you may find performing "AT+CIMI" command. c. Decompress the archive and copy "cuGSM_basic_lbr.h", "cuGSM_basic_lbr.ino", "cuGSM_SMS_lbr.h" or "cuGSM_SMS_lbr.ino" ("du3_basic_lbr.h", "du3G_basic_lbr.ino", "du3G_SMS_lbr.h" or "du3G_SMS_lbr.ino" - 4 d-u3G users) files to the folder previously created. d. Copy the code from the link below and make a file called "SMS_THERMAL_alarm_supervisor.ino" in the very same folder as above. Alternately, you can download from here (right click & save as): SMS_THERMAL_alarm_supervisor.ino : ARDUINO THERMAL SMS ALARM & GSM/3G SHIELD - main code e. Edit the "SMS_THERMAL_alarm_supervisor.ino" (double-click on the file; this one will be open by the ARDUINO environment). Write in your desired destination mobile number on line 19. (Before this you may check the supported SMS number format by your NMO, using our kickstart software.) Input the desired values for the temperature thresholds, sampling and keep-alive time. You may edit the SMS commands and the SMS messages assigned to the alarm events. If you use the c-uGSM shield, comment line 17.Application Behavior - How to use it
#0 DISARM the ALARM, #1 ARM the ALARM. Any other received SMS, makes the ALARM reply with a sort of "help message". KEEP ALIVE SMS >> the thermal supervisor sends an SMS (with STATUS and last temperature) at each "keepAlivePeriod" (seconds), if the temperature it is placed inside the "lowTempLevel" and "highTempLevel" threshold interval, or at each "keepAlivePeriod/10" (seconds), if the temperature is outside the interval (ALARM STATUS). Arduino LED (D13) copy the ARM/DISARM status....some (crazy!?) usage suggestions
- newborn baby temperature monitoring.... JUST KIDDING GUYS! NEVER DO THIS!
- home-brewed beer fermentation barrel ;)
- cellar temperature monitoring
- aquariums monitoring
- freezers
- heaters
Possible Improvements
- Restrict SMS processing only from "phoneNumber" (master number)... Just look in the function readSMS (SMS library), after second readline(), the buffd variable contains the SMS header (sender number, date+time).. Just process there in order to extract the SMS sender number...
- Add additional temperature threshold levels, in order control and compensate the temperature drift using one or more PELTIER CELLS via a Arduino digital output plus a TIP122 in open collector configuration or a relay??
Thanks for helping to keep our community civil!
Notify staff privately
You flagged this as spam. Undo flag.Flag Post
It's Spam
This post is an advertisement, or vandalism. It is not useful or relevant to the current topic.
This post is an advertisement, or vandalism. It is not useful or relevant to the current topic.
You flagged this as spam. Undo flag.Flag Post


