

Lynxmotion Quadrino Nano – Sensor Calibration


 The Lynxmotion Quadrino Nano uses the MultiWii project and it therefore needs an initial setup in order to work properly. Some of the on-board sensors will require calibration to perform correctly and in this tutorial we will cover the basic operations for this calibration.
MultiWii - Accelerometer Calibration |
Why calibrate the accelerometer (ACC) sensor
Before attempting to fly your multirotor copter for the first time you should ensure you have a calibrated ACC sensor. We calibrated the ACC sensor during testing using MultiWii Config, but the calibration may have changed if you've flashed a new firmware. In any case, it's just good practice to verify your Quadrino's accelerometer is properly calibrated. First, place the board or quad flat on a table, plug the Quadrino into the USB connection of your computer. Now startup the MultiWii Config application, select the COM port on the left hand side, and click the START button. Now look to the left of the graph output, the ACC sensor readings should read near zero for PITCH and ROLL, and close to either 256 or 512 for the Z axis. Close is anything within about 10 points. If you are not within this range then re-calibrating the sensor is necessary.How is the ACC sensor is used
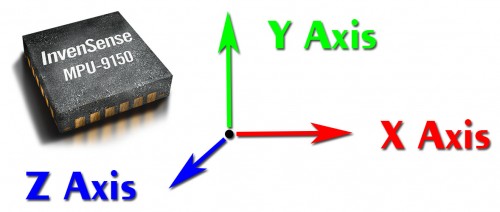
It is used to detect the orientation of the copter with reference to the ground by sensing the direction of gravity. It is the same process we use to stay upright when we close our eyes. In our case there are organics in our inner ear that act as accelerometers. On the Quadrino, there is an electronic chip that contains a micro-mechanical (super super small) machine that can measure the direction of gravity in all axis. Detecting the orientation of the copter is very important for keeping the copter steady. Although it is specifically required for the auto-level flight feature, it is also used in normal gyro (acro) flight mode as well, though it is not required. A multirotor copter can function using only a gyro sensor, but with both sensors a fusion of the two sensors occurs that results in a more accurate and precise measurement of the copter's orientation.The ACC sensor is also required in the altitude hold feature. In this case, it is used to estimate the velocity of the copter in the vertical direction. It is used to estimate the velocity by performing integration (calculus) on the ACC sensor readings in the Z axis. This process is prone to noise and numerical error and this makes altitude hold the toughest feature to implement on a multi-rotor aircraft!Performing the calibration
Calibration of the ACC sensor is a very simple process. To calibrate keep the board very still and level on a flat surface such as a table. Click the CALIB_ACC button above the graph section and wait a few seconds. You will notice the blue line in the graph section dip for a moment, then return to normal. The ACC sensor readings should now be close to the values mentioned above, so the ACC PITCH and ROLL near zero, and Z near 256 or 512. The Z value of 256 or 512 will depend on what sensor and firmware version you are using, both values are valid.
 WinGUI Serial Connection WinGUI Serial Connection |
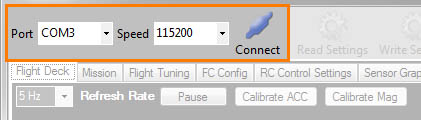
Open the WinGUI application and use the Top-Left options to connect your Quadrino Nano. Speed should be set at 115200 by default but if it's not, you can change it manually. The COM port to use can be different from our example and must match the Windows COM port of your Quadrino Nano. Note: You need to connect the Quadrino Nano before opening the WinGUI application otherwise there will be no COM port available. |
 WinGUI ACC Calibration WinGUI ACC Calibration |
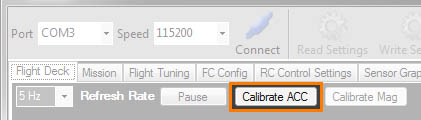
To initiate the calibration, click on the "Calibrate ACC" button in the "Flight Deck" tab of the WinGUI application. Make sure the Quadrino Nano is on a leveled surface first. |
 WinGUI ACC Calibration Confirmation WinGUI ACC Calibration Confirmation |
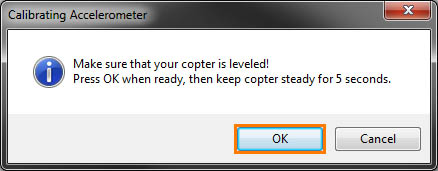
WinGUI will ask you to confirm the procedure and warn you about the Quadrino Nano / Copter which needs to be leveled. Click on the "Calibrate ACC" button to start the calibration. After 5 seconds the calibration should be complete. During this time, do not move the Quadrino Nano. |
MultiWii - Magnetometer Calibration |
Why calibrate the magnetometer (MAG)?
The magnetometer is a digital compass and is used in the MAG and HEADFREE flight features. A properly calibrated MAG will ensure these features work properly. The MAG cannot be calibrated at the factory because the earth magnetic lines vary depending on where you live and even changes from year to year. The digital compass on the Quadrino has 3 axis but fortunately all 3 axis are easily calibrated together. Why is the compass 3 axis? Well, when you were back in scouts you used a compass that was a single axis, it worked in only one orientation. You had to lay the compass flat on the ground, or level in the air in order to get a proper reading. If you held it straight up or sideways it wouldn't work! However, our 3 axis compass will and must work in any orientation. Thus, our digital compass is like having 3 regular compasses at 90 degrees to each other. No matter what the orientation is, one of these compasses will work properly. Perform your ACC calibration first! Before continuing through this tutorial ensure you have already calibrated your accelerometer (ACC). The ACC is already calibrated by us as part of the testing process so if held flat on a table the ACC reading for Z axis should be around either 256 or 512 (+/- 6 points) and the ROLL and PITCH should be near zero. Given that tables are not perfectly level being a little off is normal.|
WinGUI Serial Connection |
Open the WinGUI application and use the Top-Left options to connect your Quadrino Nano. Speed should be set at 115200 by default, but if it's not, you can change it manually. The COM port to use can be different from our example and must match the Windows COM port of your Quadrino Nano. Note: You need to connect the Quadrino Nano before opening the WinGUI application otherwise there will be no COM port available. |
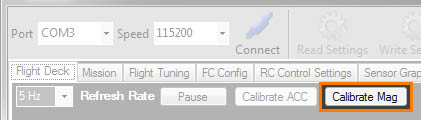 WinGUI MAG Calibration WinGUI MAG Calibration |
To initiate the calibration, click on the "Calibrate ACC" button in the "Flight Deck" tab of the WinGUI application. This time you do not have to care about the Quadrino Nano / Copter being level. |
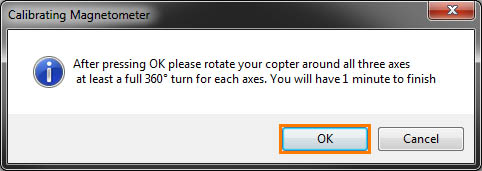 WinGUI MAG Calibration Confirmation WinGUI MAG Calibration Confirmation |
WinGUI will ask you to confirm the procedure and steps to take for the calibration. Now click on the "Calibrate ACC" button Note: The Status (Orange & Green) LED's are flashing while in calibration made. |
 MAG Calibration - Full 360deg on all Axis MAG Calibration - Full 360deg on all Axis |
Once you started the MAG calibration, you have to turn your Quadrino Nano / Copter a full 360deg on each axis. While your doing this, the controller will look and calibrate based on the information seen. Note: The Status (Orange & Green) LED's are flashing while the calibration made. |
Thanks for helping to keep our community civil!
Notify staff privately
You flagged this as spam. Undo flag.Flag Post
It's Spam
This post is an advertisement, or vandalism. It is not useful or relevant to the current topic.
This post is an advertisement, or vandalism. It is not useful or relevant to the current topic.
You flagged this as spam. Undo flag.Flag Post
✅ Your Post Has Been Submitted Successfully!
Your post is currently under review by our moderation team. The review process usually takes up to 48 business hours.
You can track your post's status in the "My Content" section of your profile. Once approved, it will be published and visible to others.

Thank you for contributing to our community!