

Arduino-Powered Desktop Pal – Lesson 3: Integrating the Servos, Ultrasonic, and Switch


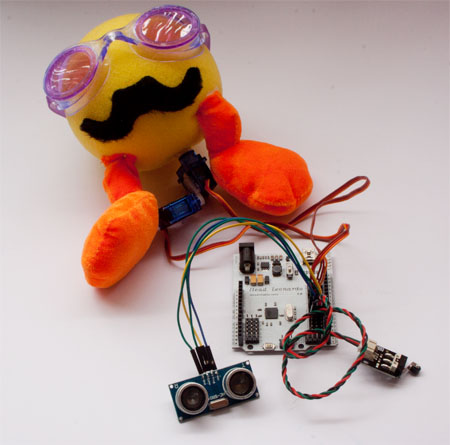 Wiring Deskbot Pal
Getting the File Downloads
All of the example sketches are contained in a single zip archive. Download this archive, and extract the individual folders in it to your Arduino sketchbook. Important! You must also download and install several Arduino libraries, required by the sketches in this installment. Follow these steps:- Exit the Arduino IDE, if it is open.
- Download the Deskbot Arduino libraries zip, and unpack its contents to your Arduino sketchbook libraries folder. Refer to Lesson 2, Program Setup and Testing, for details on finding the libraries folder, and copying files to it. When done, you should have (at a minimum) the following Arduino libraries inside the libraries folder:
Metro SimpleTimer Ultrasonic
- Restart the Arduino IDE.
To Sleep, Perchance to Dream…
Robotic buddies are only fun when they’re not constantly bugging you for attention. So, one of the first jobs to tackle is a “sleep mode,” a software-settable transition where the Pal’s motors and sensors are deactivated. We can use the switch on the side of the Desktop Pal enclosure to trigger this sleep mode on and off. There are numerous ways of tackling this. Recall that Arduino sketches use a loop() function that is repeated over and over again. A common way to handle this sort of job is to use polling: as the sketch traverses through the loop() function, it repeatedly checks the state of the switch. If the switch has been depressed, the sketch toggles a “sleep” variable that is then used in subsequent passes through the loop. As long as sleep == true, the remainder of the loop is skipped. It goes something like this:void loop() {
if (digitalRead(2) == 0) {
… // go into sleep mode
sleep = true;
…
}
// skip rest of loop if sleeping
}
Polling is a satisfactory approach for many applications, but it has several drawbacks. The major issue is typical in robotics applications, where the sketch may be temporarily halted using the Arduino delay statement. The longer it takes for the sketch to traverse the loop, the more likely the change in the switch state will be missed, because delay is holding things back. This leads to an unresponsive application.
A better – though admittedly somewhat more involved – approach is to use interrupts. An interrupt literally does what its name suggests: it interrupts the running of the main sketch, and performs a special task contained in a user-defined function; that is, a function you create.
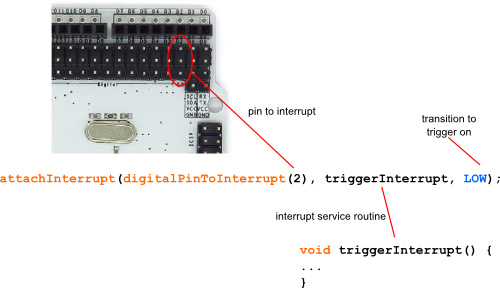
Interrupts are enabled on the Arduino using the attachInterrupt statement. For Desktop Pal, the following line of code adds (“attaches”) an interrupt to digital pin 2.
attachInterrupt(digitalPinToInterrupt(2), triggerInterrupt, LOW);When the Arduino detects a change on pin 2, it immediately halts normal sketch execution, and runs to a function we’ve created – in this case, the function is named triggerInterrupt (the name of the function is up to us).
 Arduino Interrupt Routine
void triggerInterrupt() {
// lines of code to perform at the interrupt go here
}
And it’s as simple as that. Or, close to it, anyway!
In reality, there are one or two issues we have to contend with when using interrupts, and mechanical switches in particular.
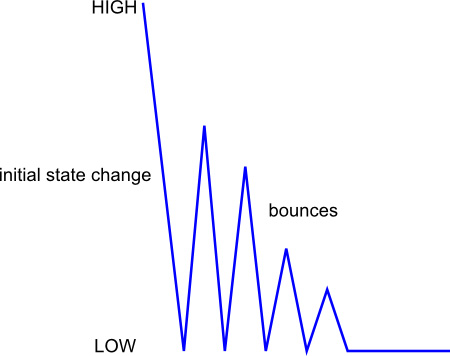
- Most switches are electrically “noisy,” meaning that when a switch is depressed, there may be dozens of HIGH-to-LOW transitions. This is called bounce. The Arduino reacts fast enough that it will register all, or nearly all, of these bounces. Ideally, we want the code in the triggerInterrupt function to happen only once per switch press.
- The usual quick-and-dirty method of using the delay statement to ignore subsequent bounces from a switch are not usable during an ISR (interrupt service routine) (in our case it’s the triggerInterrupt function). The delay statement has no effect inside the ISR.
 Electrical Noise
void triggerInterrupt() {
  if ((millis() - lastDebounceTime) > debounceDelay) {
    sleep = !sleep;
  }
  lastDebounceTime = millis();
}
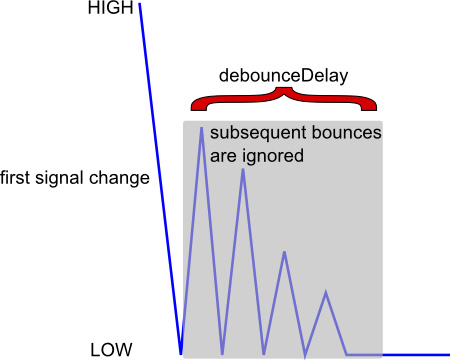
The lastDebounceTime and debounceDelay are global (accessible anywhere) variables set at the top of the sketch. The debounceDelay variable is a numeric value that specifies the amount of time to consider if subsequent transitions are bounces. The debounceDelay variable is set to 50, or 50 milliseconds -- that's usually long enough to avoid any bounce issues.
 Software Debounce
- Upload the sketch to your Arduino.
- Open the cover of your Desktop Pal so you can view the LED for pin 13 (near the upper-left corner of the Itead Leonardo board). Note that the LED is blinking.
- Press the side switch. This triggers the interrupt, which sets the sleep variable to true. Now, when the sketch traverses the loop(), it skips over the blinking.
- Press the side switch again. Once more this triggers the interrupt, and the sleep variable is reset back to false.
Tip Note the line of code in the triggerInterrupt function that sets/resets the sleep variable:
sleep = !sleep;
The ! operator inverts the current value of the variable. True becomes false, and vice versa.
Slowing Down the Movement of the Servos
Most radio control servos are engineered to be as fast as possible. That’s great for typical RC applications like steering a race car, but it can make the movement of cute little robots like Desktop Pal sudden and jerky. Alternatives include trying to find a slower servo (not easy), or investing in digital servos where their transit speed can be modified (expensive). Another approach is to use code like that found in the “servo sweep” example that comes with the Arduino IDE. That code is certainly workable, but not very self-contained, and it relies on a sequence of delay statements to move the servo in small increments. The problem with using delay is that it introduces a cumbersome modality to the sketch – that is, the Arduino is placed into a specific operating mode, handling one job at a time. It's locked into completing that task before it can continue with the next. During the delay, the Arduino is essentially running in side a closed loop, ignore everything (except for interrupts), waiting for the delay period to expire. To the rescue: use a timer library to set a recurring interval for when an action should take place. Because of their numerous uses, there are gaggles of timer libraries available for the Arduino. For the Desktop Pal I’ve settled on two of my favorites, which also happen to be oldies but goodies: SimpleTimer and Metro. They both perform timed operations, but do so in somewhat different ways. The PalScanAndPanOnly.ino example demonstrates using SimpleTimer to move the pan servo in small increments. Rather than move the servo in one big sudden step, SimpleTimer allows for incremental movement – one degree at a time – without the use of delay statements.Note PalScanAndPanOnly requires the SimpleTimer library, so be sure it is placed into your Arduino sketchbook libraries folder. USE OUR VERSION OF SIMPLETIMER! Apparently, the latest version of the library available from its author has some compile-time issues when used with the latest version of the Arduino IDE.
There are four main points related to SimpleTimer in the PalScanAndPanOnly sketch:- #include <SimpleTimer.h> – references the SimpleTimer library, which as noted above, should be in your Arduino sketchbook libraries
- SimpleTimer panTimer; – creates an object instance of the SimpleTimer class. I’ve given this object the name panTimer.
- setInterval(100, movePanServo); – prepares the panTimer object to repeat its interval every 100 milliseconds. When it does, it’s to perform the steps contained in the movePanServo user-defined function.
- panTimer.run(); – tells the panTimer object to update itself. If the time interval (100 milliseconds) has elapsed, the object will call the movePanServo function.
Metro servoMetro = Metro(3500);This creates a new object named servoMetro, with a time interval of 3500 milliseconds. Inside the loop is the line:
if (servoMetro.check() == 1)which checks if the Metro interval has expired. If it has, the value of the servoMetro.check() method is 1. This tells the sketch to reverse directions, and it starts the servo scanning over again.
Averaging Out Ultrasonic Sensor Readings
Ultrasonic sensors are a wonderful invention: they’re a quick, easy, and affordable way of detecting nearby objects, even measuring the distance between the sensor and the object. But many ultrasonic sensors exhibit some noise here and there that can affect their results. In applications where we want to check if an object is within a certain distance, it’s useful to take successive readings, and average out those readings in order to “throw out” potentially erroneous results. Such averaging is quite common when working with robot sensors. The general approach is to take a number of successive readings, adding them together each time through. The result is then divided by the number of readings that were made. The PalUltrasonicAverage.ino sketch demonstrates exactly this. It triggers the Desktop Pal’s ultrasonic sensor in a series of three pings, each separated by 38 milliseconds. This delay is the longest period possible; anything longer means the object is out of range.Note Some delay period between successive readings of an ultrasonic sensor is necessary to allow for the sound signal to reach the obstacle, and return to the receiver. If the delay is too short, the sensor may erroneously retrigger before a valid echo is received, leading to very inaccurate results.
The working part of the sketch is the lines:for (int i = 0; i < 3; i++){
delay (38);
sonicVal = ultrasonic.Ranging(CM);
total = total + sonicVal;
}
return (total / 3);
The for loop takes three readings, each separated by 38 milliseconds. The readings are added up in the total variable, and this result is divided by three to obtain an average.
Putting It All Together
The PalScanAndPanTimers.ino sketch combines all of the demonstration into one sketch.- The side switch is handled using an interrupt service routine
- The movement of the pan servo is slowed down using a timer
- An additional timer alternates the scanning direction left-and-right
- The ultrasonic sensor is read in groups of three, and the results are averaged out
Setup Values
A number of global variables provide setup values, to make it easier to modify the code. The variable names are self-explanatory, and you can experiment with other numbers to see what effect they have on your Desktop Pal.int tiltNeutral = 85; int tiltBack = 70; int panNeutral = 90; int panLeft = 70; int panRight = 110;
LED Switch Startup Blink
When the Desktop Pal is sitting on a desk, you can’t see its pin 13 LED, because the microcontroller is inside the enclosure. So you can’t use the old pin 13 blink-three-times trick as a way to show when the sketch has started up. Instead, you can use the LED on the side switch. The LED is normally activated when the switch is depressed, but it can also be illuminated programmatically. The sketch first sets digital pin 2, connected to the switch, as an output, and toggles the pin HIGH and LOW to produce a quick succession of blinks. The sketch then makes pin 2 an input, in preparation of using it to toggle the sleep mode.Loop Action
Inside the loop() is code to take a constant stream of ultrasonic measurements. If an object appears within the triggering distance – set to 20 centimeters in the sketch – Desktop Pal stops sweeping, and looks up. After four seconds, the sketch resumes its normal scanning. (In a future installment, this 4-second artificial delay will be replaced by other code.)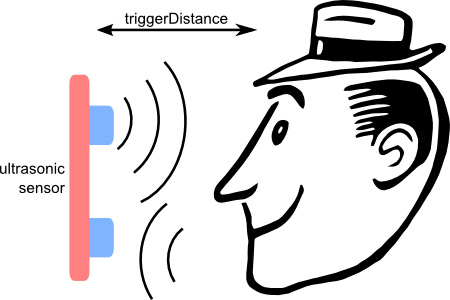 triggerDistance
Servo Detach During Sleep
At the beginning of the sketch, both pan and tilt servos are “attached” to their respective Arduino pins. When attached, the servos become energized. Try to move an energized servo and you’ll feel it resist your movement, as it applies a correcting voltage to keep itself in position. When the side switch is depressed, and sleep mode enabled, the sketch detaches both servos – effectively removing them electrically from the circuit. This saves a little bit of power. When coming out of sleep mode, the servos are reattached.Coming Up…
In the next installment, you’ll add a second ultrasonic sensor to give your Desktop Pal a kind of “stereo vision,” so it can detect the general location of objects in front of it. You’ll also learn how to add basic sound effects to the robot, and enhance its pan and tilt movements even more.Thanks for helping to keep our community civil!
This post is an advertisement, or vandalism. It is not useful or relevant to the current topic.
You flagged this as spam. Undo flag.Flag Post
Your post is currently under review by our moderation team. The review process usually takes up to 48 business hours.
You can track your post's status in the "My Content" section of your profile. Once approved, it will be published and visible to others.

Thank you for contributing to our community!