

Arduino-Powered Desktop Pal - Lesson 2: Program Setup and Testing


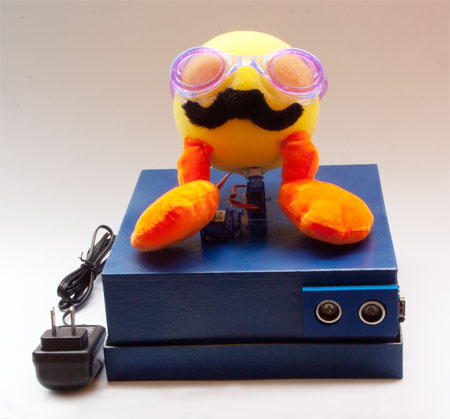 Finished Desktop Pal
Getting Started with Arduino
Important: Before proceeding with the remainder of this lesson, take the time now to triple-check the wiring and other connections of your Desktop Pal. Refer to Lesson 1, Make Your Own Arduino-Powered Deskbot Pal, and be sure all components are plugged into their correct pins on the Itead Leonardo board. This check will help assure successful results of the tests that follow. Desktop Pal is powered by an Itead Leonardo, one of the many quality Arduino-compatible microprocessor boards available. I chose the Itead Leonardo because it comes with three-pin header connectors, making it easy to simply plug in servo motors and sensors. This feature makes it a snap to hook up accessories. The Itead Leonardo board includes handy 3-pin header connectors
- Be sure you have full admin rights on your computer, so you can install software to your machine.
- Download the installer you wish to use (when downloading you have the option of making a donation to the Arduino development community, which is a worthy cause).
- Once downloaded, start the installer software, and follow the on-screen prompts. Note: If you previously installed an earlier version of the Arduino IDE, you may be prompted to uninstall the old version first.
- If prompted, be sure to install the USB device driver, so that your computer can communicate with the Itead Leonardo.
- With the installation of the IDE completed, connect the Itead Leonardo to your computer using a USB cable. The Leonardo requires a standard USB Type A to USB Mini cable.
- The USB device drivers should automatically install the first time you attach the Itead Leonardo to your computer. Driver installation can take several minutes, so be patient.
- Start the Arduino IDE.
- Select the Itead Leonardo board by choosing Tools>Board>Arduino Leonardo (it may already be selected for you).
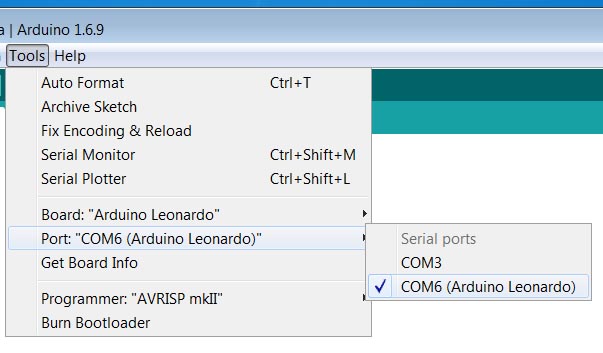 Select the Board and Port in the Arduino IDE for your Itead Leonardo board
- As needed (should the IDE not automatically identify it), select the USB communications port to use by choosing Tools>Port. Pick the port that corresponds to the Itead Leonardo you plugged in.
Testing Your New Board
Whenever you get a new Arduino or Arduino-compatible board, always test it first by uploading a simple sketch. This lets you know that everything is working properly.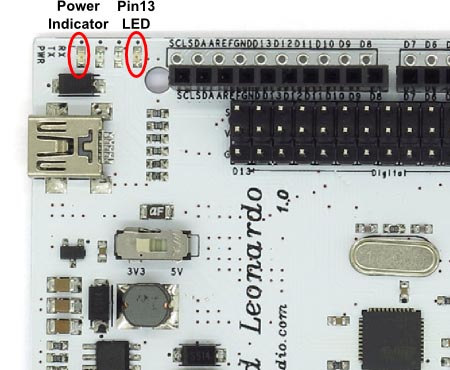 Location of the Power and Pin 13 LEDs on the Itead Leonardo board
- Before uploading a sketch, verify that your Itead Leonardo is displaying signs of life by plugging into the USB port on your computer, if it’s not already, and verifying that its power light is glowing. The green LED power light is located in the upper-left corner of the board,
- Several example sketches come with the Arduino IDE software. Open the ubiquitous Blink sketch by choosing File>Examples>Basics>Blink. The Blink sketch should load into the IDE.
- Odds are, the Blink sketch, or a variation of it, has already been uploaded to the board at the factory. You can tell by examining the green LED closest to the mounting hole near the upper-left corner of the board. If a Blink sketch is already uploaded into the board, the LED will flash on and off at one second intervals.
- To verify the success of a new upload, you can make a small change in the Blink sketch. Find the first statement that reads
delay(1000);and change it to
delay(250);
- Verify that the correct Arduino Leonardo board and COM port are still selected in the Tools menu, then click on the Upload button in the IDE toolbar.
- The IDE will compile and upload your revised sketch. During this phase, watch for the feedback messages displayed by the IDE. If all goes well, you should first see Compiling Sketch, followed by Uploading, and finally Done Uploading.
- When uploading is complete, check that the LED is still flashing, but faster. This demonstrates that the board works, and is able to accept new sketches uploaded to it.
Calibrating the Servos
Desktop Pal uses micro servos to move its head to either side, as well as forward and back. When you constructed your Desktop Pal in Lesson 1, you positioned the servos in their approximate mechanically centered positions. This position may or may not accurately coincide with what the servo considers to be its mid-point of travel. So, the first order of business is to make sure the servos are calibrated to their neutral center point. From there, you can adjust the mounting of the servos, and the head of your Desktop Pal, so your buddy points straight ahead when it’s supposed to.- Locate your Arduino sketchbook. This is the common place where your Arduino sketches are stored. You can find where it is on your computer by choosing File>Preferences. See Sketchbook Location at the top of the dialog box.
- Download the sketch in PalServoCalibrate.zip to your Arduino sketchbook. Unpack the zip file. It contains a folder named PalServoCalibrate, and a file inside the folder, named PalServoCalibrate.ino.
- Open the sketch by choosing File>Open, and navigate to the PalServoCalibrate folder. Select the PalServoCalibrate.ino sketch, and open it.
- Verify that your Itead Leonardo is still selected in the Board and Port menus under Tools, and click the Upload button in the Arduino IDE toolbar.
- After uploading is complete, both servos should immediately move to their center, or neutral, position. While in this position – and with the Itead Leonardo still plugged into your computer and receiving power – remove the head of your Desktop Pal in order to access the screws on the servo horns.
 Align the horns when both servos have been commanded to their center (neutral) position
- Take out the servo horn screws, and reposition the horns so that they are aligned:
- The horn for the tilt motor should point up
- The horn for the pan motor should point forward
- Replace the screws and tighten.
- Put the head back on the long bolt, and position it so that it points straight ahead.
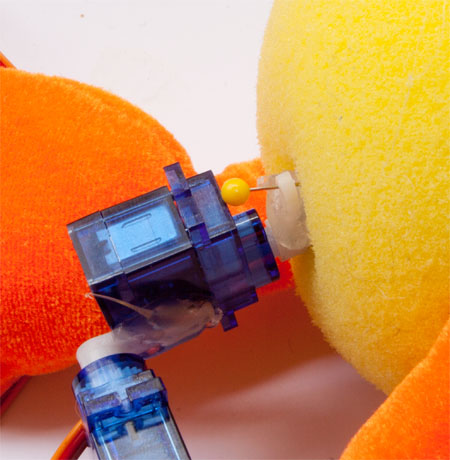 Hat pin to anchor the servo horn to the head of the Desktop Pal
“Exercising” the Servos
For every new robot I develop I create a series of repetitive test moves, to both demonstrate proper operation, and to shake out any lingering problems. This robot tai chi merely consists of the servo motors repeating the same sequence over and over. Not only does this check that the servos are working, but if there are mechanical defects – a weak glue joint, for example – the motor exercise will likely uncover it. Best now to fix the problem while the glue gun is still hot! Download the ZIP file containing all sketches used in this article: DesktopPal-Lesson-2-Sketches (each sample code is also contained within a ZIP file).- Download PalSimpleServoTest.zip to your Arduino sketchbook, and unpack it.
- Open the PalSimpleServoTest sketch in the Arduino IDE. It should look like the screen in the figure.
 The PalSimpleServoTest sketch, loaded into the Arduino IDE
- Click the Upload button in the toolbar to compile and send the sketch to the Itead Leonardo.
- Upon successful uploading, both pan and tilt motors will begin their exercise movements.
Understanding the Servo Test Sketch
Servo motors are a primary method of giving small robots mobility and movement. The Arduino IDE makes it easy to work with servos. The PalSimpleServoTest sketch begins with:#include <Servo.h> Servo servoPan; Servo servoTilt;The first order of business in any sketch involving servos is to first include a reference to the Servo.h library, which is provided as a standard part of the Arduino IDE. This library provides extensive code that manages the operation of servos for you. As with other libraries for the Arduino, Servo.h makes short work of having to deal with more complex operations. Following the #include statement, two objects are created to manage the servos used in the Desktop Pal. Objects are programming entities that are used to encapsulate a range of functionality – in this case, the behavior and operation of servo motors. The objects are defined by using the Servo object class, which comes from the coding in the Servo.h library. More about object classes in a future lesson. The terms servoPan and servoTilt (note the unique capitalization; more on in the next lesson) were created by me as a way to easily differentiate between the two servo motors. The sketch sets up the two servo objects to connect with the actual servos attached to the Itead Leonardo. This setup process is handled in a function. A function is merely a collection of code that is treated as a unit. All Arduino sketches have at least two functions, named setup() and loop().
- The setup() function performs any code necessary to prepare the Arduino and/or the hardware attached to it for the rest of the sketch.
- The loop() function is repeated over and over again, until the Arduino is either reset, or power is removed. It is in this function where the main working part of the sketch is maintained.
void setup() {
  servoPan.attach(8);
  servoTilt.attach(9);
}
There’s little to do in the setup() function for the servo test sketch. Here, the two statements “attach” the physical servos connected to the Itead Leonardo board to the servo objects created previously.
servoPan.attach(8);means to correlate the servo connected to digital pin 8 of the Itead Leonardo to the pan servo. A similar line of code does the same for the tilt servo, which is connected to digital pin 9 of the board. As noted above, the loop() function is the main working part of the sketch. Here’s the first few lines of the loop() function in the servo test sketch:
void loop() {
  servoPan.write(50);
  delay(1000);
  …
- The line write(50) tells the Arduino to position the pan servo at the “50” position. Servo positions can be indicated a number of ways using the Arduino IDE; in this case, 50 is in degrees, with 90 being the mid-point of the servo travel; 0 and 180 are the extremes in both directions.
- The line delay(1000) tells the Arduino to wait 1000 milliseconds, or 1 second, before continuing. As the Arduino can compute much faster than a servo will operate, the code allows the Arduino to hold tight, until the servo has had a chance to transit to its new position.
Verifying Operation of the Ultrasonic Sensor
The Desktop Pal uses an HC-SR04 ultrasonic sensor to detect objects that are in front of it. This sensor can be used for both proximity (detecting when something is within a certain distance), and for ranging (measuring distance). I’ve provided a separate sketch for testing the ultrasonic sensor, and observing how it works.- Before using the test sketch, you must first download the helper library for the HC-SR04 ultrasonic sensor at the main link on robotshop.com. Go to
- Open your Arduino sketchbook folder.
- If there’s already a libraries folder contained in the sketchbook, skip to the next step.
- Otherwise, create a new folder, and name it libraries .
- Open the zip file you downloaded in Step 1, and copy main folder into the Arduino sketchbook libraries directory. (The zip file should contain a main folder named Ultrasonic. Be sure to copy this entire folder intact.)
- Download PalUltrasonicTest.zip to your Arduino sketchbook library, and unpack it.
- Exit the Arduino IDE, and restart it. This is important – don’t skip this step! If there’s more than one IDE window open, be sure to close them all.
- Open the PalUltrasonicTest sketch in the Arduino IDE, and upload it to the Itead Leonardo.
- Upon successful compiling and uploading, the pan and tilt motors will stop moving, as PalUltrasonicTest has replaced the servo test sketch.
- Open the Serial Monitor window by clicking the Serial Monitor icon (far right) in the Arduino IDE toolbar.
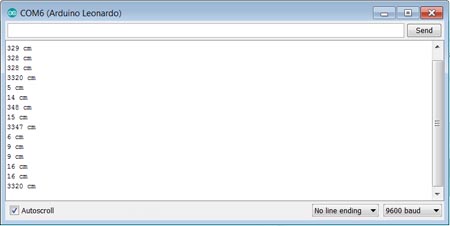 Arduino Serial Monitor window, with results from the HC-SR04 ultrasonic sensor
#include "Ultrasonic.h"
Ultrasonic ultrasonic(5,6);
The next line creates an object, aptly named ultrasonic. The two numbers following the object name are the Arduino digital pins used for the trigger and echo connections from the ultrasonic sensor. In this case, we are using pins 5 and 6 for these chores. The setup() function contains code to prepare two-way serial communications between the board and your computer. (Note: this communication link is separate from the one used to upload sketches to the board.) The line Serial.begin(9600) tells your Itead Leonardo to set up a link with a speed of 9600 baud/bits per second.
void setup() {
Serial.begin(9600);
Tip: If you open the Serial Monitor window, and you see garbage characters, confirm the corresponding baud rate speed in the lower-right of the window. Make sure it is also set to 9600 baud.
Finally, the loop() function contains the code for retrieving the distance information from the ultrasonic sensor, and displaying it in the Serial Monitor window.
int sonicVal = ultrasonic.Ranging(CM);
Serial.print(sonicVal);
Serial.println(" cm");
delay(1000);
I’ll cover much more of exactly what’s going on here, including how the HC-SR04 sensor works, in a future installment.
Verifying the Operation of the Side Switch
Last on tap is to verify the operation of the small switch located on the side of the Desktop Pal. This switch is intended as a way to set and reset different modes of the Pal.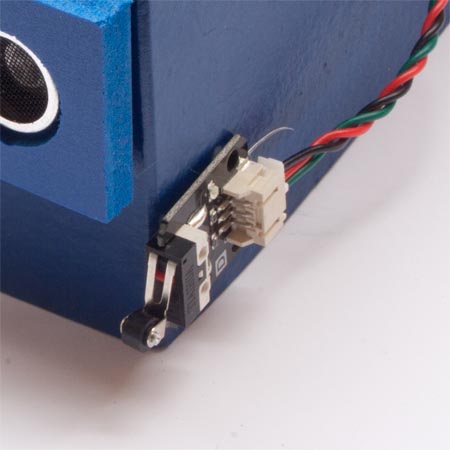 Side switch on the Desktop Pal
- Download PalSwitchTest.zip to your Arduino sketchbook library, and unpack it.
- Open the PalUltrasonicTest sketch in the Arduino IDE, and upload it to the Itead Leonardo.
- Upon successful uploading, open the Serial Monitor window by clicking on its icon in the far right of the toolbar.
- You will see a series of 1’s printed in the window. Depress the switch, and the value should changes to 0’s.
pinMode(2, INPUT_PULLUP);This prepares digital pin 2 as an input, and tells the Arduino to apply an internal pullup resistor to the signal line. (Note: This part is not actually needed when using the switch specified in Lesson 1 for the Desktop Pal, but is included for compatibility with other switches you might use.) And in the loop() function:
int switchVal = digitalRead(2);
Serial.println(switchVal);
delay(100);
The Itead Leonardo reads the instantaneous value of its digital pin 2, and prints that value – either 0 for depressed, or 1 if not depressed – in the Serial Monitor window. The delay is specified as 100 milliseconds, or 1/10th of a second.
General Troubleshooting
You may encounter the odd glitch here and there in trying to set up and test your Desktop Pal. If so, don’t be discouraged – errors are a great way to learn! Here, in no particular order, are some of the more common issues you may run into when using any Arduino board.- The Arduino IDE can’t find your board in the list of Ports. This is known to happen from time to time. Unplug your Itead Leonardo, and quit the IDE. Restart it, and plug the board back in.
- If the above still doesn’t seem to fix the issue, reselect Arduino Leonardo as the board type, and try again.
- The communications port for your board keeps getting reset, and the IDE can’t find it when uploading a new sketch. You might try plugging the Itead Leonardo into a different USB port on your computer, or simply re-selecting the port each time you upload.
- The Serial Monitor window displays nothing, or garbage text. Verify that your sketch contains the appropriate Serial.begin statement, and that its baud rate setting matches the one you’ve selected in the Serial Monitor window.
- The IDE loses track of your board when opening the Serial Monitor window. Try unplugging your board, and restarting the IDE.
- You get a slew of compile errors when you compile and upload a sketch. As noted above, this can be caused by an external library that the Arduino IDE cannot locate. Exit the IDE, verify that the library is in the sketchbook libraries folder, and restart the IDE.
- If the IDE flags a particular line of code of problematic, check that you haven’t accidentally altered that line. A missing ; character, or misplaced ” quote character or parenthesis, can cause compilation errors.
Coming Up…
In the next lesson, you’ll learn how to integrate the components of the Desktop Pal so they work together. One example: you’ll discover how to control the servos so they immediately respond to objects detected by the ultrasonic sensor.Thanks for helping to keep our community civil!
Notify staff privately
You flagged this as spam. Undo flag.Flag Post
It's Spam
This post is an advertisement, or vandalism. It is not useful or relevant to the current topic.
Report Reason
This post is an advertisement, or vandalism. It is not useful or relevant to the current topic.
You flagged this as spam. Undo flag.Flag Post
✅ Your Post Has Been Submitted Successfully!
Your post is currently under review by our moderation team. The review process usually takes up to 48 business hours.
You can track your post's status in the "My Content" section of your profile. Once approved, it will be published and visible to others.

Thank you for contributing to our community!