Robot Arm Torque Tutorial
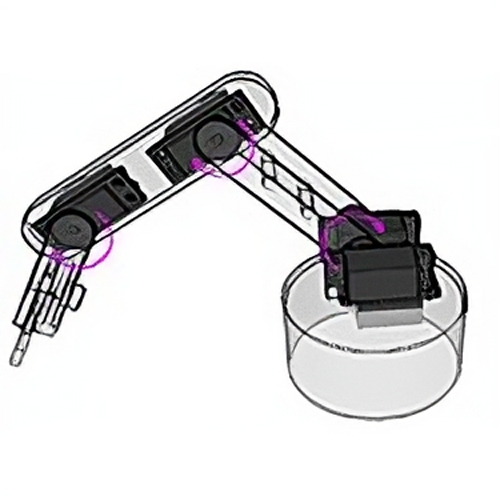
This tutorial is intended to complement the Robot Arm Torque Calculator found in the Dynamic Tools section. The equations used in the calculator to determine the torque required at any given lifting joint (raising the arm vertically) in a robotic arm are presented here. Note that the term "actuator" is used rather than motor because not all robotic arms necessarily use servo motors (some may use pneumatics, hydraulics, etc.).

Torque (T) is defined as a turning or twisting “force” and is calculated using the following relation:

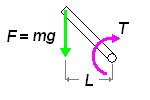
The force (F) acts at a length (L) from a pivot point. In a vertical plane, the force acting on an object (causing it to fall) is the acceleration due to gravity (g = 9.81m/s2) multiplied by its mass:

The force above is also considered the object's weight (W).


The torque required to hold a mass at a given distance from a pivot is therefore:

This can be found similarly by doing a torque balance about a point. Note that the length L is the PERPENDICULAR length from the pivot to the force.

Therefore, by replacing F with m*g, we find the same equation above. This method is the more accurate way to find torque (using a torque balance).

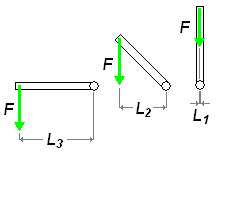
In order to estimate the torque required at each joint, we must choose the worst-case scenario.

In the above image, a link of length L is rotated clockwise. Only the perpendicular component of length between the pivot and the force is taken into account. We observe that this distance decreases from L3 to L1 (L1 being zero). Since the equation for torque is length (or distance) multiplied by the force, the greatest value will be obtained using L3, since F does not change. You can similarly rotate the link counterclockwise and observe the same effect. It can be safe to assume that the actuators in the arm will be subjected to the highest torque when the arm is stretched horizontally. Although your robot may never be designed to encounter this scenario, it should not fail under its own weight if stretched horizontally without a load. The weight of the object (the "load") being held (A1 in the diagram), multiplied by the distance between its center of mass and the pivot gives the torque required at the pivot. The tool takes into consideration that the links may have a significant weight (W1, W2..) and assumes its center of mass is located at roughly the center of its length. The torques caused by these different masses must be added:


Note: do not confuse 'A' (the weight of the actuator or load) with 'a' (acceleration).
You may note that the actuator weight A2 is not included when calculating the torque at that point. This is because the length between its center of mass and the pivot point is zero. Similarly, when calculating the torque required by the actuator A3, its own mass is not considered. The torque required at the second joint must be re-calculated with new lengths, as shown below (applied torque shown in pink):


 Knowing that the link weight (W1, W2) is located in the center (middle) of the lengths, and the distance between actuators (L1 and L3 as in the diagram above) we re-write the equation as:


The tool only requires that the user enter the lengths of each link, which would be L1 and L3 above so the equation is shown accordingly. The torques at each subsequent joint can be found similarly, by re-calculating the lengths between each weight and each new pivot point. Note: if any of the joints have two or more motors, they share the torque required evenly. Because the base of the arm is subjected to the highest torque, often two actuators are used instead of one. More Advanced: The above equations only deal with the case where the robot arm is being held horizontally (not in motion). This is not necessarily the "worst case" scenario. For the arm to move from a rest position, acceleration is required. To solve for this added torque, it is known that the sum of torques acting at a pivot point is equal to the moment of inertia (I) multiplied by the angular acceleration (alpha):


To calculate the extra torque required to move (i.e. create an angular acceleration) you would calculate the moment of inertia of the part from the end to the pivot using the equation (or an equation similar to):


Note this equation calculates the moment of inertia about the center of mass. In the case of a robotic arm, the moment of inertia must take into consideration that the part is being rotated about a pivot point located a distance away from the center of mass and a second term ( +MR2 ) needs to be added. For each joint, the moment of inertia is calculated by adding the products of each individual mass (mi) by the square of its respective length from the pivot (ri). Note that the equation for calculating the moment of inertia to consider for actuator N omits the mass of the actuator at the pivot point (N-1):


Note: The equation used to calculate the moment of inertia above (in this case multiplied by a constant value of 1/2) is not universal but rather varies from part to part (hollow vs. solid bar, cylindrical vs. rectangular cross-section, etc.). The moment of inertia also differs depending on which axis is considered (Ixx, Iyy, Izz can all be different). More information about the moment of inertia can be found by doing a search on the internet. In all cases considered here, ‘r’ represents the distance from the center of mass to the pivot. Since the moment of inertia varies tremendously from part to part, angular acceleration is not taken into consideration with the Robot Arm Torque Calculator. Instead, to correct for possible angular acceleration, a “safety factor” is used and set to 2 by default. As with all dynamic tools, inefficiencies in the actuators and joints themselves must also be taken into consideration. This way, the motor at each joint will be able to provide more than the required torque to keep the arm stationary. The required torque to accelerate the weight being support by an actuator from a static position can be calculated using the following relation:


