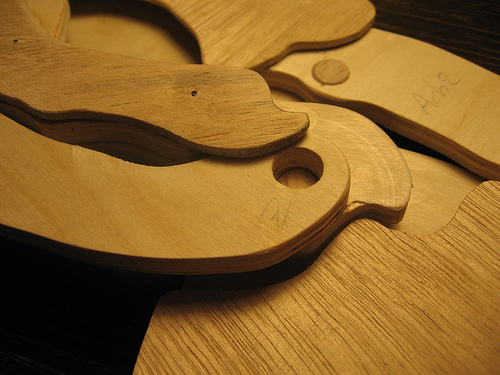
Getting closer and closer. Today I needed to clear my head. I really were dreading mass producing my legs with all those brass pivots. During a nice walk in the sun, I figured I would try 10 mm beech smooth dowel rod.
[This photo links to my Flickr set with many more details.]
Advantages:
Just glue in place. No need for the little plates soldered in the back.
Less wear and tear than metal turning in wood.
Much fewer parts than my brass bushing design.
Only possible now because:
Prototype #10 has “covers” on all parts. These “close in” the moving parts, so they cannot slide off their pivots.
I am using proper plywood. I replaced the 3.6 mm poplar with 6 mm birch. It has 5 plies instead of 3. And it is much better quality all over.
I’ll let you know here if they are any good for walking.
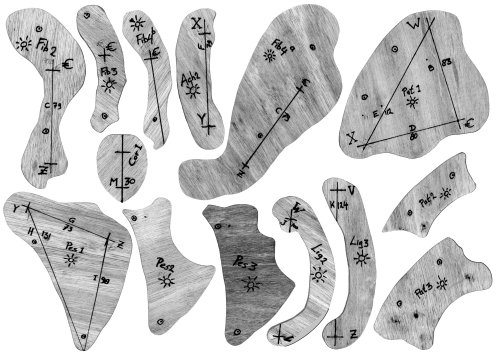
Here’s the templates I use for this version. It’s a 200dpi scan. You should be able to use this to start your own experiments with. Mind you: I have not fully tested these. Yet. (Click on image for high resolution scan.)
Instructions for assembly will follow. Some day.
Update 24 March
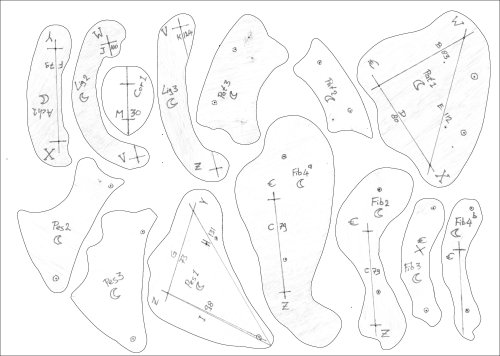
This is the same templates on the flip side. I designate the “sunny side” and the “moony side”. This corresponds with two different versions of a leg: mirrored images of each other. The photos above are a leg built “moony side up”. Always cut your parts from one and the same set.
The abbreviations on all the parts are:
Pat = Patella (knee cap)
Fib = Fibula (shin bone)
Pes = Pes (foot)
Lig = Ligament
Ach = Achilles’ tendant
Cor = Cor (heart, or in this case drive system)
The single digit numbers represent layers. A complete “bone” consists of multiple “parts”. For example Pat has layers 1, 2 and 3. Pes is a composite of parts Pes1, Pes2 and Pes3. Fib has two choices: 2+3+4a or 2+3+4b. The b-option has a much smaller, lighter cover". The ligaments are the drive shafts from the crank to the leg. The are numbered 2 and 3.
Align the parts using tiny holes and thin nails through the little circular marks. The pivots go through the holes where the black lines cross.
The double and triple digit numbers are the measurements from pivot to pivot in millimeter.
The letters A-M are taken from Theo Jansen’s drawing revealing his “Holy Numbers”. I multiplied those by 2 and measure them in mm. The whole set fits on a piece of A3 paper.
The letters Z-V indicate pivot points.
The Symbols € and $ are the two points where the linkage system connects with the vehicle’s flank (the creature’s body, if you will). Pivot $ (I forgot to mark it on Cor1) is in fact the crank axle. Pivot € carries the robot’s weight. Remember it like this: although the world seems to revolve around the Dollar, it’s weight hinges on the Euro.
This is a continuation from
here. More Theo Jansen on LMR
here.


