Hello all, may I introduce you to my first ever robot Sheldon, so named after the inspiration to build a robot in the form of a Big Bang episode (the virtual presence one). Originally I was planning to mount a Windows Phone as the head unit to tie in with my inspiration, but over time and a little kinect home dev influence resulted in a Sharp IR sensor and wireless webcam combo.
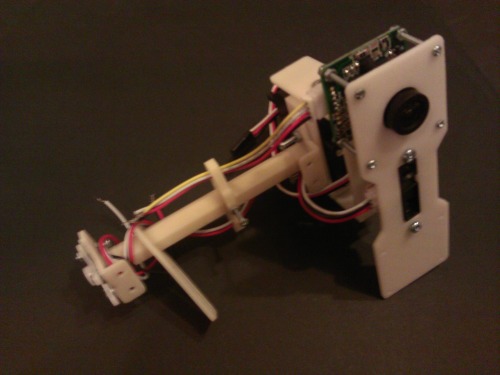
The following image is Sheldon version 1.0 with just a sharp sensor for a head:
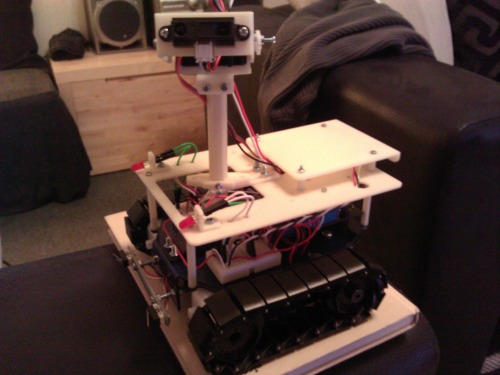
I have been working on him on and off for a while now and officially he is at 2.0 after a little mishap not so long ago resulted in the need for a rebuild. Following the need for a slight rebuild (this time I used solder instead of push fit) I decided to update the headstock and add a new bumper:
The shown version of the headstock used a TTL camera but this has now been replaced with a cheap webcam.
Key features of Sheldon 2.0 are:
·Robot Rover tank base with custom printed bodywork and headstock
·Netduino Microcontroller brain
·2 * sharp sensors for object detection and point cloud generation
·Wireless webcam for provision of vision
·Xbee for wireless control in none auto mode
·Controllable via xBox360 game pad
·Servo driven headstock
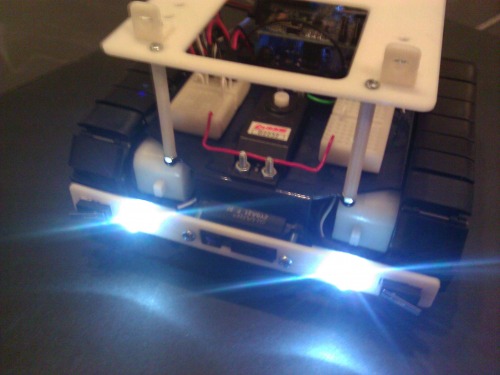
·Fog lights J
Currently I am working on extending his accompanying win-form control application and trying to enhance the overall smoothness of control etc. I am also pondering on swapping the xBee for Bluetooth and/or swapping the Netduino for the Plus model so that I can control him via both web and phone.
Hope you like
Update - I have added is some video of Sheldon running without the headstock attached. I'll add more demonstrating the full featureset asap
I’m thinking I’m going to name all my bots after characters from the series. I’m about to start on a RepRap called Leonard and a quad-copter called Penny - am I aloud to use smilleys or is that classed as text speak?
@MetalmonkeeLad - was thinking a shy biped and wolowitz a robot arm of course. @David thanks, @Azza I have added some video showing the drive control via gamepad Ill add more asap
Hi and thanks, for this build I used a Dimension uPrint desktop 3D printer (a great but quite expensive 3D printer which I fortunately have access to through work). All the CAD was done using Autodesk Inventor.
I have just started on a new project (Leonard) which is going to be a highly modified Prusa Mendel to try and save on personal print costs and gift provision for custom circuit board dev etc, funnily enough, my need was inspired by your timing belt tank, a great project by the way
… is that if your left joystick controls movement for the tracks, the head is controlled by the right joystick, right? I like how your lights can individually be turned on by the front buttons and that led lights up when the lower sensor spots something. Have you assigned any other buttons for different tasks?
Awesome work, one of the greatest first robots I’ve seen.
… the sticks work just as you describe, however I must admit that the servo control is not as smooth as I’d like at the moment. I included the on-board led at the stage of development shown in the video to demonstrate activation of the sensor and have not removed it as I like the glow
A few of the other buttons are mapped to a couple pre-defined operations including “really” rudimentary point cloud scanning (Low and High quality) via rotation of the head at varying degrees in both the X and Y axis and a taking distance reading at each point, I aim for this data to eventually be rendered as quads in an XNA environment within my accompanying Win-form.
I have also been toying with wiring up the triggers for individual track control and an additional button for the activation of the webcams photo capability, but at this stage be honest more often than not I send commands via the form app.
Currently I’m focusing on developing some ai caps and improving the accompany app. It’s funny how the software is taking longer to implement than Sheldon himself I have also been working on another modification to the headstock to improve the mounting of the webcam.
Ill up-load some more video to demonstrate all this as soon as I can (hopefully at the weekend).


 - am I aloud to use smilleys or is that classed as text speak?