Sensing servo feedback

PWM vs. PPM

To whom it may concern (perhaps FingerTech and Robotologist):

Our little discussion about whether a servo is controlled by PPM or PWM kinda bugged me, so I created a topic on the Arduino forum hoping to get a comment from the guy who wrote the comment I posted earlier. And I did. Here it is:

http://www.arduino.cc/cgi-bin/yabb2/YaBB.pl?num=1253149521/6#6


Aniss

Those are MG995 with my
Those are MG995 with my version of openservo. More information at https://www.robotshop.com/letsmakerobots/node/2423

Thanks again!
1st of all you’re english seems fine. Sorry if I gave you any other impression.

The reason I wrote “what?” was because you said…

“if you want to measure the stress of a servo at any time by taking measure of the current it uses, you have to make sure the servo is not moving at the time of measurement. The reading of a moving servo is not useful in this case.”

…And I was unaware that a servo even draws current while NOT moving. So I got confused. I still have very limited knowledge of servos.

My idea was to measure the current draw ONLY while the servo is moving. Like this: I tell the servo to move to a specific position. If something is blocking it’s movement then it stalls and I should be able to detect an abnormally high current draw, thus I would know that something is blocking it’s movement.

So I wanna ask you one more thing: in the video…is the current draw reaching 1.4A simply because you’re bending the leg OR because it’s trying to move at the same time (thus it is stalling)?

Sorry if my questions seem silly. I will off course be spending hours experimenting myself once I get my setup up and running…


Thanks again for all your input :slight_smile:

Aniss


PS: WOW! Your walking robot is even more impressive. I hope one day to be as skilled as you. Respect!!

>> And I was unaware that a

>> And I was unaware that a servo even draws current while NOT moving.

You are basically correct. The servo only draw a very little current when it is not moving when it is not under “stress”. i.e. the servo already move to the decided position.

>> So I wanna ask you one more thing: in the video…is the current draw reaching 1.4A simply because you’re bending the leg OR because it’s trying to move at the same time (thus it is stalling)?

When I bend it, the servo positions are shifted away from the original position, so it tries very hard to restall back…and thus a high current is measured.


>> PS: WOW! Your walking robot is even more impressive. I hope one day to be as skilled as you. Respect!!

Thank you ! I am also a beginner in robot building.

Pulse Width Modulation/shunt

Hello Aniss,

I am not sure why the confusion, but (typical) servos use Pulse Width Modulation, the width of the pulse is what controls the output position, Servos are typically very tolerant of variations in the pulse interval. Finger Tech provided a good description of PWM vs PPM. The only thing I did not like was the “Pulse Width Modulation has a fixed frequency and variable period” statement, normally the term period refers the duration of cyclic wave form, thus period = 1/frequency, but I think we know that finger Tech was refering to the “On period”. I have never seen a servo which uses PPM, that does not mean they don’t exist. One could successfully control a servo by providing a pulse train which is (control pulse) 20ms (control pulse) 20ms, this would keep the period within 25ms; so in this case the position of the pulse would vary but that is not what the servo looks at, in fact if the pulse is late this triggers a missing pulse detector, in this case the behaviour of the servo varies from manufacture to manufacture.

I thought I would add something on shunt resistors (sense resistors) there are two ways of using the shunt resistors, high side and low side, High side is where the resistor is on the posititive side of the load (motor), so as not to waste power it is important that the shunt resistor be of a reasonably low resistance so to make the signal useable we need to amplify it, the circuit below shows one way of doing this for high side sensing:

Highside.jpg

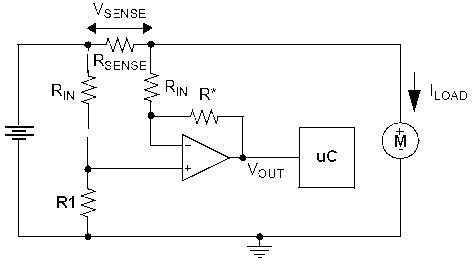
The uC is the microcontroller and is natually an Analog (A/D) port.

In this case Vout = Vsense x (R*/Rin) = Rsense x Iload x (R*/Rin)

[R1 = R*]

Now for the low side:

lowside.jpg

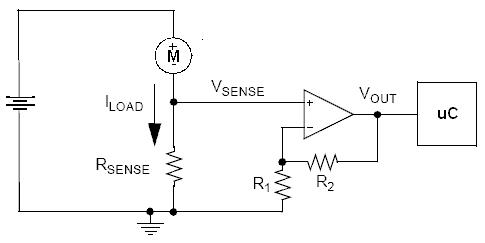
In this case Vout = Vsense x (1 + R2/R1) = Rsense x Iload x ( 1 + R2/R1)

The Opamps are just configured as fixed gain amplifiers.

Now the trap, the servo motors are reversable, so in one direction the shunt is on the low side and the other way the high side.

A couple of other issues is the motors are inductive loads and generate a back EMF when the current stops, this could be enough to cook the Opamps. Normal practice is to tie Vsense line to the +V and Gnd rails by REVERSE BIASed diodes.

You can also sense the "speed of the motor" using the comutator noise (little DC can motors typically consist of 3 windings which are turned off and on) in the Automotive industry this is the common tecnique used with such things as Window Winder Motors (i.e. detecting you head is in the window).

any way got to fly, I am late again....

If this is of any use I can write a little more.

best regards

cliff


Hi again

Well, the confusion originates from this article and the fact that several very knowledgable people (on the Arduino forum) believe that PPM is more appropriate than PWM for describing servo signals.

Here is (a part of) an explanation that I’m still trying to fully understand (copied from this thread):

PWM involves the modulation of a signals duty cycle. In controlling a servo, the duty cycle does not control the position of a servo. Servo position is controlled through modulating the on time of the pulse. Indeed it is possible to control a servo over its full range of movement by changing the on time but keeping the duty cycle constant. If servo control works perfectly well without changing the duty cycle then PWM modulation would not be the most appropriate term for the modulation used.

The terminology is confusing because servo control pulses do involve changing (modulating) the pulse width. And a subset of PWM can be used to emulate the modulation needed to control a servo. But its no more correct to say that this makes the servo signal PWM than it would be to say that an AC (Alternating Current) signal is PWM because PWM is capable of alternating (switching on and off) current. Indeed it is possible to emulate AC using PWM (along with a few passive components) but of course that doesn’t mean one should say that AC is PWM modulation.


Perhaps you will understand it better than me. I just understood what duty cycle means, but I’m still not clear on what the term modulation actually means…

And thanks for your thorough comments on the shunt resistor matter. I’ll get back to you on that when I’ve studied it some more…


Best wishes :slight_smile:

Aniss

OK

Just one last question…for now anyway :slight_smile:

Is the servo trying to restall back because your microcontroller is constantly telling it to do so, or simply because of the last command received?


Thanks

PWM vs PPM

Hello Aniss1001,

Duty cycle, in a repeating signal, the duty cycle is the percentage of the period which the signal is a high (on, a 1 what ever). Sof 50% (50/50) the signal is a high for half the time.

Modulation, refers to the method of encoding the signal on the carry, for example Amplitude Modulation (AM) Radio encodes the signal by increasting and decreasting the ampliture of the carrier. So PWM is just stating that the signal (servo position) is encoded by the width of the pulse (1 to 2ms).

I think the above explanation is splitting hairs and is not quite right.

The statement that PWM varies the duty cycle is true, sort of but this depends on keeping the pulse interval constant, it is not necessary to keep the pulse interval constant. PWM VARIES THE WIDTH OF THE PULSE. I think the author is thinking of PWM control of motors.

Servos are very tollerant of the pulse interval, my servos only start to play up if I get much faster than 10ms and slower than 70ms, I have a servo tester built with a 555, I can vary the pulse interval and duration, if the pulse interval stays at >10 <70 only the pulse duration (width) changes the postion.

So If I can vary the interval between pulse, then the pulse position has little to do with the servo output position. So I would not call it pulse position modulation.

If I vary the width of the pulse the output position changes, so I would personally call it PWM.

An the Signetics Databook (real paper!) calls it PWM.

Anyway it is a bit of a simantic argument, if you keep the pulse interval to >10 & < 70ms and the pulse duration between 1 and 2ms, your servos will be happy.

all the best CW

The OpenServo modification
The OpenServo modification he made might rely on last position sent, but regular servos will only seek a position that is being updated every 20 ms or so. Stopping update pulses will cause the servo to go slack, not seek a position.

Thanks

That’s what I thought…

And as promised I’m out of questions…for the time being :slight_smile:


Aniss1001… over and out

Hi again cwignell


Hi again cwignell (and anyone who wish to contribute),

I’ve been looking at your solutions trying to understand them the best I can with my limited knowledge of electronics.

I tend to like the “low side” solution best because:

1) It’s simpler. Easier to understand and has less components/resistors.

2) It seems easier to combine with an analog multiplexer (to measure the current draw of several servos from 1 analog input).

3) It seems similar to my ORIGINAL idea I mentioned as option 1 in the topic description.

Here is a diagram of that idea:

img005.jpg

However this option has now been dumped because I was told it would cause servo noise. But the "low side" solution is basically the same just with a smaller resistor (I was told 0.1 Ohm would be appropriate) and the op amp. So I made a new drawing including the multiplexer, based on your "low side" solution (as well as others I've seen). Here it is:


img006.jpg


I added 3 servos in the drawing but in reality I’ll be using 12, so I’ll probably use a 16 channel analog multiplexer like this one.


Questions:

Does this seem possible? What kind/size of resistors will I have to use as R1 and R2 given that the servos use 5V, the Arduino analog in can measure from 0V to 5V and the peak current draw of the servos I’m gonna use is ~750mA? Would it be easier/better to use a (hall effect) current sensor IC like this one (still using a multiplexer)?


And then you lost me when you said: “Now the trap, the servo motors are reversable, so in one direction the shunt is on the low side and the other way the high side”. Are you sure you’re not refferring to DC motors? I don’t think servos are reversable?!


Best wishes

Aniss

PS: Please note that the diagrams are incomplete as I left of the digital outs (from Arduino) that control the servos as well as the multiplexer…

Well…

Well the discussion is still ongoing on the Arduino forum. However I decided just to call it servo signals/pulses from now on and leave it at that :slight_smile:

But the author is DEFINATELY refferring to standard SERVOS. And perhaps he has a point (however nitpicky it may be)…

Quote from wikipedia: “PWM of a signal or power source involves the modulation of its duty cycle”.

Quote from the author of the previous statement: “Are you aware that a servo can be operated correctly over its full range without altering the duty cycle of the control signal? If servo control can be achieved without modulating the duty cycle then PWM would seem a poor choice for describing its encoding”.

Low Side Servo Feedback

Hi (again ;-),

Measuring across the entire servo means you don’t have to worry about the motor reversing, the current will alway flow neg to positive. I was refering to DC motors, the tecnique is normally used across DC motors. But I suppose we can treat the enire servo as a DC motor.

Yes 6ohm is too high, if you feed the servos with 5V, 6ohm would result in ~3V which would cause a couple of problems.

First the servo need a little more than 3Volts across for the onboard regulator to work,

Second, we push the servo’s ground up, it is the reference for the signal and I think you might run in to problems here; also the 0 signal level will be below the servo ground, a lot of digital gates do not like the level to be pulled below ground.

For these reasons I would be inclind to go high side measurement, this has the advantage that the ground never changes so 2 is not a problem. But with a 0.1Omh shunt it probably wont be a problem.

So 0.1 Ohm is a good choice, with an Opamp you can adust the gain to get a nice full range (0-5V) signal although you may need to much around to match the gain to the servo performance.

You are going to have to do a bit of testing, running the servo and looking at the results so you can understand the Load vs Current, Starting currents etc, this may require you to expect a high start current and then a decreasing current until you hit something. You might even see little current pulses conenciding with the signal pulses; I am not sure how apparent these will be.

best regards

CW

Thanks

Thanks for all you advice…it’s all being taken under consideration.

However the pole shifting is going on INSIDE the servo. It’s all being taken care of by the servo’s motor controller. So I don’t have to worry about that. And I very much doubt you can treat it like a DC motor. In fact I think it’ll destroy the servo if one tried.

But you were on to something. Just read on the Arduino forum that a guy using a similar setup reported erratic readings (high current draw peaks) whenever a servo changes direction.


Regards

Aniss

Hmmm…

Hmm…the more I look at the original circuit…

lowside.jpg

...vs. my multiplexed one...

img006.jpg

...the more I think it's all wrong. The thing is..in the original the low side of a single sense resistor is being fed to the op amp's negative input. While in my version the low side of ALL the sense resistors are being fed to ditto.

I'm no wiz (as ya'll should know by now) but I can't help thinking this will mess up the readings? Perhaps I'm wrong. I hope so, but I did come up with a new circuit using 2 multiplexers. It also includes two 0.1uf capacitors that I was adviced to add for less noisy readings...

img008S.jpg

Any opinions on this?


Best wishes

Aniss

Hmmmm part 2

Hi Aniss1001,

You don’t need the bottom Mux (2), the connections to this mux will always be at ground, thus it wont matter which is selecte so get rid of it. The caps are ok they will by pass the hi-freq stuff. but other than that should be ok


COOL!

That’s good news (about mux 2). It was getting rather complicated. I just couldn’t help thinking it would be better to feed the op amp with a matching high+low side of one sense resistor at a time…

But I’m glad I don’t have to go there.

Thanks for a VERY quick answer :slight_smile:

Technically the original
Technically the original multiplexed circuit is already connected to both side of the sense resistors; the multiplexer connects the (+) OpAmp input to the high-side of the resistor, and the (-) OpAmp input is always connected to ground, which is the same point the low-side of the sense resistors are connected to.

Well…

Well…I have a similar topic running on the Arduino forum (I need all the input I can get). A guy who’s running a similar setup (though he used several op amps BEFORE the MUX) said:

The current signal is pretty noisy when the motor is switching directions though. That is coupling into other A/D signals at the moment.

In other words the outputs from the different servos are interferring with each other. I was trying to figure out a way to avoid this. Still don’t quite understand why the 2 MUX solution isn’t better in that sense. BUT I believe you guys when you say it :slight_smile:

The 2 MUX solution is

The 2 MUX solution is redundant because the 2nd MUX takes 3 identical inputs and spits them back out again. Having the OpAmps before the MUX is totally different because each OpAmp needs to be connected to ground.

If you want to cut back on noise you should consider dropping a few caps on the signal lines to cut out high-frequency interference, and maybe put a larger cap on the supply line to reduce voltage sag when the motors pull a large current (ie: when stalling or changing direction suddenly).
Additionally you can reduce inductive interference by keeping your wires as short as possible, especially your signal wires. If it is realistic to do so you should also keep the signal wires away from the high current motor wires.