A remote-controlled Baneblade for a HSC Software Design and development project, already done by BobPanda, thanks for the inspiration, but now with a little more functionality. This is for a school project, by the way. The idea is to get the tank to navigate by itself through ultrasonics, track body heat with the sensor mounted on a rotating turret (which will be a bitch to program, from what I've heard), and basically look awesome with LED cannons. Also, it can receive commands via an IR sensor, and because my classmate is making a universal remote for his project we can have an RC baneblade. It's very ambitious, but I'm hoping that I can do it and maybe even make it a Golden Daemon entry :-). P.S. sorry for image quality, taken with my iPhone.
Navigate by ultrasonic sensors, track targets with moving turret via non-contact temp sensor, "shoot" with LEDs in the guns
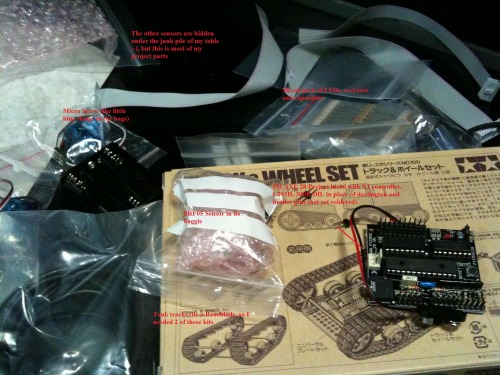
- Actuators / output devices: tamiya dual motor gearbox, Tamiya gears and tracks, Micro 9g servos (the little blue ones), quite a few LEDs
- Control method: IR receiver, semi controlled
- CPU: Picaxe 28x1
- Power source: 3x AA
- Programming language: Basic
- Sensors / input devices: SRF005 Ultra, MLX90614ESF-AAA Infrared Temperature Sensor 90, SE-10 Passive Infrared Sensor
- Target environment: indoors for now
This is a companion discussion topic for the original entry at https://community.robotshop.com/robots/show/robot-baneblade
The parts, again, sorry for poor image
RE: tracking heat
Thanks for the help, just to be clear, the body moves based on range data from the ultrasonic sensor, its the turret that moves from the temp sensor. the turret only uses one servo (left right) for simplicity’s sake.
I looked up the MLX90614ESF-AAA Infrared Temperature Sensor 90 on www.littlebirdelectronics.com and the datasheet says that it is suitable for human body temps, so i think i have the right sensor maybe. Its not going to follow an IR beam, though it can recieve remote control commands from a universaa remote that my friend is building.
Also, could you also clarify what you said about needing multiple sensors for each axis? i was planning on using only one sensor, because it said it had a 90 degree FOV. i’ve never done this before so im a bit of a noob at robots.
By the way, your tracking systems are really good!
Since your thermal sensor
Since your thermal sensor only has one monitoring zone it can tell you whether or not a warm target is in its sights, but it can’t track the target effectively.
Let’s say the turret is rotating in search of targets, and it detects that a person has come into view. Now the person moves out of the sensor’s monitoring zone - but which direction did the person go? With only one sensor there’s no way of knowing, so there’s no way to properly track the target.
If you had two sensors instead, or a single sensor with two adjacent monitoring zones, then you’d be able to detect whether the target was moving to the left or to the right before the target left the field of view. Even if the target was able to outrun the rotation speed of the turret, at least you’d be able to determine the direction it was last seen heading.
WOW
I like warhammer 40k as-well, I like your idea.
thermal sensor
thanks TeleFox and Oddbot, that really made things very clear. I think I should be able to get another temp sensor within a week or two, along with the actual model (time/money have been short and a baneblade is very expensive), so that should take care of things. Thanks again, big help, and I will post pics of the work in progress as soon as I can.
How the baneblade should look
so that we’re all clear about what exactly the end product should look like pending further images/info, here is a link to the RC Baneblade that BobPanda built, and this is where I got the idea from:
http://www.youtube.com/user/BobPanda#p/u/8/IbsLgeNJ20o
His method, I feel, is a little crude, simply ripping the electronics out of a $35 rc tank and sticking them inside the baneblade, but I like what he has done with the LED positioning.
Speaking of which, does anyone have any ideas about mounting a Luxeon Rebel LED in the searchlight?. I only have the actual LED, the tiny little rectangular thing, but what other components do I need to properly mount and use it? I have lost sleep over this, as I really want to use this neat little thing to light up the area and generally look kickass.
Thanks again, you guys have been a great help.
Modified design
I could’t be bothered having to but another temp sensor so I bought a PIR sensor to mount on the tank. the plan is that if the PIR senses something, the turret goes into “sentry mode” sweeping left and right until the heat sensor locks onto an appropriate heat source (human heat, in this case). Maybe more erratic turret movement, but my budget was starting to get squeezed and a PIR was less expensive than a decent non-contact temp sensor where I was looking.
This will work, but just
This will work, but just remember that when the tank is moving the PIR will act as if everything around it is moving, so you’ll only be able to use it when stationary.
I see…
ah I see. This may necessitate some programming changes, but seeing as in real life a Baneblade would have to stop to fire its main cannon (more accuracy plus protection from recoil effects), this is acceptable. Thanks a lot!
PIRS, how to mount?
Well, as I said before, I’m using an SE-10 PIR to detect movement and cause the turret to rove and search for heat sources (targets). However, what do I need to do to connect it, as I have heard that I need a resistor of some sort as it is a “open collector”?
An “open collector” output
An “open collector” output is a digital output that pulls the line to ground when active - essentially it acts like (and often is) an NPN transistor with the output connected directly to the collector.
To use an open collector output as an input to a microcontroller or other digital input, you need a pull-up resistor to allow the output to go from low (when it’s on) to high (when it’s off again).
The open collector output acts a lot like a switch, in that when it’s inactive the output line is left disconnected, also referred to as an “open” connection. The open connection is left “floating”, with no power source driving it to be at a high or low voltage. Floating inputs are highly susceptible to noise and interference, and may result in erratic signals and/or false positive readings.
This is where the pull-up resistor comes in. When the open collector is active, the output is pulled low to ground, with the contribution made by the pull-up resistor (which connects the output to V+ via a high resistance, often 10-20kΩ) being swamped by the strength of the open collector. However when the open collector becomes inactive the pull-up resistor is able to pull the output line up to V+, providing a clean and reliable transition from high to low, which is seen on the microcontroller’s digital input.
In short, you connect the output of the PIR to a digital input on your microcontroller, and then you connect a suitable resistor (10-20kΩ if in doubt, the PIR’s datasheet may have a recommendation too) from the digital input to V+. Depending on which input you use, you may have pull-up resistors already connected, or you might be able to enable them internally (inside the PICAXE itself).
its not moving!
hi again, long time since my last post, but most of the body is done (picture on the way), and I have even mounted some of the lights. However, I have a problem. The Tamiya Twin Motor Gearbox I have been using (with the motors it came with) is just not powerful to move the tank, so I have been rather frustrated trying to get things going. Any suggestions as to track tension, correct gear ratios or what kind of gearmotors to use?
Before you go shopping for
Before you go shopping for new parts, have you changed the gear order for the maximum reduction to increase the torque?
yeah I thought of that
yeah, I was using 203:1 and that didnt do much, but then I realised that the tracks were getting caught on some internal cross-bars that are part of the model. I cut them out, and the tracks should run fine now. I say “should” because in my frustration I pretty much ruined the gearbox by running it despite the sticking tracks, and I need a new one 
The tank body, with servo
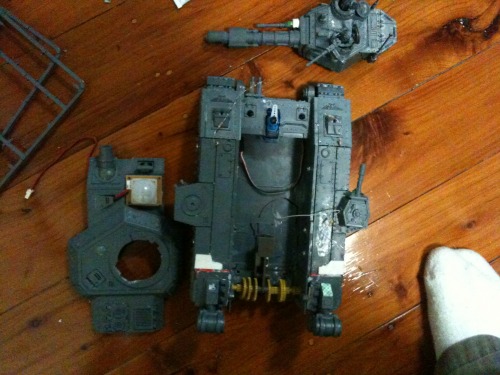
The tank body, with servo for the ultrasonic sensor, PIR on the upper body (left) and turret with some lights (top)
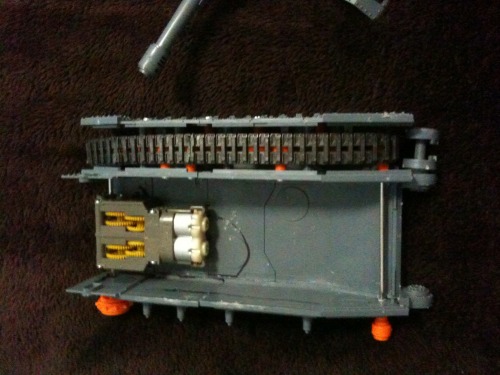
What the track system should look like (except it wont be as out-of-line as it is here)
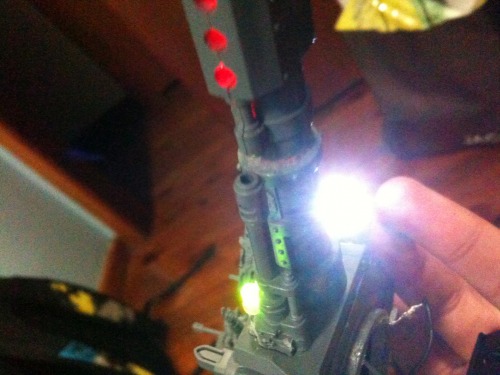
Jesus christ that is bright! (green targeting light, red main cannon light and cool white searchlight). I even put the lens from an old optical mouse inside the turret so it looks extra bright from the front (the front view was way to bright for my camera to handle)
thanks
thanks! I’m trying to make it look reasonably ok, but if I can enter it into the Golden Daemon painting contest then so much the better
more questions, RE the temperature sensor
ok, so finally got the drive system mentally sorted, but now for the next bugbear; the Melexis temperature sensor. I know how to mount it, I have the wires, but thats it. The sample code is only for polulo controllers, so is there any chance that someone knows how to program this in basic, and wire it to a picaxe 28 project board? I would find this myself, but I have to go out now, and I have exam prep to handle for the next couple of weeks.
flashing lights
so i was looking up some other baneblades that had been lit by their builders, and I noted some lights such as targeters that flashed every second or so, as if scanning for targets. I know i can say something like, high 4, pause 500, low 4, pause 500, and loop it but there must be a better way to do this. Assuming the voltage drop across the LEDs is 4 volts, a power supply of 4.5V and all the proper resistors are in place, is there some way to put a capacitor in place to produce the flashing effect?
Nope, the capacitor will
Nope, the capacitor will just smooth out the supply to the LED, so it fades on and off instead of switching immediately.
If you really don’t want to control the LED with your micro then you’ll need some active components to make it flash - search google for “led flasher”, “led blinker”, etc, to find some of the easy ones that just use 2 transistors or an inverter chip.
Even easier would be to find some LEDs with built-in flasher circuitry. They’re pretty common and cheap now, and you connect them just like a normal LED (power, resistor, ground), but they flash at a pre-determined rate all by themselves.


