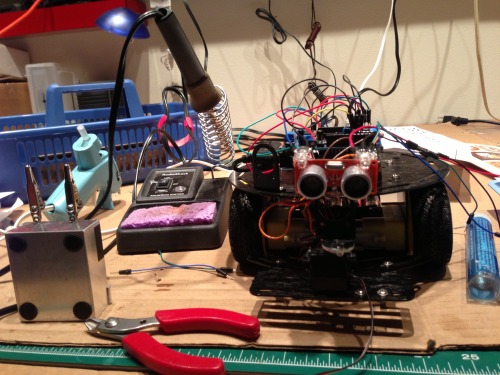
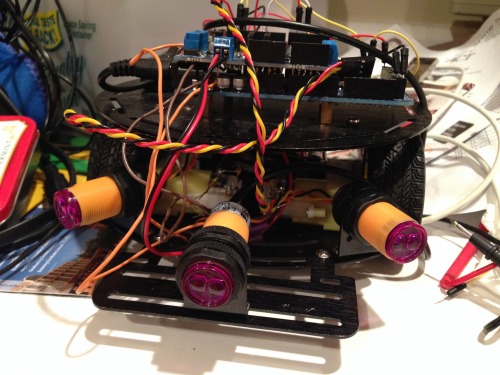
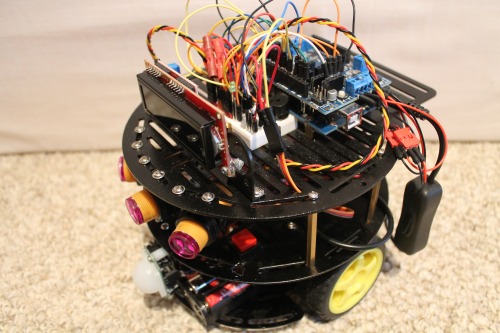
I built this robot as an all-around robot to jump start my way into Arduino. I self taught myself everything about this robot from code to hardware and have taken no formal classes in computer programming or electronics. The robot took aproximately 8 months to complete. The chassis of the bot is a 2wd platform that is highly configurable and features tons of connection points, ideal for a all around experimentation bot. I later added a third plate in order to have even more options for connections and more room for sensors and such. The original goal was to simply navigate a room without bumping into obstacles, that goal quickly expanded to include things such as analyzing data from multiple sensors to make semi-intelligent decisions about it's path. An lcd display was added to give a personality of sorts to the robot. The robot communicates what it's doing/about to do via the screen. For example when an obstacle is detected the robot will say something like "Uh Oh!", "Looks like I've chose the wrong path!" and similar phrases. Atop the robot are 2 leds for use of communicating quickly what is going on in the code. One LED shows the status of obstacle detection, green when clear, and red when detecting/avoiding an obstacle. The other lights up every time the code completes one cycle of object detection (roughly 1/10 seconds) which I added simply for curiosity sake.
After completing those tasks I decided to add some new capabilities to the robot, first being the ability to play "hide and seek." The robot will wander around a bit, stop, and then use the PIR sensor to detect any motion. If there is no motion the robot will wander around once again. It's surprisingly entertaining trying to evade the robots vision but is slightly unfair as the robot cant detect motion while it is in motion. The bot boasts whenever it believes it's found you by taunting you to evade it again. The second functionality I added was the ability to be controlled via IR remote (tv remote). The remote gives you access to four degrees of motion in three different speeds. I will continue to develop this robot as money and ideas come to me. My latest endeavor is combining my two skills, Java and Arduino, to make a Java GUI that can control the robot. I've also started another project with a RC rock crawler which I will be entering into a robotics competition this spring. If you'd like to support this project feel free to check out http://igg.me/p/635797/x/5956262
Navigates via 3 IR Switches, Plays "hide and go seek", makes semi-intelligent course corrections, gives audio and visual feedback via buzzer and lcd display, remote controlable
Actuators / output devices: 2 6v motors
Control method: autonomous, Semi-Controlled, Controlled
CPU: Arduino Mega 2560
Power source: 7.5 battery pack
Programming language: Arduino
Sensors / input devices: IR reciever, PIR, IR switch
Two things that I look for in a rover design. Sensor implementation and wire discipline. I dispise rovers that drive a short distance, stop, pan and scan the environment with the ultrasonic ping))) sensor, and then repeat ad infinitum. In my opinion, this is a design flaw and should be avoided. Clearly the sensor arrangement was well thought-out as was demonstrated in the video. However, you failed to maintain proper wire discpline in your rover design. Imagine for a moment the Mars rovers: MSL, Spirit and Opportunity, sitting up there on Mars, sprouting chicken coup wire? Cleanup that spaghetti. PRESENTATIONis everything! I look forward to the next iteration.
TitiMoby, I think both 2wd and 4wd have their advantages, I personally only want 4wd if speed and stability are important. If you’re looking for something indoor, and very agile, 2wd is the way to go (plus it’s simpler code wise). In a situation where I don’t mind a slow speed but need stability, I use a tracked design. I look forward to seeing what you do with your project!
birdmun, Thanks! And I never considered adding line sensors on this robot. I mention in my post about my previous Lego Mindstorms robots, if I remember right, I made two robots that involved line following and I guess I have a mindset of “been there, done that” when it comes to line sensors. (EDIT: Just kidding, I realized I deleted that portion about Lego Mindstorms from my post!) However, I have been tossing around the idea of making a robot that instead of following a set line, finds patterns in the surface it’s on and follows those. I got this idea originally from a wooden floor in my house. I’m not sure how I would go about this challenge, I would want the robot to be able to recognize a wide variety of patterns on many surfaces with varying contrast. Possibly a new project!
Machina, Thank you for the compliment on the sensor arrangement! And on the topic of wiring, I cannot agree with you more that presentation is key in these robots, however one of this robots best qualities is how customizable it is. The picture doesn’t show it, but there is a breadboard behind the LCD screen and a small prototyping area ontop of the motor driver shield. I rewire this robot to add new components and features nearly every week and this setup allows for rewiring to take minimal time and effort. I didn’t intend for this robot to be something that is sleek or beautiful, it’s a platform for my personal experimenting before I allocate funds for a dedicated, permanent robot. Out of curiosity, what is your reccomended method for clearing up such wiring messes? Clearly if I wanted to make the robot more “permanent” I could shorten the to the minimal length and cut out some un-necesarry tie-points… But no matter how much I condense there will be some ammount of “spaghetti” atop it. What is your recomendation on cleaning up a mess such as this? Thanks for your feedback!
That is a great robot and I like how you used a lot of devices to make it an all-rounder! Good luck with your new chassis. I second what birdmun said. You may have your own plans for further modifications and functions, but adding a line sensor and maybe making it solve a maze or something might add some more variety in the already “multipurpose” thing it is.
And if you did not notice, you can add the youtube video’s link in the project description right here on LMR. I think that would help you a lot more with spreading the news. Perhaps many are missing out on your video!
I myself am a high-schooler and it’s great to see someone of my own age build something really cool!
Thank you for the welcome! Yeah I might just have to add a line sensor here soon, currently I’m focused on my new robot but when I get the time I’ll see what I can put together. And on the topic of a video, I have a great video that showcases this robot which obviously you’ve seen but it’s in the context of crowdfunding for my current project and wouldnt make much sense here. I have plans to edit the video a little and make it more appropriate for this page.
I’m also glad to see another high-schooler in the area of robotics! I can’t say that I’ve met many peers I share a common passion in robotics with… However my experience on this forum has been phenomenal and I already have got enough inspiration for projects to last me months and drain my wallet! It’s all worth it in the end though!
I look forward to following your projects, I admire your ingenuity and creative use of materials to make some very cost effective and unique robots. See you around the forums and thanks for the comment!
Congratulations for your robot. It’s a great development also full of sensors and actuators. It’s good also that you though about versatility when you designed it. I can’t imagine what you’ll do in 3-4 years time.
I don’t know if you documented the building process as it could help others to replicate or do something similar. It’s also good for yourself as you can review your own work process and make improvements
Thank you for the compliments! Yeah I wasn’t ever planning on sharing this robot when I initially started it so unfortunately I dont have any documentation on what I did… I’m making sure to document my current project though so my next post will certainly have some information on my process.
Ideally a separate rover should be setup for the purpose of testing and further development. Any software or hardware modifications that prove successful would then be transferred to the final rover design. In this way the final rover is always in a state of readiness—read as ‘presentation’ ready. If cost is a factor the test rover does not have to be an exact model of the final rover. However, it should be functional enough to test whatever component or feature you want to implement.
The most effective solution for wire management is the popular zip tie. Break open any old printer, dvd player, or computer and you will find zip ties organizing errant wires and cables. I particularly fancy the plastic spiral wire wrap variety.
One last topic—customization. Your rover should incoporate a level of modularity in its design that lends itself to customization. To address this principle—start by deconstructing your rover. If you remove the third plate, do you have a functioning rover? What about the second plate? Does the rover still move. And what of the first layer? If the answer is no to any of these questions then there is a flaw in your design.
Consider the five subsystems of a basic rover:
Power
Mobility
Control
Navigation
Communication
If you properly integrate each subsystem your rover will prove effortlessly customizable.