

Hey guys, I have finally gathered up enough salvage parts and such to finally make a half way decent robot. This is the first custom robot, meaning that all the pieces dont come together and you decide how to screw them together. About a year ago I made a robot in the schools robotics club for the FTC (First Tech Challange) Competition, we didnt do so well, but we tried our hardest and put so much time into the robot, and had a good time and thats all that matters. Back to the current build, I have just started on this build and I will be posting pictures as I go along.
LISTS (SO FAR...)
Heres the salvage materials list
- Aluminium 1"x1" beams (cut off and waste from fencing jobs)
- 20 3/4" x 12 7/8", 1/16" steel sheet
- 2x 24v DC Motors with gear box(from robotic pools cleaners I have fixed)
- 1/8" aluminium Brackets(from the greenhouse they tore down at school :D)
- Wiring from various different things
- tons of Altoids tins (I have no clue how I will use them on this build)
- various other bits and piecies that I cannot recal)
Parts I have that I plan to use:
- 2x 12V DC 20W Hallogen bulbs with cone lenses (on clearance at radio shack for $0.25)
- 3V Laser Diodes (I have like 20 of them)
- LCD Display HC16102-B HYUNDAI KOREA (that I still cant figure out how it works)
- Various Relays(I love relays)
- Various LEDs(I also love lights)
- Various Switches(I also like switches and randomly buy/aquire them)
Ordered but not yet recieved List
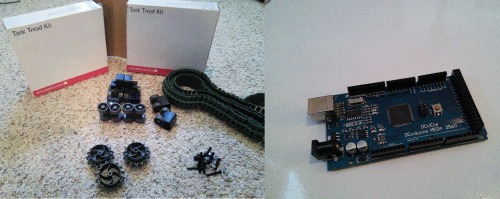
- Arduino Mega Clone
- Bluetooth module
- Ultrasonic sensors
- Motor controller
- Standoffs
- Microswitches
Shopping List
- 4 or 5 3S Lipo Batteries
- Charger for Lipos
- Wheels or Tracks(may make my own tracks)
- Small horn (XD)
- More LEDs
- Lots of other odds and ends I cant think of right now.
I will be posting pictures and more information soon!
The Frame, before assembly
Making 'L' Brackets from the greenhouse brackets
Frame assembly
Putting on the plate
UPDATE 8/24/2014
Upon researching further into robot tracks, I have decided to buy 2 VEX Tread kits, this will allow me to quickly assemble the drive system and give me more time to focus on programming, and all the other odds and ends. Using the VEX tracks will save also save me money.
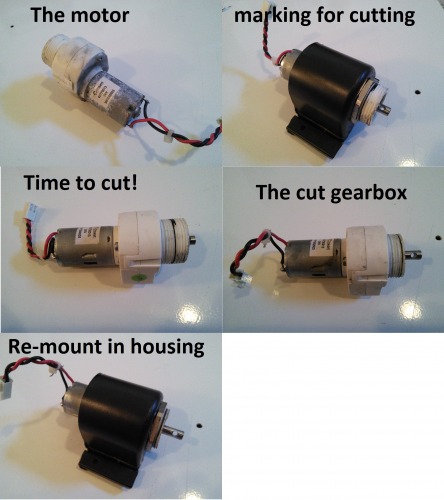
This is the original housing for the motors, it originally housed 2 smaller drive motors and one very large propeller motor and was air tight. I decided that it would be the best thing to hold the motors in place. It is made out of 1/8" injection molded ABS plastic, so it is very strong. Although in order to use it, we must first cut off the mounts for the motor and the lip which held the O-ring in place.
Cutting the Housing
Update 9/6/2014
New Parts
NOW TO THE GOOD STUFFS! THE PART THAT YOU HAVE ALL BEEN WAITING FOR, THE NEW PARTS!
Yesterday I recieved my 2 VEX tank tead kits and my $13 Arduino Mega clone (which can be found Here).
Some more work.....
Cutting the gear boxes to have more of the axel exposed
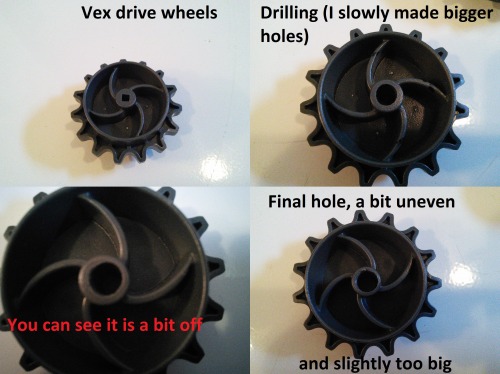
Drilling out the drive gears. I had a bit of a problem with this as you see they are a bit off centered, I am going to do the rest of the reaming with the drill press at school.
UPDATE
Okay Okay, I might be bad at keeping you updated on stuff, but c'mon man give me a break.
SO I Built the sides and everything for the tracks to rest on, but when you have motors with crazy torque and plastic tracks, and everything isnt aligned, it doesnt end well. So that was like 6 Months ago, But I finally got some wheels for the bot, grabbed 4 of my high speed 24V motors, printed adapters and well we have 4 motors with wheels, next to make is mounts for the motors and then wiring. So Yea, should be coming along soon. Ill post pictures soon!
This is a companion discussion topic for the original entry at https://community.robotshop.com/robots/show/multi-purpose-robot-my-first-custom-robot