Mech-Spider Fail (ARRRGH!)

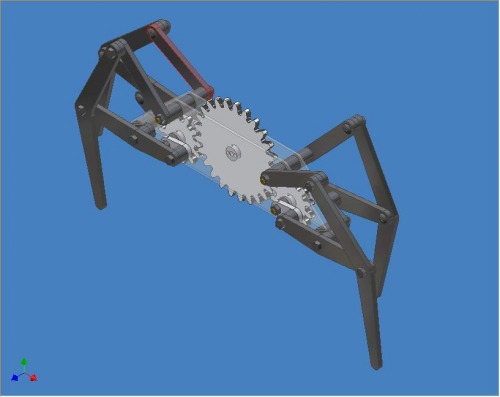
I got interested in the Klann linkage when I stumbled across MechanicalSpider.com, so I decided to play with it to see what would come of it. After designing the first leg mechanism in AutoDesk Inventor 9, I thought it would be fun to build a robot spider to hand out treats on Halloween. This is the process I used to develop this robot. I wanted to use materials I had on hand and make most of the parts myself. I started with the leg-driving mechanism shown below.


I cut the gears from 1/4-inch polypropylene sheet. I got the gear patterns from the CAD library at www.hobbing.com. After I ran the exe file from the library, I ended up with 573 gear drawings of gears with 10 to 200 teeth. The drawings were DWG files, which is a format for AutoCAD. I used a free CAD package called DraftSight (a nice 2D CAD application from www.3ds.com) to scale the gears to a size I could work with, imported the DWG drawings into Inventor, printed them out as a pattern, tacked them to the plastic sheet, and cut them out with a band saw outfitted with a metal-cutting blade.

I downloaded the enable text for the Klann linkage from www.mechanicalspider.com. The text outlines the design method to get the linkage sizes and pivot points. I used DraftSight to draw the lines for the design. I tried a 6-in step at first, but the robot would have been too big, so I went down to a 4-inch step and everything was reasonably sized. The design drawing is shown below.


The next step was to import this drawing into Inventor, isolate the pivot points, draw the linkages around the pivot points, and produce the patterns. I tacked the patterns to some 1/4-inch black polyethylene I had stockpiled and cut the linkages out on the band saw as well. I managed to put most of the first set of legs together this weekend (9/24-25/2011). So far, everything is working well. I just have to build one more set of legs and figure out how to bind them together. I'm thinking PVC so far...


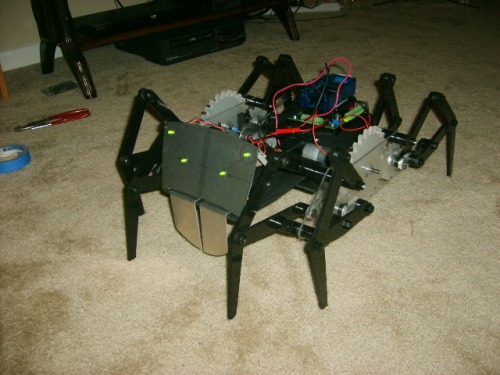
Update 10/23/2011: The picture at top shows my progress so far. I should be able to get motors installed this week (hopefully). I tried to hand-hold the motor and first set of legs for testing, but all hell broke loose because the motors have too much torque. That was quite interesting. Don't do that! I had to scrap the arm for now because of time constraints. I'll make that my project for next year. I still have to make it look all spidery, so I've got some artsy work to do.

Update 11/4/2011: Well, I finished but lo, it doesn't work. Maybe the motors are too small. Maybe there is just something jamming the mechanism. I don't know. Right now I'm too frustrated to mess with it. I'll have to strip it down and start putting things back on slowly to see what the problem is.

Walks around via remote control

  • Actuators / output devices: Polulu 37mm 1:131 gear motors
  • Control method: radio control
  • CPU: Dual TI MSP430
  • Power source: 7.2V 1500mAh RC battery
  • Programming language: C
  • Target environment: indoors/outdoors/small areas

This is a companion discussion topic for the original entry at https://community.robotshop.com/robots/show/mech-spider-fail-arrrgh

Nice work.

I’m very impressed by your hand-wrok with the plastics - it looks very clean.  One of my “works in (slow) progress” uses Klann linkages, so I’m glad to see the work you’ve done.  The Jansen linkage/mechanism is cool and sexy, but I like the Klann because you only need 2 linkages per “wheel” instead of 3.

What are you doing to pin the PE linkages together - a bolt and jam-nuts?

Pins

Thanks! For the pins, I use my old favorite - nuts and bolts with blue thread lock! If they become a problem, then I switch to red thread lock. But then if I want to change anything I have to start sawing things apart, so I avoid that as long as I can.

It’s cool to see machine

It’s cool to see machine with these gear operating chassis. cant wait to see your bot in action.

I can’t either!

I’d like to see it in action as well. I’m hoping I can get a motor on this set this weekend.

how are the legs mounted to the plywood chasssis?

Hi great job! Can you show us how are the legs mounted to the plywood chasssis?

How the legs are attached

The two leg modules are attached with 1/2" PVC pipe. I cut 4 PVC “T” connectors in half lengthwise, attached the “T” part to the inner walls of the leg modules, and connected the two units with the PVC pipe. The plywood acts as the robot deck and stiffens the structure enough to keep it from going wonky on me.

Amazing!

Are you planning on posting some video?

Great job!

Thanks!

Yes, I plan on adding some video after I get in moving. I’m waiting for some mounting screws for the motors. I can’t get the right size locally.

Nice! It’s good that you

Nice! It’s good that you post the failure video. That’s how we learned! Thanks for posting.

Did you try to lift it in the air? Does it work without weight? If its moving fine maybe you need bigger motor or try to down gear it for better torque.

Does it move when you lift it off the floor?

If it does I would expect there is not enough torque from your motors.  The first sprocket is quite large. You could possibly gear it down so the motor turns a small gear on the large sprocket.  It would be slower but it would move I think…

Good luck.

Lift test

Yes, I tried that and it helped, but I think that the gear ratio is just too big for the motor.

Dumb question perhaps?

Do you use any form of a hbridge or something? Or is it onboard on the TI board you’re using? because I cant see anything like that on your video…

H Bridges

The controller I’m using has four integrated H-bridges that run the motors. The circuitry is under the plastic shield. It was originally designed by the robot competition group (BEST Robotics) that the team I coach belongs to. I use it when I want a quickie robot because it uses radio control and I don’t have to spend a lot of time writing control code. BEST has since abandoned this controller and moved over the VEX Cortex controller.

This robot was 1 of 3 that

This robot was 1 of 3 that inspired me to make a walker. I too am going to use a Jansen style linkage. Though I’ve got different gearing on mine. I think the problem your having is you need stronger motors.

Thanks for the inspiration!


Plastic spider

We have plastic spider with same structure, i think you can use 9g servo as drive engine, it’s applicable on my one