

My First "non-kit" robot.
Ok so it's partly a kit. I am using the Tamiya tracked vehicle chassis and the dual motor 4 speed drive train but the rest of it is just scraps. I make the body from the bottom side of an old RC car I had laying around. It provides a nice battery box for 5 AA to run the Arduino and a built in On/Off switch. I am currently using another two AA batteries in the supplied housing for the Tamiya kit to run the motors. I removed the default switch for the Tamiya battery case and run the motor power through the built in power switch that controls the Arduino power source. Everything comes on when I hit the switch. I just purchased an adafruit SD shield to add to the mix to write the temperature readings to a text file. At some point I will add a wireless shield as well to write the data to a web page in the form of an XML document. I just need to figure out how to use it in conjunction with the adafruit motor shield that runs my motors and the servo that moves the ultra sonic sensor. I also need to mount the small servo on the front to hold the ultrasonic sensor. That is my next step. I will post more pics when complete.
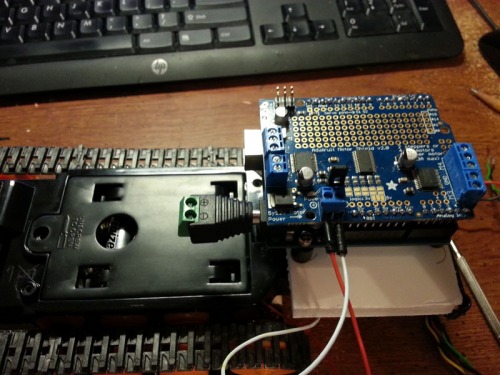
The arduino and shields will be mounted on the rear pad. It is just a piece of foam core glued to the chassis. I have another piece of plastic to act as a cover for the electronics once I have them complete.
11/29 - Moderate redesign will be required. In my continued search for a better way to do things without reading the manual, I did not realize that the 3v motors in the Tamiya gearbox will not work with the adafruit motor shield. It REALLY wants 5v or more motors. I have orderd two 6v size 130 motors from Pololu and as soon as they get here I will replace the stock motors with the higher capacity ones. If nothing else, the robot will move faster and make, I am sure, a MUCH more annoying whiney sound. These cheap plastic gear boxes are REALLY noisy. I will then need to figure out a new battery box for the motor power supply. Meanwhile, back to playing with my Legos Mindstorm until the new motors arrive.
12/5 - 6v motors arrived in the mail -check
Installed motors and soldered leads without melting anything important - check
Write sketch for arduino and adafruit motor shield v2 - check
Both motors run when sketch uploads - check
Now it gets annoying. Both motors do indeed run forward and backward when asked but they are NO WHERE NEAR in synch. Are there any ardiuno gurus out there who would be willing to look at my code and give me an idea of what might be wrong? I am using 9v (6xAA) for arduino power and 7.5v (5xAA) for motor power. One motor starts and about .5 seconds later, the other starts. My robot runs in curves. If anyone is interested in offering advice I will post the code (if someone will let me know the proper place to do such things.) Thanks.
12/5 continued - Here is the code I am testing with. It is just an expansion of the example code and should make both motors speed up forward, stop, speed up backward, stop, and repeat. Both motors do what is expected but one starts about .5 seconds before the other and it pulls my robot into a curve. I am not sure how to compensate for that in the code.
<code>
/*
This is a test sketch for the Adafruit assembled Motor Shield for Arduino v2
It won't work with v1.x motor shields! Only for the v2's with built in PWM
control
For use with the Adafruit Motor Shield v2
----> http://www.adafruit.com/products/1438
*/
#include <Wire.h>
#include <Adafruit_MotorShield.h>
#include "utility/Adafruit_PWMServoDriver.h"
// Create the motor shield object with the default I2C address
Adafruit_MotorShield AFMS = Adafruit_MotorShield();
// Or, create it with a different I2C address (say for stacking)
// Adafruit_MotorShield AFMS = Adafruit_MotorShield(0x61);
// Select which 'port' M1, M2, M3 or M4. In this case, M1
Adafruit_DCMotor *myMotor = AFMS.getMotor(2);
Adafruit_DCMotor *myMotor2 = AFMS.getMotor(1);
// You can also make another motor on port M2
//Adafruit_DCMotor *myOtherMotor = AFMS.getMotor(2);
void setup() {
Serial.begin(57600); // set up Serial library at 9600 bps
Serial.println("Adafruit Motorshield v2 - DC Motor test!");
AFMS.begin(2000); // create with the default frequency 1.6KHz
//AFMS.begin(1000); // OR with a different frequency, say 1KHz
// Set the speed to start, from 0 (off) to 255 (max speed)
myMotor->setSpeed(50);
myMotor2->setSpeed(50);
myMotor->run(FORWARD);
myMotor2->run(FORWARD);
// turn on motor
myMotor->run(RELEASE);
myMotor2->run(RELEASE);
// turn on motor
}
void loop() {
uint8_t i;
Serial.print("tick");
myMotor->run(FORWARD);
myMotor2->run(FORWARD);
for (i=0; i<255; i++) {
myMotor->setSpeed(i);
myMotor2->setSpeed(i);
delay(10);
}
for (i=255; i!=0; i--) {
myMotor->setSpeed(i);
myMotor2->setSpeed(i);
delay(10);
}
Serial.print("tock");
myMotor->run(BACKWARD);
myMotor2->run(BACKWARD);
for (i=0; i<255; i++) {
myMotor->setSpeed(i);
myMotor2->setSpeed(i);
delay(10);
}
for (i=255; i!=0; i--) {
myMotor->setSpeed(i);
myMotor2->setSpeed(i);
delay(10);
}
Serial.print("tech");
myMotor->run(RELEASE);
myMotor2->run(RELEASE);
delay(1000);
}
</code>
12/13/13 - New Update. Here are the brains of the operation...
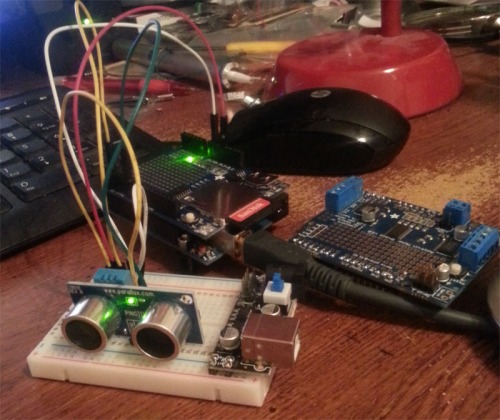
I have encapsulated the routines for getting distances and for getting temperature and humidity information into functions and have figured out the basic algorythm for my sketch. It drives while looking for obstacles to avoid. At 3 minute intervals it pauses to take a temperature/humidty snapshot of its surroundings and writes the data to a text file. The text file is in the form of an xml document. I can use that data source to build graphs, etc of the average temperature of my house. My next step is to find a thermostat that hooks up to the internet that I can hack to read the XML document and use that info instead of its own thermometer to turn the heat on and off. Someday I would like to get some kind of vent controls so that the info my robot generates can open and close heater and AC vents in individual rooms. I hate it when my work room is freezing cold and the thermostat says the house is 70 degrees and turns the heat off. :). I am about to decide that I need to mount the temp sensor on a long telescoping extension so that it will not be affected by the heat that the robot generates. Something like an accordian fold extender that goes up two or three feet, takes readings, and then telescopes down to move to the next location. Who knows.
obstacle avoidance, data (temperature) It travels a random path around my house recording the temperature in different rooms.
- Actuators / output devices: 1:200 Tamiya gear box for the tracks and a mini servo for the ultra sonic sensor
- Control method: autonomous
- CPU: arduino uno
- Power source: 7.5 v (5 x AA batteries) for the Arduino/sensors and 3 v (2 x AA batteries) for the motoros
- Sensors / input devices: ultra sonic PING sensor, temperature probe.
- Target environment: indoors
This is a companion discussion topic for the original entry at https://community.robotshop.com/robots/show/inaugural-robot


