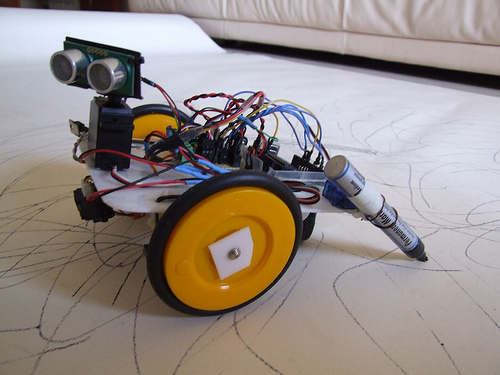
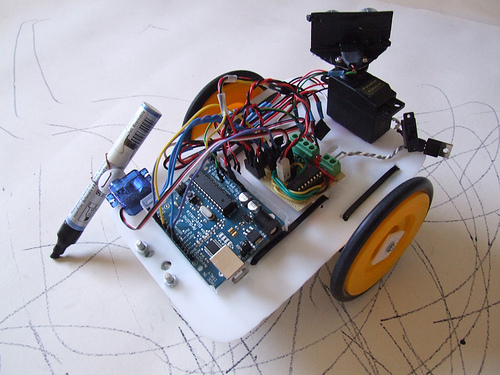
While coding new interactivity into this robot, and trying to achieve more control on the way it moves, I though it would be cool to see what happens if I mount one little servo to hold a pen, and tell him to write 'LMR'.
The idea came from this challenge... and I thought I could give it a shot.
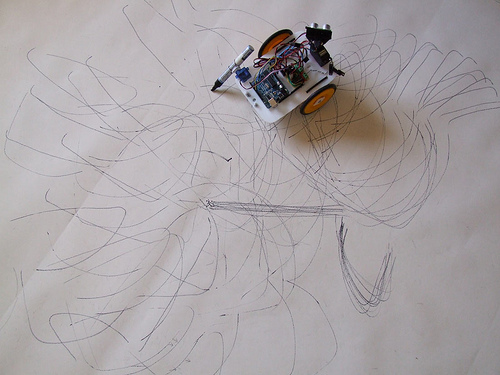
The result was far from what I expected. The pen is not centered on the chassis.. the correct position for the pen would be exactly between the wheels..
If the pen was in the chassis center the result would be accurate!! I still can´t keep 90º angles everytime I move on to the next letter! :)
At the same time it was nice to see this little creature drawing lines on its own :)
What you all have failed to realize though is that the little bot has drawn a composite 3 layer PCB trace which would flash LMR across a 64 X 32 LED sign. Wow!
That’s give BOA a run for his money
BTW - what did you use for your video editing software & annotations & how did you do the time-lapse?
I like your pen mechanism. AND no umbilical!! If this ever works, it doesn’t give me much time to prepare my counter-offensive!!
Your pen is off centred. So’s mine. That’s why it takes about 3 moves to do a right turn. Look closely. I penup, reverse so the end point is under the centre of the wheels, rotate 90, then forward the length of the chassis before pendown again.
You might try the same. Do you know anything about 2D computer graphics? It’s called “translation.” You translate to the origin, perform the function (rotation, etc.) then translate back to where you want to be.
Yes it would take 3 times to Yes it would take 3 times to move before penDown!!! At the moment I thought it would be extensive coding, but now I think I can do it another way.
I will give it another shot!
I think Translation in 2D, and 3D software is when you change the canvas offset, and your operator stays in the same position. In this example, we would use Rotation to rotate 90 degrees, and Translation to move to the next letter.
The pen system I used works very well … Will post a close up picture later…
Normally to perform an operation, we translate the object back to the origin. In my case, the "origin" (notionally the top-left of the canvas) changes at the start and end of each line, if you like. I believe this is the way vector graphics works.
there are some softwares there are some softwares that apply the terms Translation and Rotation to the canvas instead of the object… for example Processing language apply Translation to all the canvas, and the object remains in the same place in 3D Studio Max it is the oposite, the Object translates but the canvas remains in the same place…