Alfred the butler bot *Advanced*

New Post

I have added this robot to my personal website. I would like to share with everyone that is interested. The website is a portfolio of all my major projects for the past years.
www.secondrobotics.com

Project update *March 3rd 2011" I got the drink pouring system installed and tested, still a long way from a complete robot as I need to get a array of ultrasonic sensors and IR so it can navigate though the house without the laptop if needed.
http://i155.photobucket.com/albums/s291/ollopat/DSC03481.jpg

““old first post below””

Well its been a bit since I posted though I have a nifty new project, it will be my most ambitious to date that’s for sure, I just ordered a few days ago a 16inch zagros robotics base with three lvls and two 10 inch riser sets,

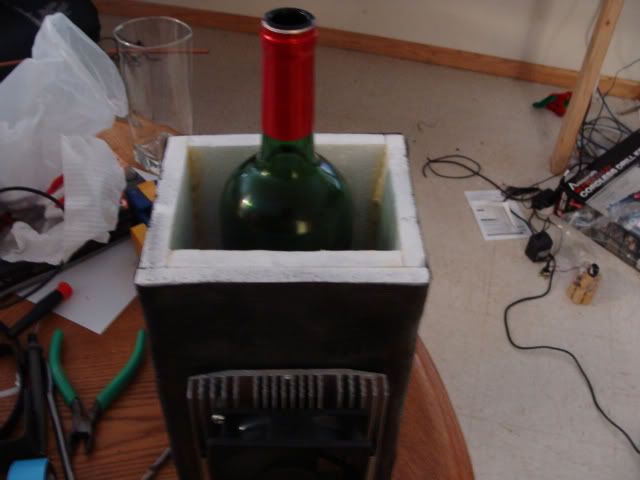
So the project will be to make my very own butler bot, I will call him Alfred and it shale be that. So far Ive got a TEC fridge made for it to cool wine down to a nice serving temp of 43-47 degrees F. I also found a nice window washer pump to pour the wine or other beverage into a glass that I will probably detect with a IR sensor. below are some pictures of what I have so far, He will be carrying a vaio laptop and a web cam for on board video processing, with a Arduino mega for the lower lvl sensor interfacing and motor control.

http://i155.photobucket.com/albums/s291/ollopat/DSC03334.jpg http://i155.photobucket.com/albums/s291/ollopat/DSC03344.jpg

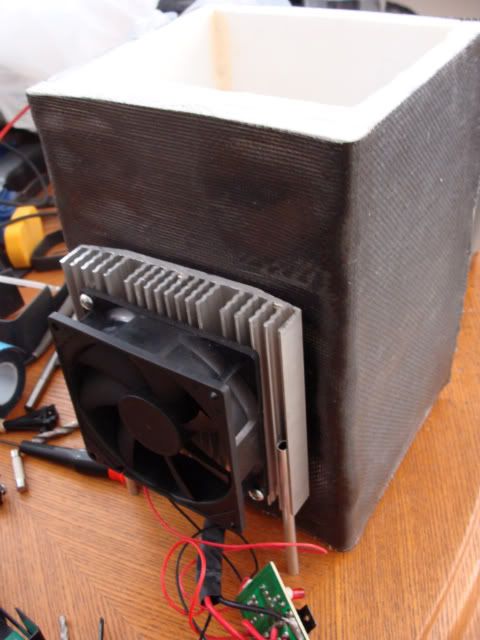
Here is the TEC mini fridge it uses a 50watt pelter and its made with Styrofoam and a layer of carbon fiber, it cools a 12oz soda in about an hour

http://i155.photobucket.com/albums/s291/ollopat/DSC03337.jpg

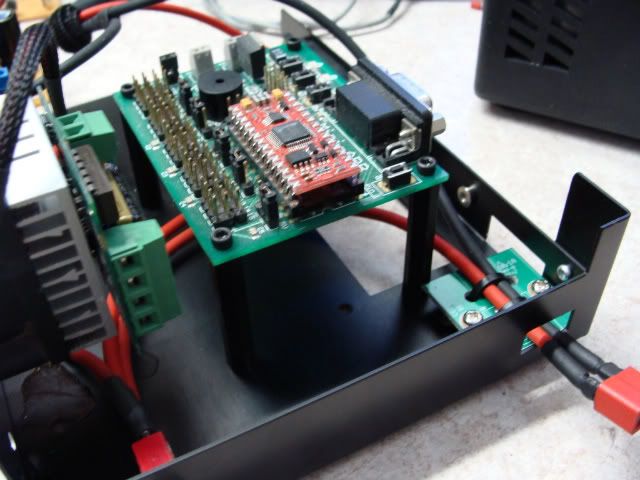
Here is the motor controller I will be using its a Sabertooth 2x5 with a upgraded heat sink and fan, The fan is from a ram cooler and runs off the 12volt system

http://i155.photobucket.com/albums/s291/ollopat/DSC03339.jpg

These are the Antec speakers I plan to use for the robots sound system this should also allow it to speak and play music

http://i155.photobucket.com/albums/s291/ollopat/DSC03345.jpg http://i155.photobucket.com/albums/s291/ollopat/DSC03351.jpg

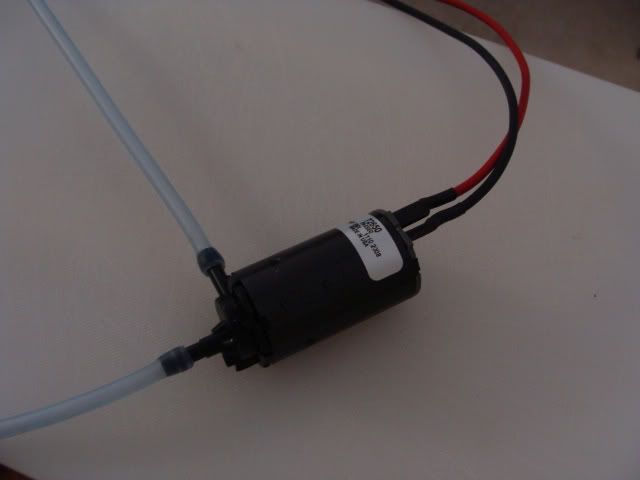
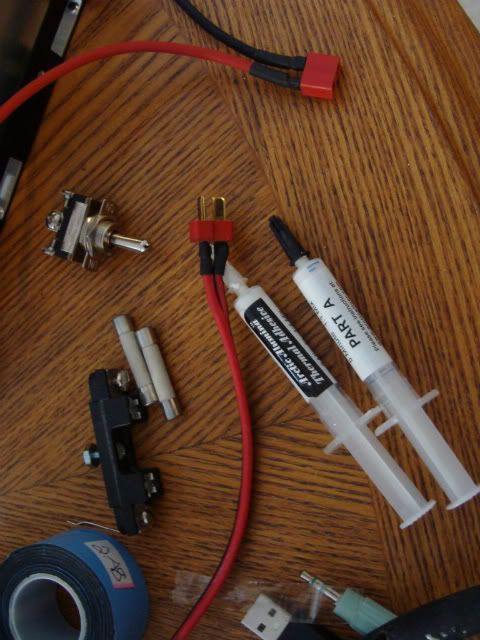
I found a 16 dollar window washing pump at my local auto shop and added silicon tubing. it works like a charm Ive already force fed myself Amp with it. also a few random parts i will use in construction a 10amp switch, 8 amp slow blow fuses, as well as thermal epoxy i already used on the motor controller and fridge.

Feel free to ask me any questions I have did what i can atm till the base arrives.

DoC

I got a prototype of the drink pouring system all rigged up today and I think i got the program stable, I wish to have the processor sleeping most of the time then wake up to a interrupt and put less delays in it but for now it checks if there is a cup as a close distance to the IR sensor then checks again in 1.5sec then pours a drink.

Here is some code let me know any good ways to improve it please I always a noob at programing eff.

Main: my_input var Word ADIN p19, my_input debug [DEC my_input,13] pause 20 if my_input > 291 then pause 1500 ADIN p19, my_input if my_input > 291 then SERVO 13, 1000 pause 5000 'perfect for water /wine SERVO 13, -100 else gosub Main endif pause 5000 endif goto Main

Here is a link to the video of it working

facebook.com/#!/video/video.php?v=1433201368659&comments

I cant see the video, probably due to your securetyconfiguration

I fixed the security on the video I think so you should be able to watch it now also I took a pic to get an idea of it if you cant see the video

http://i155.photobucket.com/albums/s291/ollopat/DSC03368.jpg

It works really well I added the cover on since the making of the video to keep more of the cold air in it can swing away as I added a dowel to one side for larger/taller containers
Ive been testing battery life and got about 40mins out of the TEC mini fridge before the battery’s dropped below 3volts each, At this time the pump does not even kick on :frowning: I’m using li-ion laptop batteries rated at 2200ah so the battery pack is about 12v at 4400ah I plan to buy two more packs to get a total of 13200ah or 13.2ah out of a pack.

DoC

Just a new small update. I found that the tube dripped a bit after pouring a drink so I needed to come up with a cheap, easy and small drip tray to use for the robot, I thought about it a bit and came up with using a 80mm case fan gutted and wire frame cover, I added a sponge inside to absorb most of the liquid. and a sensor housing to the side to be on the look out for thirsty people. Pictures of this small add-on below…

http://i155.photobucket.com/albums/s291/ollopat/DSC03380.jpg
Servo tape FTW

http://i155.photobucket.com/albums/s291/ollopat/DSC03382.jpg
The cup shot in action…

DoCDoC

Well The base should be here tonight but I did get in a few of the other goodys I plan on using on it, First up i needed a hub for all the things i wanted to plug into the laptop so i got a Belkin powered 5 port usb 2.0 hub I needed to power it so I whiped up a down and dirty 5v regulator that will put out 1.5Amps, I plan on changing to a DC-DC converter in the future but for now it gets hot and does what i need it to do. having the hub powered by the robot batterys means i can run the laptop longer and charge phones and I-Pods from the top deck,

http://i155.photobucket.com/albums/s291/ollopat/DSC03409.jpg http://i155.photobucket.com/albums/s291/ollopat/DSC03405.jpg

I got a track ball as I wanted a better on-board way to control the laptop so a track ball fits the bill as I can mount it if i need and It will take up less room then a mouse and mouse pad

http://i155.photobucket.com/albums/s291/ollopat/DSC03401.jpg

The down and dirty voltage regulator for powering the usb hub. I apologize for the radioshack breadboard its what i found laying about :frowning:, I do have the two decoupling caps in smd form on the underside for you out there thinking you should go without them. I also put a 1000uf 16v cap for good measure, the regulator and cap I found off a scrap electronic gadget stored in the closet :stuck_out_tongue: total cost 2 dollars maybe

http://i155.photobucket.com/albums/s291/ollopat/DSC03406.jpg http://i155.photobucket.com/albums/s291/ollopat/DSC03410.jpg

This is my new favorite sensor it is a Microsoft kinect. I plan on putting on there once I find a way to supply the 12v 1.08A it req’s, This thing is a amazing device Its more or less a IR camera with a IR projector, so the robot will be able to navigate at night. As well as it has a accelerometer, sound sensors, a regular web cam, a motorized tilting base and a nifty controllable led on it. All this for 150bucks witch is a steal for the depth map it produces for objects in its view, The Tank is my new favorite training tool for the roborealm software to recognize objects.

That’s it for now the base should be here today so I can show you a much better all in one of these components on the base

DoCDoC

I got the base in and installed the motor controller, micro controller, power switch, charge port, fuse and the down and dirty regulator

http://i155.photobucket.com/albums/s291/ollopat/DSC03423.jpg

http://i155.photobucket.com/albums/s291/ollopat/DSC03427.jpg

here’s with the basic-atom pro/bot board, mounted. I plan to upgrade to the arc 32 or a Arduino a bit later

http://i155.photobucket.com/albums/s291/ollopat/DSC03441.jpg

Installed the belkin 5port hub

http://i155.photobucket.com/albums/s291/ollopat/DSC03443.jpg

Alfred rocking out with Pandora

K there is the project so far feel free to ask me any questions

DoCDoC

I’ve start self teaching myself roborealm, so far I’ve ran a few small programs that detect motion then the robot speaks “Hello. I’am Alfred. The butler of this fine residense. If you need anything just ask.”. I found a nice uk voice for it named brian though its a 30 day trial so in 28 days or so I will need to decide if I would like to keep it. Im close to coming up with a serial comunication protocal to interface with the basic atom pro. I also need to buy some relays so I can control the TEC chiller and pump for the drink serving system.

DoCDoC

I ordered a dual solid state relay made by phidgets “3053 - Dual SSR Relay Board” This will have a bit longer life then two regular relays. This will allow the micro controller to switch on and off the pump and TEC chiller, completing the drink serving system on board. The relay board has nice holes for standoffs and screw terminals witch I’m trying out on this robot as a main hook up as to allow for multiple configurations to be made and to take for other projects when that time comes. I could not just get away from the site ordering one relay board so I grabbed a nice 5.5inch dome that I may use for a smaller project soon. Also some sad news I overloaded my down and dirty 5volt regulator with the usb hub, speakers and such sob so I will be needing to pick up a DC-DC converter in a few weeks prob go with the three amp “Simple Switcher Power Module - LMZ14203 Breakout” from Sparkfun as its got a nice selector switch for 5 or 3.3 volts out and a nice input range. Thats it until the relay board comes in then I will show you the robot pouring me a glass.

DoCDoC

I relay board came and I quick wired it about a week ago. It works very well and it turns on and off the TEC and pump via programing commands as you would expect. I have just not got around to posting, I have yet to hard mount much to the base as I think its better to see placement so everything will fit, I cut the hole for the bottles to fit into the TEC chiller and have served wine to my wife with it, the overall first try with the robot worked well problem was I failed to clean off the silicon tube correctly. So when making the hole small pieces of abs plastic ended up in a glass or two, lesson learned there “clean hose before use, also run water though at the end of use”

http://i155.photobucket.com/albums/s291/ollopat/DSC03481.jpg

This is a picture of the tube routing and a mock wine bottle placed in.

http://i155.photobucket.com/albums/s291/ollopat/DSC03549.jpg

Here is the fancy tube holder for keeping it in the right place for pouring into a glass, its made of 5 ply wood and carbon fiber with a piece of heat shrink holding the tube in place, It was about what I envisioned when I started constructing it. Its held in place via servo tape.

http://i155.photobucket.com/albums/s291/ollopat/DSC03550.jpg

I found that the tubes route nice though the USB hub so less holes in the bases. That’s what progress I have so far I’m currently charging the pack for a demonstration video I will try and make it a bit longer then before and explain a bit more.

DoCDoC

Here is a video below of a use of the drink system, The TEC works I just wanted to have more tea then it can serve.

s155.photobucket.com/albums/s291 … V03556.mp4

Specs of the robot

weight 26 pounds

Features:
Drink pouring system(onboard TEC chiller)
Pandora radio
charging system for I-pod or phone(anything that uses usb to charge)
on board robo-realm navigation and higher lvl processing

Future upgrades:
5 volt DC-DC converter
bigger battery pack for longer run time
sensor’s and lots of em so that the base can navigate with out the laptop if needed
remote docking to charge

Hope you like the video, please feel free to ask questions or leave comments

DoCDoC

That’s an awesome bot! I’ve been working on my own “robot butler” even though I no where near where yours is!

forums.trossenrobotics.com/showt … bot+butler

The posts extremely old and really only the first few picture are accurate I “scrapped the rest of the design” . Now I’m using pvc and it looks a lot better :slight_smile:

I noticed you where working on a serial protocol; I wrote a lengthy/poorly written tutorial for arduino but the core concepts might apply to your project as well:

forums.trossenrobotics.com/tutor … rial-3300/

I used this technique for my new butler version 3.0 and it works great. Keep me posted on your progress I would love to see a video of it driving around navigation on it own.