

Servo Magazine's Review of the Lynxmotion Quadrino Nano


We've had the pleasure to read in the October issue of Servo Magazine a glowing review of our Lynxmotion Quadrino Nano. We're sharing some excerpts and images of the article with you today.

There is a plethora of flight controllers on the market. Some tout their small size and low cost. Others offer advanced flight planning functionality. Yet others aim to target the true tinkerer with open source firmware that can be hacked to add features. I was thrilled when RobotShop offered to let me evaluate their Lynxmotion Quadrino Nano flight controller module. This flight controller hits many of the check boxes for most hobbyists in a tiny package. Let's unbox and install the Quadrino on our homebuilt quad, and play with some of the settings to get into the air. The Quadrino is a pretty powerful little flight controller, packing an ATmega 2560, inertial measurement unit (IMU), barometer, and GPS on board. The flight controller also offers plenty of expansion ports. There are I/O headers to interact with the ATmega, and two I2C and three UART ports exposed! Everything from sonic rangers to camera triggers could be attached to these ports.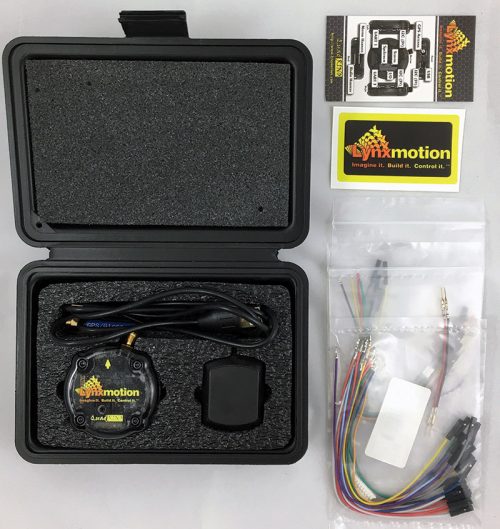 Photo courtesy of Servo Magazine
I have to say, that the attention to detail in the packaging was really nice, and it’s good to know when switching out flight controllers for testing (as often happens), there is a safe place for the Quadrino to live.
[...]
Photo courtesy of Servo Magazine
I have to say, that the attention to detail in the packaging was really nice, and it’s good to know when switching out flight controllers for testing (as often happens), there is a safe place for the Quadrino to live.
[...]
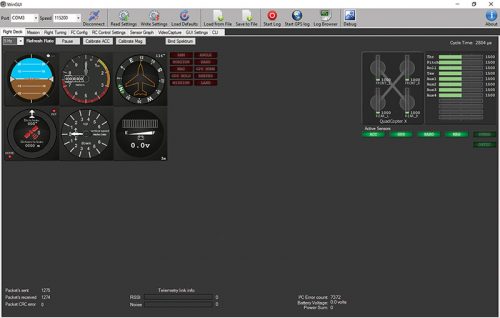 Photo courtesy of Servo Magazine
[...]
Photo courtesy of Servo Magazine
[...]
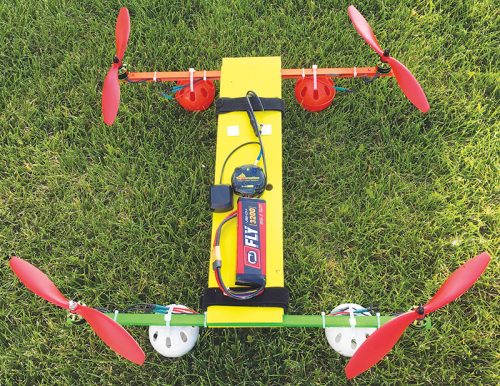 Photo courtesy of Servo Magazine
[...]
Photo courtesy of Servo Magazine
[...]
Reprinted by permission of T&L Publications, Inc. - Read the full article here. Originally written by John Leeman.

There is a plethora of flight controllers on the market. Some tout their small size and low cost. Others offer advanced flight planning functionality. Yet others aim to target the true tinkerer with open source firmware that can be hacked to add features. I was thrilled when RobotShop offered to let me evaluate their Lynxmotion Quadrino Nano flight controller module. This flight controller hits many of the check boxes for most hobbyists in a tiny package. Let's unbox and install the Quadrino on our homebuilt quad, and play with some of the settings to get into the air. The Quadrino is a pretty powerful little flight controller, packing an ATmega 2560, inertial measurement unit (IMU), barometer, and GPS on board. The flight controller also offers plenty of expansion ports. There are I/O headers to interact with the ATmega, and two I2C and three UART ports exposed! Everything from sonic rangers to camera triggers could be attached to these ports.
UNBOXING
After UPS dropped off the box at my doorstep, I immediately cut into it and was surprised to find a hard plastic case inside. Yes, the nano comes packaged in a hard case with custom foam inserts! This was instantly a treat compared to the crushed cardboard boxes our electronics so often show up in. Inside the box is a set of cables for the drone, USB micro cable, GPS, a few tools, double-stick tape, flight controller, connector chart card, and Lynxmotion sticker. Photo courtesy of Servo Magazine
HOOKUP
Like any other flight controller, the Quadrino takes signals from an RC receiver module, interprets them, combines the control inputs with the state data of the craft, then effects changes in the motor control outputs to modify the craft’s attitude. This isn’t all that dissimilar from commercial “fly-by-wire” systems in which pilots no longer manipulate the control surfaces of aircraft, but provide inputs to a flight control system that maintains the stability of the aircraft during the maneuver and eases pilot strain. To get our flight controller up and running — at a minimum — we need to connect it to the RC receiver and electronic speed controllers (ESCs). [...] Here, we set what flight mode the system will operate in and how the system is armed. I used a three-position switch on my controller to set the flight mode, and a two-position switch to arm and disarm the system. The online instructions indicate that a stick pattern is used to arm the flight controller — much like the original OpenPilot system. However, I believe that is a relic of past firmware as it did not arm the current system. As far as flight modes go, I elected to operate in angle + mag mode by default. This is similar to the stabilized mode of the Parallax ELEV-8 — an easy-to-fly configuration. I used a magnetic heading mode as one, which should hold the craft in a constant magnetic heading (unless acted upon by the yaw control) and land. I did really like that you could see the position of each switch on the controller via the color changing boxes. This made it easy for me to confirm which mode would be active with which switch position. Note that when settings are changed, the outline of the box turns orange, indicating that the settings have not been written to the flight controller. Make sure you save and write these settings! Before flying, we also need to calibrate the accelerometer and magnetometer in the Quadrino. This is done with buttons on the Flight Deck panel. Photo courtesy of Servo Magazine
FLYING WITH THE QUADRINO
Now that everything is calibrated and properly set up, you should see a flight deck display that shows the orientation and heading of your craft accurately, and moves appropriately if you tilt or rotate the craft. (A common point of confusion is the artificial horizon. Remember, the brown represents the ground. So, in a right bank, the right side of the indicator will rise.) [...] The overall flying experience with the Quadrino is very pleasant. It flies nicely, but suffers some from the slightly complex setup and lack of auto control range sensing (hence, all of the trimming). With an improved firmware configuration and ground station software, it would be an even better product. Photo courtesy of Servo Magazine
CLOSING THOUGHTS
In the end, I thought the Quadrino was a really nice product with a very small form factor. It’s lightweight and has lots of versatility for the hacker/maker.Reprinted by permission of T&L Publications, Inc. - Read the full article here. Originally written by John Leeman.
Thanks for helping to keep our community civil!
Notify staff privately
You flagged this as spam. Undo flag.Flag Post
It's Spam
This post is an advertisement, or vandalism. It is not useful or relevant to the current topic.
This post is an advertisement, or vandalism. It is not useful or relevant to the current topic.
You flagged this as spam. Undo flag.Flag Post
✅ Your Post Has Been Submitted Successfully!
Your post is currently under review by our moderation team. The review process usually takes up to 48 business hours.
You can track your post's status in the "My Content" section of your profile. Once approved, it will be published and visible to others.

Thank you for contributing to our community!