Make Your Own Arduino-Powered Deskbot Pal: Lesson 6 – Going Further

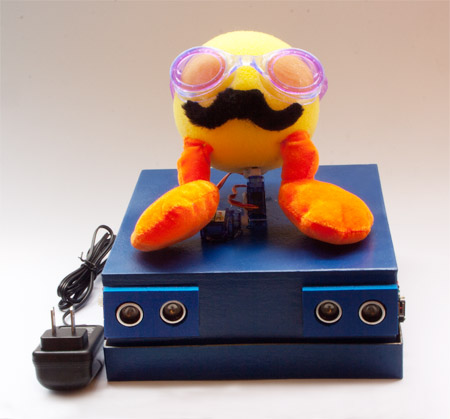
 Completed Desktop Pal
Getting the File Downloads
Download the sketches for this installment, and extract the individual folders to your Arduino sketchbook.Important! You must also download and install the Arduino libraries (see link above), required by the sketches in this installment. All of the libraries required to run the sketches for the Desktop Pal series are provided in this single download.
Remember When adding new libraries, you must exit the Arduino IDE if it is open. Once you have copied he library files to the Arduino sketchbook libraries folder, you may restart the Arduino IDE.
If you’d like to add the optional MP3 player to your Desktop Pal, download the sounds archive, and extract the contents into a micro SD card (formatted for FAT filesystems). Read below for additional information.Room to Grow
Desktop Pal already includes a bunch of external hardware:- Two servos for head pan/tilt;
- Two ultrasonic rangers, for detecting the distance and approximate location of objects in front of it;
- Pushbutton switch, that provides a “sleep” mode setting, effectively turning the Pal on and off without unplugging it;
- Passive infrared (PIR) detector as a general motion alarm;
- Electronic buzzer, for making rudimentary sounds.
Signal Pins
Unless you get fancy and add port expansion hardware, you’re limited to adding no more than about 10 new things, possibly fewer if the add-ons require more than one signal pin. This limitation comes down to the available pins, which are Digital pins 0, 1, 4, 7, and 12, and analog pins 0 through 5.Note Digital pins 0 and 1 are used for hardware serial communications. In the Arduino Leonardo, there are two “channels” of serial communications: a direct USB channel used to communicate from the host PC, and a second “Serial1” channel used to communicate with hardware on digital pins 0 and 1.
Location of Pins
If using the Itead Leonardo (and most other Leonardo-compatible boards), make note that several specialty hardware functions are placed on different pins than those used for the Arduino Uno board. For more details on the Itead Leonardo, refer to the manufacturer’s hardware guide.Current Load
You must also consider the total power draw from all of the hardware you add. When powered by the USB connection, used for sketch uploading, the total power draw of all components must be 500 milliamps (mA) or less – this is the maximum provided by USB 2.0 ports on most computers. (This limit is also imposed by a resettable fuse on the Itead Leonardo. If you go over the 500 mA limit, this fuse will open, to prevent damage. The fuse will automatically reset once the overcurrent condition is removed. Generally, heavy current loads tend to be a problem with electromechanical devices such as motors, as well as ultra-bright LEDs and LED strips. Exercise care when adding these. Most sensors do not consume much current. In all cases, consult the documentation that comes with the hardware to determine its electrical requirements.Processing Load
The Arduino-compatible microcontroller used with the Desktop Pal is single thread, meaning it can do just one thing at a time. This thread is managed by the loop() function in the sketch. Inside the function are numerous short-term actions – because they take place very quickly, it gives the impression that the robot is doing many things at once. The more jobs that must be done in the loop() function, the more bogged down the processor can become. When adding additional hardware, be mindful of the processing overhead required. For example, A sound module that requires constant feeding of data to output a music clip may rob considerable processing time, leaving less opportunity for other functions, such as servo scanning. As you’ll see later in this installment, there are all-in-one sound modules that don’t require constant data shuffling between it and the Arduino. Such self-contained modules are vastly preferred over those that require constant supervision from the Arduino.More Input, More Input!
Robots love input. The more sensors a robot has, the better it can detect its environment. Desktop Pal already uses three types of sensors: a pushbutton to set its operating mode; a passive infrared sensor to detect general motion in the room, and a pair of ultrasonic sensors to “see” objects in front of it. You can augment these sensors with other types, each of which brings its own unique method of detection. Low-cost options include:- Photocell light sensor to register the presence (or absence) of light in the room. One use of this (or any light) detector is as an “AM/PM” sensor, where the Pal reacts differently depending on the room light. For example, in a darkened room, your Desktop Pal might return to sleep mode more quickly.
- Temperature and humidity sensors turn your Desktop Pal into a chief meteorologist. Combined with a Bluetooth or WiFi module for remote communication, you could transmit this data to your computer or smart phone. Or take readings once every 10 or 15 minutes, and store them in the Arduino’s EEPROM memory for later recall. The data remains, even if the Desktop Pal is unplugged, until you reset it.
- RFID sensors allow identification of people and objects, such as cats or dogs. Attach an radio frequency identification (RFID) detector to the Desktop Pal, so it can tell one friend from another. Place a matching RFID tag next to the detector, and the Pal uniquely identifies the bearer of that tag. Key fob tags attach on key rings or pet collars, and are easily portable.
- Biometric sensors record things about you, such as your heart rate or muscle action. The data can be stored inside EEPROM memory, or transmitted to a nearby computer or smart device. Bio sensors tend to be among the more expensive of the lot, but they’re fun to play with.
- Sound sensors give your Pal the ability to hear. Many of these are basically microphones that trip when the sound reaches a certain decibel level. They’re mainly useful for when the Desktop Pal is asleep; the sensor will pick up the sounds of the Pal’s motors and electronic buzzer when the robot is awake and whirring.
Lights and LEDs
One inexpensive way to customize your Desktop Pal – or any robot – is with lights. Add some flashing colored lights and the project seems to come alive! There are three principle light components you can add to your Pal, light emitting diodes (LEDs), laser, and electroluminescent wire.Adding LEDs
LEDs are the least expensive method of adding light effects. There are many options. First and foremost is color. LEDs are available in all colors, even white. An RGB LED can produce each of the three primary colors – red, green, and blue – and therefore produce a rainbow of hues by adjusting the intensity of each of these three primary colors. Though the actual light emitting element in a LED is quite tiny, LEDs come in a variety of sizes, from a tiny 1mm pinpoint, to 10mm or even larger. Size is not necessarily equivalent to brightness. The larger LEDs are typically used as indicators rather than illumination, so they’re not always very bright. One use in a robot like Desktop Pal: big, soulful eyes. Over the years, light emitting diodes have gotten brighter, to the point where looking directly at one of the “super-bright” LEDs can hurt your eyes! High brightness often comes at the expense of higher current draw – some of the very brightest LEDs draw more than 40 milliamps of current, and that’s the maximum safe level provided by the Arduino. With higher currents you run the risk of damaging the microcontroller. To effectively operate LEDs with high current demands, you must wire them up using a transistor or other circuit that boosts the current capacity. Avoid connecting them directly to the Arduino. Gaining in popularity over the last few years is the multi-LED strip of RGB LEDs. Though the entire strip of dozens or more LEDs uses only a few wires, each LED in the strip is individually controllable; the LEDs are “addressable” by means of a fast serial signal that is transmitted down the strip. While multi-LED strips are a handy way to add all kinds of nifty light effects to your robot, they place an increased processing load on the Arduino. The more LEDs in the strip, the higher the processing demand, and less time there may be for the Arduino to conduct other important business. In a project like Desktop Pal, where the microcontroller is kept fairly busy with servo movement and the various sensors, you may be better off using regular LEDs that you individually control from separate signal pins.Adding Lasers
Lasers provide a pencil-thin beam of light that can be used for decoration, signaling, or getting attention. Now, I’m not talking about the high-power lasers used to cut metal, wood, or paper, but the same kind used in laser pointers. You can attach a laser pointer to your Desktop Pal, or better yet, hook up a laser module that’s specifically designed for use in hobby projects. For example, the TTL Laser Red Diode is a self-contained laser that can be powered from the Arduino’s 5V regulated supply. It has three wires: red and black for power, and yellow for control. You can turn the laser on and off simply by bringing its control wire HIGH or LOW. The control signal of the TTL laser can be driven at up to 50 kHz, fast enough to send coded signals through the beam of light. Point the laser into a phototransistor across the room, and you can capture and decode those signals as a form of remote control.Adding Electroluminescent Wire
Electroluminescent wire – or EL wire, for short – provides a ribbon of colored light. To use EL wire, you need the wire itself, and an inverter. The inverter takes the incoming supply power, and converts it to the much higher voltage needed by the wire. The inverter modules aren’t expensive, and come in different input voltages: 3V, 5V, and 12V are common. Because of current limitations inherent in the Arduino boards, you’re best off using a separate power supply to operate the inverter. For example, the 12V inverter can be operated from a separate 12V wall adapter. EL wire is available in long spools, where you cut to length, or in precut coils. If you’re just starting out with EL wire, opt for the precut coils that have already been terminated with connecting wire. These are a lot easier to hook up to the inverter – just stick the wire in, and turn the inverter on. Once you get the hang of using EL wire, you can learn how to splice electrical terminals to it. The process is not difficult, but it’s best done with specialty tools, and takes some practice to create an air-tight splice. EL wire comes in various colors. Get several hues that you like and snake the wire around and under the Desktop Pal. Standard wire is ideal for darkened rooms; in higher ambient conditions opt for the high brightness wire.Enhancing Your Desktop Pal with MP3 Sounds
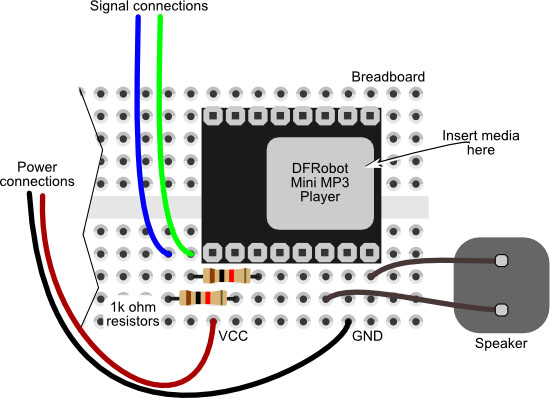
Another way to upgrade your Desktop Pal is with a self-contained MP3 player. The player has its own micro SD flash card containing the music and sound effects clips you wish to use. Under the control of the Arduino, specific clips are played as the response to different sensor inputs. There are numerous self-contained MP3 player modules available; for price and adaptability to the Desktop Pal project, I’ve selected the DFRobot Mini MP3 Player. Connecting it to the Itead Leonardo used in the Pal requires just a few extra parts and connections. Thanks to a utility library provided by DFRobot, operating the player requires just a few extra lines of code. Parts you’ll need: 1 DFRobot Mini MP3 Player 1 Micro SD card 1 Solderless breadboard, 400 tie points 2 1K ohm resistors 1 PC mount speaker 1 Jumper wires. You may have some jumper wires remaining from the original set you got for the basic build in Lesson 1. You'll need a total of six more. The Mini MP3 Player needs a small solderless breadboard as a way to interface it to the microcontroller. Refer to the hookup diagrams for connecting everything to the Itead Leonardo. Breadboard connections for Mini MP3 Player
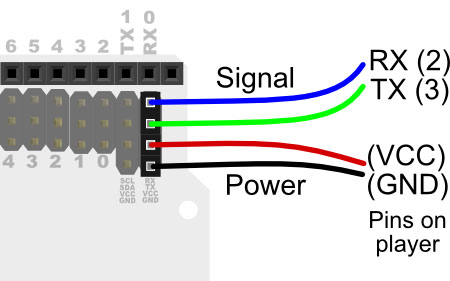
 Itead Leonardo connections for Mini MP3 Player
 Speaker mounted to back of Desktop Pal
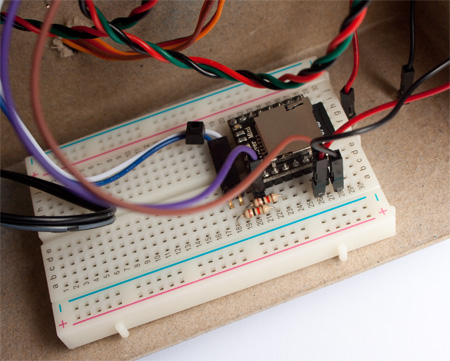
 Breadboard for the MP3 player
Important! After installing the libraries files, exit the Arduino IDE if it’s open, and restart it. Otherwise, the IDE may not be aware of the newly added libraries, and any sketches you attempt to compile that use the libraries may fail.
You will need some MP3 sound files to test the MP3 player. I’ve provided a set of short public domain sound effects clips, obtained from freesound.org, for you to use until you can round up your own music and sounds. Download these files from the link at the beginning of this installment, and place them into a micro SD card. Whatever card you use, be sure it is formatted for the FAT file system.Important! The MP3 clips must be located in a main folder named mp3. For best results, organize your SD card so that there are no other files or folders except for the mp3 folder. All clips must be contained inside the mp3 folder. Clips follow a consistent naming sequence, starting at 0001.mp3.
Insert the SD card into the Mini MP3 player, and upload the PalMP3Test.ino sketch. Once the sketch has finished uploading, you should hear all of the sounds in sequence. If you don’t hear anything:- Watch for the blue LED on the Mini MP3 player. If it flashes every few seconds, this means the player is outputting sounds, but you just can’t hear them. Make sure the jumpers are firmly connected to the speaker pins.
- If the LED does not flash, double-check your wiring for any errors. If the wiring looks okay, try unplugging the USB your Itead Leonardo, and plugging it back in. I found this was sometimes necessary from time to time, to reset the Itead Leonardo and player.
Important! The PalMP3Test.ino sketch is for use with the Arduino Leonardo family of boards – that includes the Itead Leonardo. If you use a regular Arduino Uno, change all references of Serial1 to Serial. Otherwise, the sketch will not compile. For the Leonardo family, Serial1 refers to the serial port available on pins 0 and 1.
Once you’re satisfied that the Mini MP3 player is producing sound, upload the PalLookAroundWithSound.ino sketch. This sketch is functionally identical to the PalLookAround program detailed in the previous installment, but with MP3 sound effects added for when the left and right ultrasonic sensors are triggered. If you’re interested in learning more about the DFRobot Mini MP3 Player module, check out the manufacturer’s wiki page.Share Your Pal
This brings us to the close of the Desktop Pal series. If you’ve built your own Pal, or simply used some of its concepts in other robotics project, feel free to share your design by posting a comment below or showing your project under the Robot Project Showcase on the RobotShop Forum . We’d like to see what you’ve come up with!Thanks for helping to keep our community civil!
This post is an advertisement, or vandalism. It is not useful or relevant to the current topic.
You flagged this as spam. Undo flag.Flag Post


