

How To Build A Simple Robot


Do not miss the new, up-to-date and detailed How to Build a Robot - Grand Tutorial Series

Frame / Platform
- Wood: Depending on the size of your robot, plywood may be a good choice. Plywood is inexpensive (or free) and easy to work with using simple tools. You can get 1/4" and 3/8" plywood at Home Hardware, Home Improvement, Craft, or other home improvement / construction / hobby stores. You should also be able to find a lot of free wood locally. For example, a cabinet shop may throw out a lot of wood which is too small for their use but can be perfect for building a robot frame.
- Aluminum: This material is light weight and moderately easy to work can also be found at Home Hardware, Home Improvement, Craft, or hobby stores. You should always be very cautious when working with aluminum since the edges can be very sharp and should be sanded or filed to round them. The thicker the aluminum, the harder it is to form using hand tools.
- Plastics: Acrylic or Plexiglas are both easy to work and can also be found at many Hardware, Home Improvement, Craft, or Hobby stores. High-speed tools should not be used since they will melt the plastic. When cutting or drilling use low speeds.
- Re-purposed Materials: There are a lot of items around the house which can be turned into a robot frame. Take for example and old CD; These can be easy to find most people get them free in the mail from AOL or Earthlink. Instead of throwing them away you can use them to make a robot. They can be a little on the brittle side so go easy when you do any cutting or drilling.
Motors
- Continuous Rotation Servos: Did you know you can use servos to create reversible gear motors? Hobby shops will usually carry several sizes and brands of servos, as well as servos which are intended for continuous rotation. RobotShop even carries continuous rotation micro servos for <$5 each! If you choose normal servos, you will need to modify them for use there are many sites on the net with different methods. Servos already have all of the control circuitry built in and are easy to control; they have 3 wires which represent signal, Voltage, and ground. By pulsing the signal line you can go forward, stop, or backward. Servos are probably the easiest and cheapest way to make a propulsion system, but may not be the best for you.
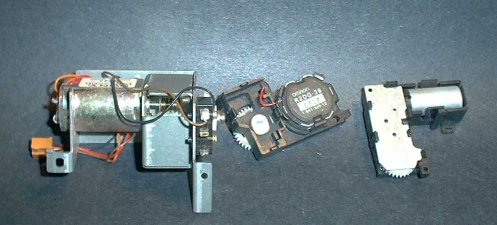
- Gear motors: These are available from surplus stores or hobby shops, and can also be purchased online at stores like RobotShop. Gear motors will require additional control circuitry (normally an H-bridge) to allow forward and reverse motion and in some cases braking. Gear motors can provide great flexibility but usually cost more compared to servos. Another source for gear motors is the toy section of your locale department store. What you want are the radio control toys which have "differential steering", meaning they have a separate motor for each side (like a tank). To turn left, the motor on the right is signaled to go forward, while the left motor is turned off. You would do the opposite to turn right. The really good cars will turn right by going backward on the right motor and forward on the left this will allow a vehicle to almost turn on a dime. If you use gear motors you will need to devise a method to mount the wheels. I will be using gear motors from a toy for my example.
Wheels
You can use wheels from old toys or you can buy wheels from a hobby shop.Foam or air-filled wheels for model aircraft are very easy to use. Note that often wheels from toys don't have the right hole size, so you might have to do some customizing to get them to fit the motor. We adapted the wheels below to use the servo horn which came with the servo, and screwed it to a round wheel. Anything round can be used as a wheel - even a CD. You can add friction by stretching a rubber band around it. If your robot is small, don't use a heavy wheel.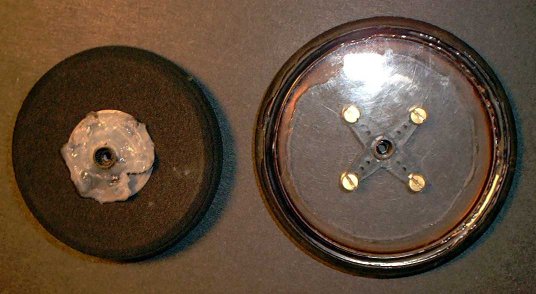
Power
Batteries: You will need to decide what type of batteries to use. It can quickly become very expensive replacing non-rechargeable batteries. Rechargeable batteries are really the best and the two two most common are NiMh and LiPo, though there are a number of different types to choose from. Electronic supply stores or Hobby shops are good places to look. You will not only need the batteries, but also the corresponding charger to charge them with. Power supply: We will need a voltage regulator to drop the voltage from the battery to the 5 volts needed by the Microcontroller and other parts of the Brain for the robot. I will cover using two different voltage regulators; both are available FREE from National Semiconductor as samples. Each part has its good and bad points: LM2825 Integrated Power Supply 1A DC-DC Converter is a complete switching power supply on a 24 pin DIP although a little large it requires no other components and has an efficiency of 80%. It does require at least 7 volts on the input but your batteries will last much longer than with a linear regulator. LM2940 1A Low Dropout Regulator is a linear regulator in a TO 220 package it requires a couple of filter capacitors it is not as efficient as the LM2825 the big up point is it only requires 5.5 volts input to give a regulated 5 volts out."Brain" (a.k.a. "Microcontroller")
For the brain, lets have a look at three different microcontrollers. I will admit I am biased when it comes to Basic Micro products as I have been using them for quit a while now and have always been very happy with the products and the support.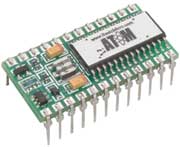 Atom: The Atom from Basic Micro is mostly compatible with the Basic Stamp but is much better, just to name a few of the things that set it above the Basic Stamp:
- 8k of program space
- IDE for programming
- ICD for in circuit debugging lets you watch your program run
- Floating point 32x32 bit math allows you to do real math. In case you don't now it 5/2=2 to a Basic stamp but to the Atom 5/2=2.5
- Interrupts (Up to 14 Sources) allow the Atom to stop where it is in a program and jump to another part of a program and when finished go back where it came from based on an event either internal or external.
- Analogue to Digital Converter 4 10 bit analog to digital converters.
 A third choice is to buy a Basic compiler; I will be using Basic Micro's 2840 Combo w/ Pro Compiler. This development board lets you use either 28 or 40 pin PIC's. I will be using the 5.0 beta Version of the Mbasic compiler which is still in beta the current version is 4.0.3 but the 5.0 should be available by the time we start the programming and updates are free.
Below are some things that make the Atom or Mbasic compiler a great choice: speed, Basic interrupts, and hardware pulse width modulation. The speed is obvious; you can never have too much processing speed. The second, Basic interrupts, we will use by connecting whiskers so that they generate an interrupt if something is bumped and the program will jump to a subroutine that will determine the correct course of action. After it completes that corrective action, it will continue the program from where it left off when the interrupt was generated.
The third, hardware pulse width modulation (HPWM), will really shine if you use gear motors instead of servos. With the Basic Stamp we will just be able to turn the motors on at one speed because we have other things to do. We will not be able to do variable speed. An Atom or a PIC16F876 each have two hardware pulse width modulation (PWM) channels which means we can set the pulse width and it continues until we change or stop it, which will give us variable speed.
For gear motors we can use the same HPWM command on the Atom to get a variable speed. The Basic stamp has a PWM command but it is done with software and while it does this, the Stamp cannot do anything else so it is not really user friendtly when it comes to variable speed motor control because we will not get smooth movement. Since this is the case, all we can do is turn the motor on full speed.
A third choice is to buy a Basic compiler; I will be using Basic Micro's 2840 Combo w/ Pro Compiler. This development board lets you use either 28 or 40 pin PIC's. I will be using the 5.0 beta Version of the Mbasic compiler which is still in beta the current version is 4.0.3 but the 5.0 should be available by the time we start the programming and updates are free.
Below are some things that make the Atom or Mbasic compiler a great choice: speed, Basic interrupts, and hardware pulse width modulation. The speed is obvious; you can never have too much processing speed. The second, Basic interrupts, we will use by connecting whiskers so that they generate an interrupt if something is bumped and the program will jump to a subroutine that will determine the correct course of action. After it completes that corrective action, it will continue the program from where it left off when the interrupt was generated.
The third, hardware pulse width modulation (HPWM), will really shine if you use gear motors instead of servos. With the Basic Stamp we will just be able to turn the motors on at one speed because we have other things to do. We will not be able to do variable speed. An Atom or a PIC16F876 each have two hardware pulse width modulation (PWM) channels which means we can set the pulse width and it continues until we change or stop it, which will give us variable speed.
For gear motors we can use the same HPWM command on the Atom to get a variable speed. The Basic stamp has a PWM command but it is done with software and while it does this, the Stamp cannot do anything else so it is not really user friendtly when it comes to variable speed motor control because we will not get smooth movement. Since this is the case, all we can do is turn the motor on full speed.
Sensors
We will use infrared obstacle avoidance and bump sensors we will use the PNA4612M it is easy to use and inexpensive you could substitute the infrared detection module from Radio Shack. So what will you need to complete a robot as described in this series of articles? Material for a base a piece of material 8" x 8" will be more than enough. Motors: To get started, you will need 2 motors; either servos modified for continuous rotation or gear motors. You could also hack a toy that has the motors and the wheels or even legs.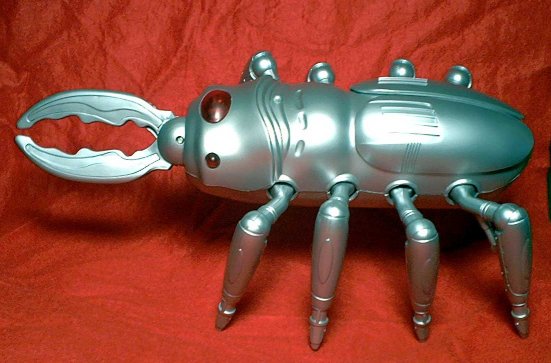 This is a toy called a "Battle Scarab" and is a good candidate for hacking if you want something with legs instead of wheels.
In short, you will need:
This is a toy called a "Battle Scarab" and is a good candidate for hacking if you want something with legs instead of wheels.
In short, you will need:
- 2x motors + 2x wheels
- Batteries and a holder (you should consider between 6 and 12 volts depending on what motors and regulator you use. Servos will run best at 6 volts).
- A voltage regulator LM2825 or a LM2940
- A microcontroller such as the ATOM, Basic Stamp, Arduino or a PIC
- Infrared detection module (you will need one or more and we will go more into these later)
- You will need a development board a solderless breadboard or perfboard to build on.
- If you are using gear motors, you will also need a motor controller either a L293DNE Dual H Bridge with diodes or two 3952 Full-Bridge PWM Motor Drivers available from Alegro as ree samples.
- http://www.national.com/pf/LM/LM2825.html
- http://www.national.com/pf/LM/LM2940.html
- http://www.allegromicro.com/sf/3952/index.htm
Thanks for helping to keep our community civil!
Notify staff privately
You flagged this as spam. Undo flag.Flag Post
It's Spam
This post is an advertisement, or vandalism. It is not useful or relevant to the current topic.
Report Reason
This post is an advertisement, or vandalism. It is not useful or relevant to the current topic.
You flagged this as spam. Undo flag.Flag Post
✅ Your Post Has Been Submitted Successfully!
Your post is currently under review by our moderation team. The review process usually takes up to 48 business hours.
You can track your post's status in the "My Content" section of your profile. Once approved, it will be published and visible to others.

Thank you for contributing to our community!