

How to Build a Retro Console with a Raspberry Pi and a Nespi Case


Do you miss the games of your childhood? What if you could build your own retro console with a Raspberry Pi and an NES-inspired case? In this very easy tutorial, we'll teach you how to use a Raspberry PI with the Nespi case and the RetroPie OS to create your own retro console center capable of emulating dozens of consoles and arcade systems. It won't take you more than 30 minutes and will cost less than 90USD!

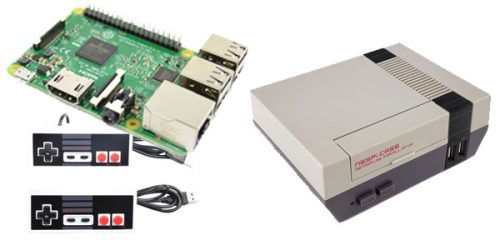 The core components that you'll need
You'll also need an HDMI cable to link the console to your screen and a micro-USB cable to power it. That should be easy to find around your house, but otherwise here's one option for a Micro USB cable and one for an HDMI cable
Last but not least, you'll need a microSD card of at least 8Gb. This card won't be usable for anything else and will serve as your Operating System (OS) hard-drive. We suggest getting a new one for this sole purpose.
The core components that you'll need
You'll also need an HDMI cable to link the console to your screen and a micro-USB cable to power it. That should be easy to find around your house, but otherwise here's one option for a Micro USB cable and one for an HDMI cable
Last but not least, you'll need a microSD card of at least 8Gb. This card won't be usable for anything else and will serve as your Operating System (OS) hard-drive. We suggest getting a new one for this sole purpose.
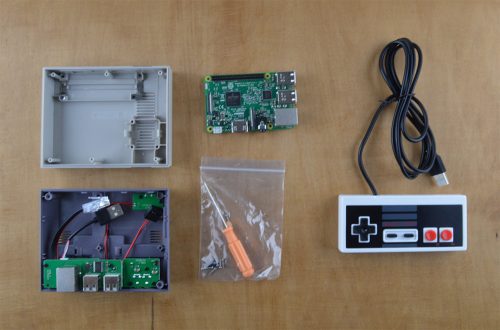 The components unboxed
You basically just have to:
The components unboxed
You basically just have to:
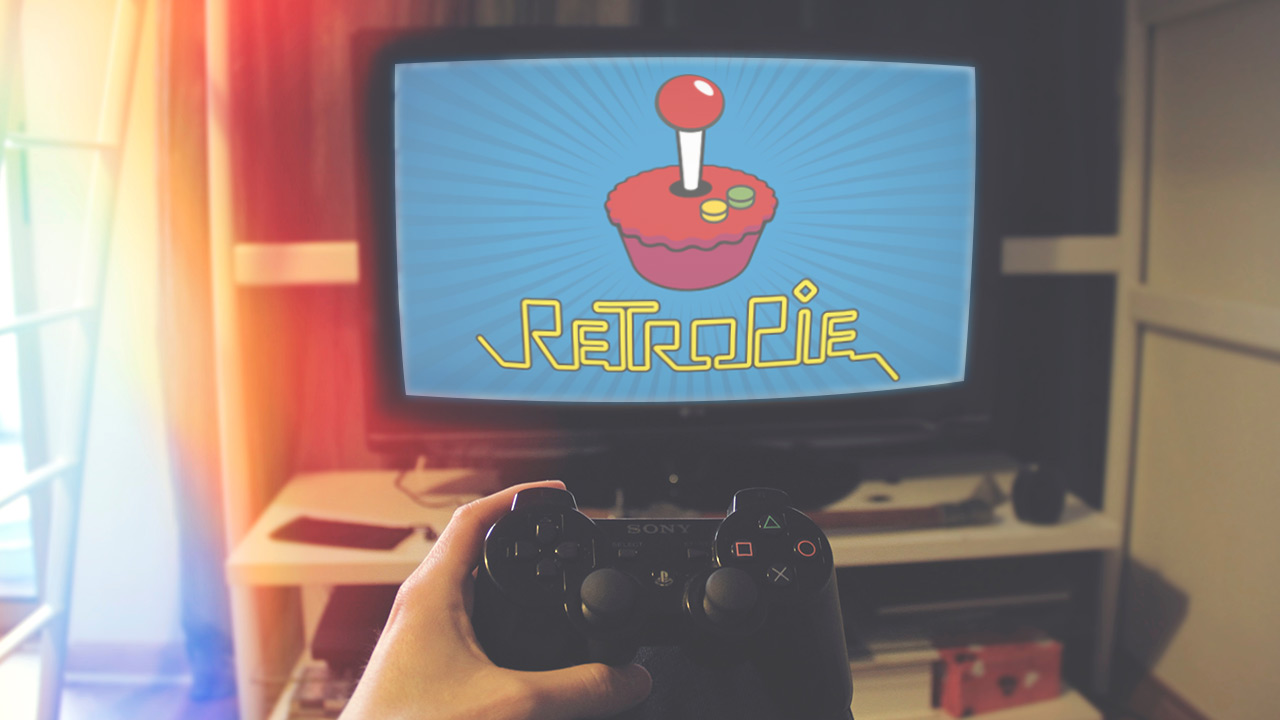
 The RetroPie OS is the best way to enjoy retrogaming on your Raspberry Pi
This second part should take about 15 to 25 minutes depending on your Internet connection speed. We'll use the Retropie OS as it's the most efficient way to use emulators of consoles and arcade systems on the Raspberry Pi.
The RetroPie OS is the best way to enjoy retrogaming on your Raspberry Pi
This second part should take about 15 to 25 minutes depending on your Internet connection speed. We'll use the Retropie OS as it's the most efficient way to use emulators of consoles and arcade systems on the Raspberry Pi.
 You can also use a Bluetooth controller
 Are you ready to play some vintage arcade games now?
What you'll need
- 1 x Raspberry Pi 3 Computer Board
- 1 x NESPI Raspberry Pi Case Vintage NES Style
- 1 x Ventilation Fan for NESPI Raspberry Pi Case (optional but strongly suggested)
- 1 x NES USB Controller (2pk)
- Or you can upgrade your kit with 1x Classic Wireless Controller Bluetooth 8Bitdo NES30
 The core components that you'll need
How to assemble the components together
This part is very straightforward and easy, and shouldn't take out more than 5 minutes. The NESPI Raspberry Pi Case Vintage NES Style is a very well designed case for the Raspberry Pi. The instructions provided are clear and all the tools and screw are in the box. The components unboxed
- Take the Raspberry Pi 3 Computer Board out of its box and its protective wrapper
- Put it in the designated space, and use the provided screws to lock it down
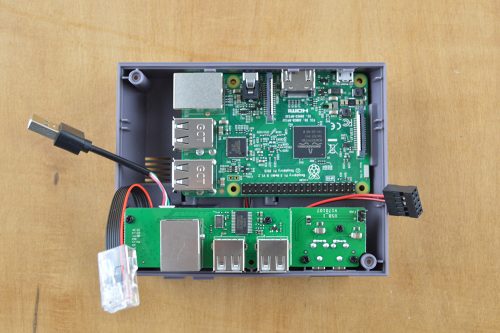 The Raspberry Pi should be inserted like this
 - Connect the Ethernet and USB cables to the board
- Lock the fan with the screws and connect it to the GPIO pins (if you picked the fan)
- Close the case and lock the two parts together with the screws
- Ta-dah! You're done! Congratulations!

How to install the RetroPie OS on your Raspberry Pi
Welcome to RetroPie. RetroPie allows you to turn your Raspberry Pi, ODroid C1/C2, or PC into a retro-gaming machine. It builds upon Raspbian, EmulationStation, RetroArch and many other projects to enable you to play your favourite Arcade, home-console, and classic PC games with the minimum set-up. For power users it also provides a large variety of configuration tools to customise the system as you want.
Preparing the microSD card for the installation
- You should head over to https://retropie.org.uk/download/ and download the latest version. At the time of writing, it's the 4.3 version (~615Mb)
- Once downloaded, you will need to extract the .img file from the .gz archive
- Now, you'll need to install the RetroPie image on the microSD card
- For Windows, you can use Win32DiskImager
- For MacOS, you can use Apple Pi Baker
- For Linux, you can use Etcher
- If you need further help, please refer to the official Raspberry Pi instructions for "Writing an image to the SD card"
Configure controllers and system
NB: While not necessary, having a USB keyboard around will help speed the setup and allow you to easily configure the WiFi on your Raspberry Pi.- On the first boot of your console, the filesystem will automatically be expanded. In a couple of minutes, you'll be presented with a Welcome screen asking you to configure the controls for the system.
- Hold down any button on a controller (or key on your keyboard) and its name will appear, and then open up into a configuration screen.
- For each option presented, press the button you'd like to associate
- You can skip a button configuration by holding any button or key.
- When you get to "OK", press the button you have configured as "A"
- You'll now arrive at the EmulationStation screen. It's normal to only see the RetroPie option. The other emulators are installed, but will only show up in this menu if there are ROMs in their respective folders.
- You can now configure your WiFi through the RetroPie menu (accessible by clicking/pressing "A" when you see the RetroPie logo selected in the middle of your screen. It's a pretty straightforward process where you'll select your SSID (your network's name) and enter its password. Connecting the RetroPie to WiFi allows you to transfer ROMs from your computer to the Raspberry Pi wirelessly.
 You can also use a Bluetooth controller
Transferring ROMs - Installing games
Before getting into the technicalities of that process, we should highlight that:- You should only have ROMs of games that you own.
- Due to the nature and complexity of Intellectual Property and Copyright Laws, we can't provide any ROMs, nor help find them, nor suggest repositories of such files.
- WiFi / Local network (easiest)
- USB (easy)
- SFTP/SSH (hard)
- Make sure your RetroPie is connected to your WiFi, and that your computer is connected to the same network.
- Access the RetroPie remotely
- On Windows, type \\retropie in the Computer folder.
- On MacOS,
- Open the Finder and select "Go" menu
- Click on "Connect to Server"
- Type smb://retropie and click "Connect"
- Open the "roms" folder
- Drag and drop your ROMs into the appropriate folder
- Once the transfer is complete, you'll have to restart your system. You can use the Reset button on your case to do so.
 Are you ready to play some vintage arcade games now?
Congratulations! You have assembled and configured your own retro console!
So sure, you could buy an official NES Classic Edition ($60 MSRP). However, not only would you only have 30 games on one system (instead of thousands across multiple systems) but where would be the fun and learning in that? We're sure you'll enjoy the nostalgia moment of playing the games of your childhood. Or share that passion and style with younger generations. If you're looking for a follow-up project, why not assemble your own arcade controllers?Thanks for helping to keep our community civil!
Notify staff privately
You flagged this as spam. Undo flag.Flag Post
It's Spam
This post is an advertisement, or vandalism. It is not useful or relevant to the current topic.
Report Reason
This post is an advertisement, or vandalism. It is not useful or relevant to the current topic.
You flagged this as spam. Undo flag.Flag Post
✅ Your Post Has Been Submitted Successfully!
Your post is currently under review by our moderation team. The review process usually takes up to 48 business hours.
You can track your post's status in the "My Content" section of your profile. Once approved, it will be published and visible to others.

Thank you for contributing to our community!