


YABB - Yet Another Balance Bot
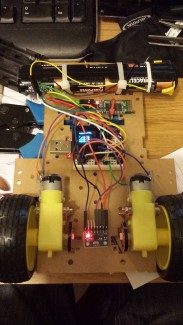
Threw this together quickly to play with, I've seen others do the same online and recently a friend started work on a balance robot. I ordered Banggood's 4 wheel drive robot base originally just to get the four gearmotors with wheels. When it arrived I decided to make use of two of the wheels for this robot I started setting out the design for laser cutting an acrylic plate, following the design of Banggood's robot base for the motor mounts when I realised I should just use the supplied base. Some quick saw work and the 'bumper' was removed giving just enough clearance for the wheels to contact the ground through any angle (probably want to take some off later and tidy it up).
Motor drive is through a L293d dual H-bridge chip which is currently sharing a solderless breadboard with the MicroView. Hidden within the smooth case of the MicroView is an Arduino UNO compatible with an OLED screen. For angle measurement I'm using the popular MPU-6050 (6DOF accelerometer and gyroscope) which connects to the Arduino over I2C. Use of this chip and the arduino compatible microcontroller meant I was able to base my robot's code on Bajdi's hard work. He has implemented PID control with Kalman Filter, taking most of the hard work out of it and letting me concentrate on other areas of the code. I added a bluetooth serial module and coded serial communications which allow the P, I and D terms together with the target/zero angle to be set while the robot is running. On the MicroView these settings are displayed and they're stored in EEPROM so they aren't lost when the power is turned off.
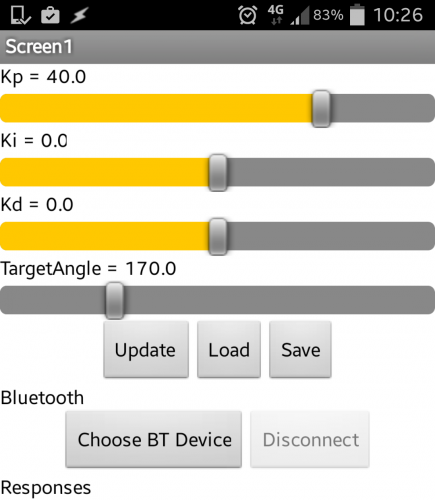
On the other end of the Bluetooth serial connection is my Android phone running an app thrown together using the MIT App Inventor 2. For those of you who have not seen this tool it is a relatively easy-to-use graphical interface for building an app. Reusing some components I learnt about when building my first app (namely bluetooth connection setup) it didn't take long before I had a sliders to adjust the PID terms and I could easily experiment with different combinations of settings.
Initially I had arranged the components with the battery pack (6 AA batteries) high up on the robot. The motors weren't fast enough (or didn't have sufficient torque) to catch itself so I lowered the batteries and the improvement was immediate. I have yet to find the perfect balance of PID terms though it's not far off with just the P term. I hope to have the robot drive around, controlled by bluetooth. For this I'll likely need feedback from the motors and I have some IR reflectance sensors to use with the encoder wheel included with the robot base.