


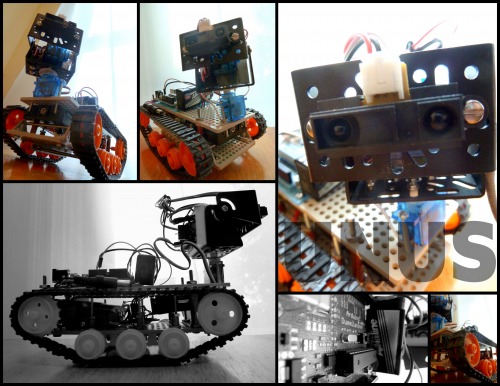
UNUS: First Robot
UNUS
A quick introduction: it was about 2 1/2 years ago that I first decided I might like to build a robot. I of course knew nothing about it but it seemed like a fun challenge to me. I found a lot of great info online and read a ton of people's posts on LMR. I decided Arduino was the best path for my entrance into the world of microcontrollers based on its ease of programming and vast amounts of info available. It wasn't for another year that my fiance graciously bought me an arduino experimenters kit from adafruit. I went straight to work learning all about arduino until my son was born a month later.
After he was a few months old I finally had time to start tinkering again on the weekends and evenings but had lost sight of what originally got me started with microcontrollers because of all the cool ideas I had for other projects. Finally after several distraction-projects (like my baby interface device), I eventually started planning my first robot. A few weeks later I ordered parts from pololu followed by an additional order from robotshop and a few trips to lowes, radio shack, and home depot. Now a few months after that first order I have my first functioning autonomous robot and plans for the second are in the works.
objectives (UPDATED after completion)
The robot will be autonomous and remote controllable
The robot will be a tracked vehicle (probably mostly from watching short circuit too many times as a kid)
The robot will do basic obstacle avoidance
The robot will do basic edge detection to avoid falling off tables or down stairs.
The robot will have "personality" (unless by personality i meant it freaks out and has a delicate disposition)
The robot will have a finished exterior with plastic or metal. (the innards shouldn't be visible)
The robot will be entirely constructed with plastic or metal.(no wood or cardboard)
The robot will be completely able to be taken apart.
Build
I started by assembling the tamiya track and wheel kit on a universal plate system. I assembled the tamiya double gearbox and wired up a pololu low voltage dual serial motor controller. I tested the motors by alligator clipping the battery leads directly to the motor wires.
My motor battery pack is a 3xAA holder that fits snugly in place in the front of my chassis. An additional 9 volt battery is used for the sensors and micro controllers but has yet to be permanently placed on the robot. I also currently time it on and off by unplugging the battery so until I wire a switch it is just easier to rest it up on top.
To create the second tier I cut copper tubing to act as spacers on 2" 6-32 machine screws (the universal plates don't fit that big of a screw so I had to drill 4 holes bigger to accommodate the larger size.) The smaller screws that hold the bottom set of wheels in place and form the bed for my battery holder are 1 1/2" 4-40 machine screws and the very small ones that hold on the gearbox and various other parts are 3/4" 4-40.
After assembling the chassis I put together a dagu pan and tilt kit so the robot can "look around". This is purely a personality enhancement as he won't really look up and down for any real purpose, just to give him "animated expressions". I put a teensy board on the head unit to make it portable by itself while I experimented with different head movements. Eventually I decided to use a Teensy instead of the arduino but i don't have the custom carrier board put together for it yet so the videos only show using the arduino. The head is also not really attached permanently to the chassis yet so that is why it wobbles around in the video.
Next I crafted an adapter for my arduino since the mounting holes don't line up with the tamiya plate. I used a $1.00 plastic pencil box cut up with a pair of scissors then drilled with the appropriate hole locations. It works great... I have a sketchup model I used for a template if anyone is interested.
I created two mounting brackets for the bottom Sharp ir sensors out of the same material. I just free-handed them so they aren't nearly as nice as the arduino mount but they serve their purpose well.
The robot is currently fully autonomous so I feel I can finally post this and call it a "functioning robot". It is still very much a work in progress though as you.can see I have only met a handful of my objectives (not to mention the vast amount of scope creep yet to be added in).

This pic shows how the battery holder slides in and out: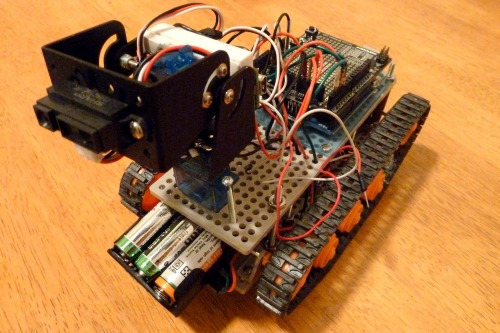
UPDATE: 2/6/2014
This robot has been done since march of 2012. I don't know why it took me a year and half to ever update this post and mark it as complete. As you can see in the video i made a "shell" for it out of plastic parts. 2dof head never ended up getting set up on the final build so i just called the project "done" without it... i think i may just take it off since i like the little dagu pan and tilt and it seems worthless to not be using it for something real. oh and its LOUD... like scary loud... i think my gear box is not lubricated enough or something.
Here is the board i made for the teensy microcontroller: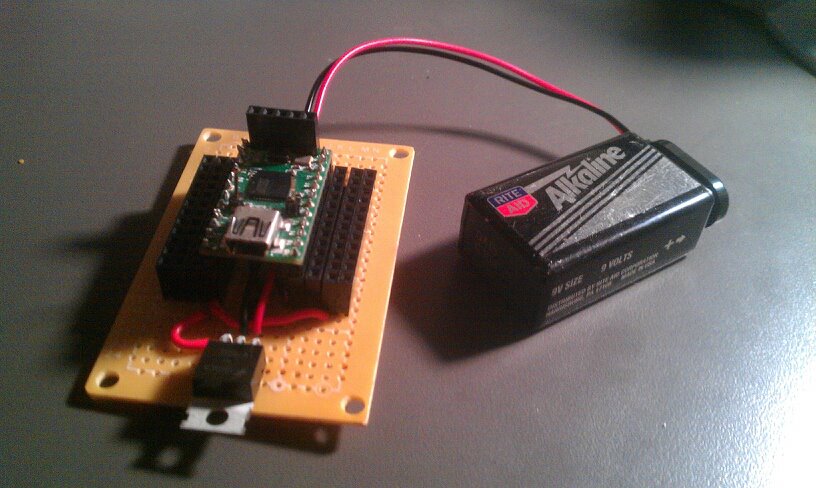
360 Rotation of the final robot
Youtube playlist of my videos of UNUS
i learned so much while building this project that has allowed me to do a lot of other things since then.
Obstacle Avoidance
- Actuators / output devices: Pololu dual serial motor controller, Tamiya Twin Motor Gearbox
- Control method: autonomous
- CPU: teensy microcontroller
- Power source: 9v logic, 3 AA drive
- Programming language: Arduino C
- Sensors / input devices: 1x Sharp IR GP2Y0A21 analog
- Target environment: Floors away from drops., Mostly indoors, desk