Tracked Robot
Hello,
As the rules to this site state, “Write the best English you can.” I have prepared this article as such and can only hold on to the desire it’s up to standard. If I have used inferior language at any point, please accept my most sincere apologies for this unacceptable deficiency regarding perception of my mother tongue.
Now, to the reason for my writing…
I’ve been working on this project, as and when I find the time. However I did a little more yesterday and decided it’s time to share with you all and also ask advice. As you can see, it's nowhere near complete, so I'll update as and when I get more done.
I designed the robot on Google Sketchup, which is a fantastic tool for the likes of myself, someone who's never previously used CAD of any description. It made the whole process simple and best of all, it's a free download. Unfortunately and for reason unbeknown to me, the Sketchup design bears no resemblance what so ever to my creation.
I've had the outline for this robot echoing inside my mind for some time now, but lack of cash made realisation a slow process. I’ve wanted to make a robot with tracks out of bike chain for quite some length of time; however my initial concept was quite large in design. So in order to keep costs down and as an assessment to test my ideas, this robot is tiny in comparison to my earliest thoughts.
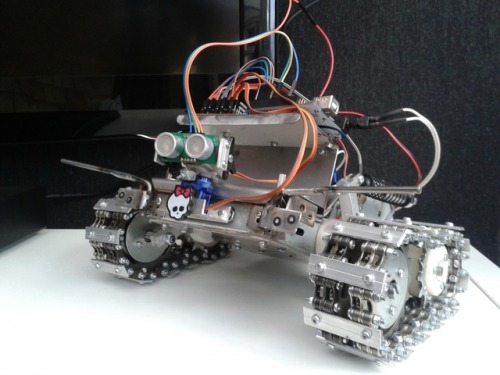
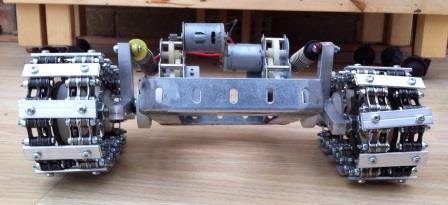
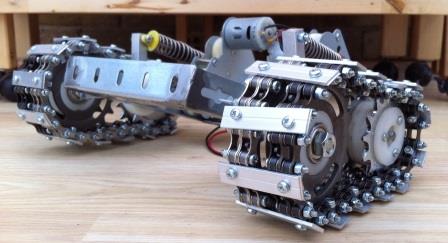
Initially I bought two bike chains, which were designed for a BMX style cycle. This type of bicycle has a fixed gear ratio, so the chain isn’t required to flex from side to side, which I assumed to be an advantage. As both chains were purchased from the same shop, at the same time, my presumption was they would be two identical chains. This presumption was a colossal error of judgement on my part, as the two chains were differing colours. I’m well aware colour makes little, if any difference to performance, but I’d have preferred them to be the same and I’m somewhat a gasp as to why the colour wasn’t stated on the packaging! I’m outraged by this, which I’m sure you realise. Still, I fashioned the miscoloured chains into what you see within the photographs.
The sprockets were ordered from e-bay and were reasonably priced. The gearboxes also came from e-bay. They were brand new, from an RC tank and priced surprisingly low, due to this pricing, the concept I originally had in my mind for creating my own gears, prevailed to be prohibitively expensive. The suspension dampers were donated from an old RC car I had lying idle. I also required some bearings for the front wheels and the suspension arms, these once again came from e-bay, are skateboard bearings and I bought ten, as they were so cheap. At the time of writing, eight have been incorporated into the design.
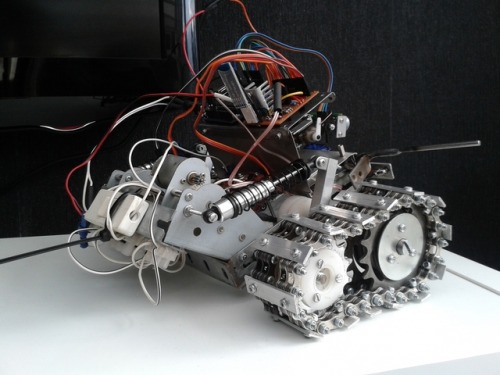
The chassis is simple in design. Merely angle iron acquired from a local DIY shop and welded into a square. As welding tuition has never been bestowed upon me and as my workshop suffers from considerable welder void, I visited an acquaintance’s place of business for a welding class. Approximately one hour later I'd made my chassis.
Constructing the wheels, suspension arms, bearing housings, etc. took some time, as a lathe and drill press were required. As I had only just purchased my lathe, I needed tooling, such as cutting tools, taps, dies, vernier calipers, etc. Collecting all this as and when required is the main reason this particular process took so much time.
The majority of this project has been prepared as cheaply as possible, using inferior materials. This has been done with the intent of testing various concepts and if I find they perform as expected, I'll upgrade the individual components using ameliorate materials.
I still need to decide what I'm going to use for power, or what I’m going to use as the brains. I’ve been thinking of two RC car batteries as these are readily available along with chargers. As for the mainboard, I’ve used PICAXE previously, but I severely struggle with programming. A simple process for many of you, I’m sure. A massive minefield of mind mashing misunderstanding for myself.
So, what are the recommendations?
Thankyou all for reading,
Paul
PS I could also do with advice on naming my robot. Something feminine I think.
Lukeyes suggested the name Victoria for my robot. As this suggestion is tremendous my robot is now named Victoria (Vicky)
Thankyou Mr. Lukeyes Sir.
Since writing, I have been informed, the site rule, “Write the best English you can." maybe shouldn't apply to me. I like special dispensation, so will no longer be writing the best English I can.
Thankyou for the advice Lumi
Hi,
I'm not sure how to update, so thought I'd just add to the bottom here.
It's been a while, I know. I spent the summer building a heating system for my garage, in order to use the facilities in all weathers. Now that particular project is complete, I can resume other activities, such as completing my robot.
Now, as OddBot kindly pointed out, some time ago, I'd need to know the power requirements of my motors, in order for me to select appropriate motor drivers. As I found, speed controllers are not the cheapest items available, I opted for a work around. This came in the form of two servos and two mechanical speed controllers lifted directly from old style Tamiya rc cars. I'm aware these items aren't particularly efficient, however the repurposing of used parts, prevents a chastisement from my wife, regarding money.
I wired the servos into an rc reciever, only to find the received is no longer operable. I have since purchased an Arduino Uno and almost immediately broken it. At the time of writing another, is making it's way to me, as fast as Royal Mail's finest can manage. I've been spending the time studying the programming, however I expect this may take an enormous amount of time for me to understand.
The reason for this update however, is not for me to regale you, with my woes of incompetence, or garage heaters. I thought you may enjoy seeing the first movements made by my robot, in the form of a video. It's not exciting, only my creation spinning in a circle, but here it is for anyone interested.
Another update,
I'm struggling to get to grips with the Arduino programming, but muddling my way through it, one step at a time. I've found tutorials online, however they all seem to re-iterate the same point and skate over others.
Anyway, back to the robot. When traveling it will throw a track from time to time and I've traced this to my suspension arm pivots and front axles. When I made these I used some M8 studding, I had kicking about and didn't put much effort into the design. I had planned on remaking these, with a greater degree of tolerance, on my lathe, however a back injury has stalled that process.
I have instead spent the time on lighter duties and the fruits of my efforts are shown on the second video.
Thanks for reading.
Another update,
First, I know I'm working slow, before anyone else tells me, but I'm enjoying myself.
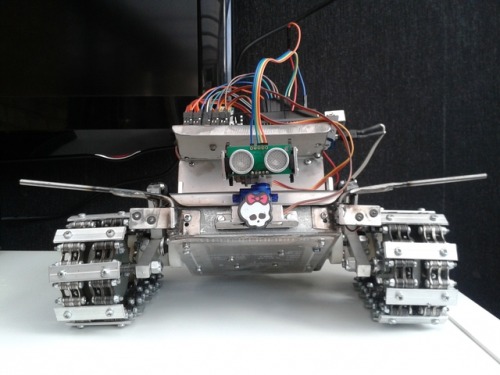
This update, is to show, anyone who's interested, in the part, I've named the head mech. It works as expected and is shown in the third video. The boom extending from the front is an interesting point. I've added this for no reason, other than I wanted to. Having said that, I think it's turned out quite cool.
The fourth video is just my robot and I, listening to my favorite band, while enjoying ourselves.
Thanks for reading,
Paul
Yet another update,
However, this one proves a little more exciting. I now have a functioning robot, but not yet finished. Please see the video and I welcome your comments. thanks for reading.
Paul