


The Ugly Quad
UPDATE: got (some of) the videos up :)
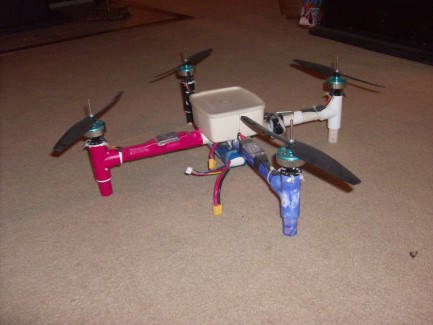
Not a robot yet, but kinda cool, so I thought I would share it. The Ugly Quad is a completly homemade quadcopter, built with payload capcity, parts avalibility and most importantly cheapness in mind. All of the electronic parts were purchased at hobbyking.com, which I have found to be the cheapest place to buy hobby/robot making parts along with dealextreme.com the shipping takes forever and is not so cheap, but boy are their prices.
That ugly PVC frame you see is what comes after destroying this flimsy wooden frame that I bought with the original order of parts.
http://www.hobbyking.com/hobbyking/store/__16583__HobbyKing_Quadcopter_Frame_V1.html
the different coloured arms are to orient myself when I am flying this thing 200-300 feet off the ground, red for right, black for back, and purple for phront. I tryed with just the purple front arm, but flying that high, your mind starts flipping the orientation and it is hard to get back on the ground. And there are lots of benefits, easy to work with and repair, parts right close by at the hardware store if I break anything, and it is sturdy, I have killed the motors and had it drop from 15 feet; it just soaked it up and didnt complain, try that with a plywood or glass fiber frame. :)
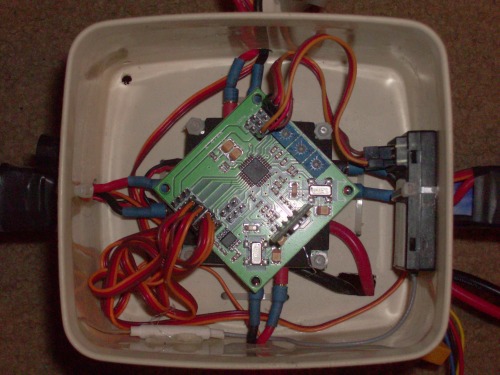
So anyway, after I totaled the wood frame learning how to fly, I built this one. I already explained the benefits of PVC, and the tupperware container that houses the electronics is close to indestructable.
After making the frame, I experimented with some attachments, first being a 200mw laser aimed airsoft gun mounted on one of the arms. This was kinda fun, but unfortunately I accedentally glued some moving parts while reinforcing the gun mount, and recked the gun :(
in order to fire this gun using the 5th channal I built this little circut using a 08M

closeup of the board

I programed this to look for a change in the state of the pwm signal coming from the reciver and activate the gun and laser.

after the gun failed, I built a two servo claw that I also did not get any pics of, when in use, I had to replace the short legs with somewhat longer ones so the claw had room to actuate. I kept the laser on the robot pointed down to aim where to land, and where to drop the objects I picked up. I also added the other 3 pin header to the boardso that I could tell first the laser to activate, and then the claw.
after that, I got bored of the claw, removed it and put a mount for a GOPRO camera to take videos with

I have some video files from the quad, but they are on a thumb drive at my friend's house, as soon as I get them back, I will post them.
top view

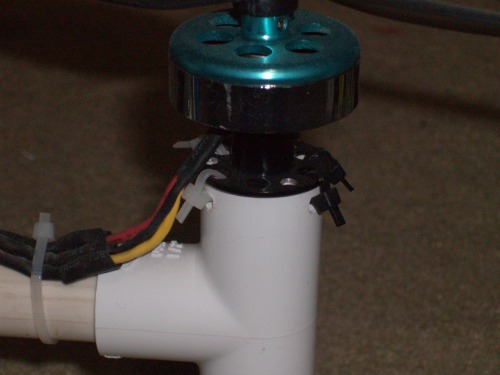
closup of the motor mounts, they use zip ties, first they are cheap, light and easy to fasten, and if I botch a landing, rather than breaking the motor ($$) they simply strech and snap and are replaced.
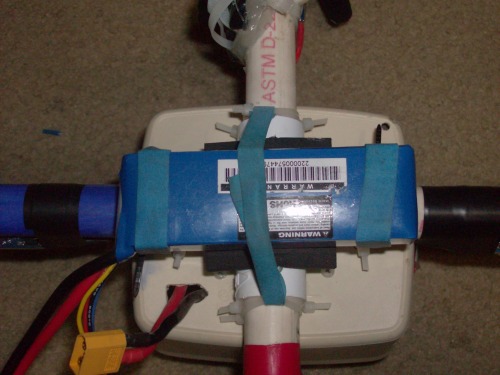
my super high quality battery mount, a cupple rubber bands and more zip ties :)
have a look at the video, not the best quality, but it was filmed in a bit of a rush this afternoon.
UPDATE 11/18/12====================================================================
As requested by ignoblegnome here is the parts list
control board (comes with software preloaded)
motors: I bought 5 just in case one broke
http://www.hobbyking.com/hobbyking/store/__6247__hexTronik_DT750_Brushless_Outrunner_750kv.html
propellers: deffenatly buy like 10 packs, every time you crash, 1-4 of these are going to break, and you really run out fast when you are learning, also, they are quite poorly ballanced, I use a needle thru the hole, and when one side goes down, I snip a bit off the end using a pair of side cutters, and repeat until the prop stays ballanced.
speed controlers: I also bought 5 in case one dies
power distrobution board
connectors:
http://www.hobbyking.com/hobbyking/store/__68__PolyMax_3_5mm_Gold_Connectors_10_PAIRS_20PC_.html
to connect the RX to the board
I already had a 5ch tx/rx that I used, hobbyking stocks a number, just look around for one with at least 4ch
batterys, I bought 4
http://www.hobbyking.com/hobbyking/store/__8932__Turnigy_2200mAh_3S_20C_Lipo_Pack.html
and chargers, I bought three, and I use a old power brick from a laptop to power them.
http://www.hobbyking.com/hobbyking/store/__7637__Turnigy_balancer_Charger_2S_3S.html
I also got a pack of 4 mm nuts for mounting the props to the motors and all my pipe and fittings at the local hardware store.
I think that is everything, plus I think $50 for shipping.
UPDATE 11/22/12=================================================================================
I was asked for some dimentions, here they are:
hight 7.5" from floor to top of motor shafts
width/legnth outside of bell on the motor to outside of bell on the other arm 20"
width/legnth tip of prop to tip of prop (the longest distance, and the one you would have to use if you were say, flying thru doorways with it :) 28.5"
I also lied about the weight in the inital posting, it is actually 1.2Kg, sorry about that.
effective load capicity, the motors each produce ~900-1000g of thrust, and you want to have a little wiggle room to let the control board do it's thing to keep the quad stable, and for asending really fast, so I would say you could lift at least 2Kg no problem.
also, here are all (most?) of the other parts I used to build the basic quad, not bought from hobbyking. all the pipe is 1/2" PVC
1 + cross piece, 4 T tee pieces, a legnth of pipe, 8 wood screws for locking the pipe joints without gluing. tuppeware container big enuf to hold all your electronics, 4mm nuts for motor shafts, rubber bands for holding the battery, and lots of little zip ties
If anyone is considering building one using partially my plans, comment, and I will share some tricks and things I learned along the way.
UPDATE 11/26/12=================================================================================
I just looked at my page, and realized that I hadnt put up the link to the video while the site is down. here it is
http://www.youtube.com/watch?v=7YvltycRPgI&feature=plcp
still waiting to get the other videos back from my friend, sorry. you guys will be the first to see them once I get them back :)
UPDATE 12/3/12======================================================================
Ok, here they are, the long awaited and underwhelming videos shot with my quadcopter at various places around where I live. more will be posted when I get a little more time. These videos are made from a few of the shots pasted together so I didnt have to upload a milion videos. I tried to paste related clips together, One of these videos has a good crash at the end involving flying too close to a telephone wire. On that note,reinforcing the claim that my quad frame is nice and sturdy, the only thing that broke in that crash was one of the props :) also in some of these vids, you can see another homemade quad that looks remarkably similer to mine flying around. one of my friends built a quad with the same basic parts as mine and a little different frame. as you can see, when you cannot see what you are filming, sometimes the results are less than dazzling.
Flys around taking video
- Actuators / output devices: 4 brushless motors
- Control method: 2.4 GHz 5 channel Tx/Rx
- Power source: 11.1v 3 cell LIPO
- Sensors / input devices: none at the moment
- Target environment: outdoor, in the air!