


T and E (Trial and Error a Start Here robot)
Like most people I saw a link to the start here robot and was instantly intrerested. It seemed to marry my interest in techy stuff and my programming knowledge. So I made some orders online and have built my attempt at it. It was a bit fiddly in places, and I learnt a few things which I can take forward to mark II.
I bought the following recommended parts (all from tech-supplies.co.uk):
USB Picaxe 28 starter kit
Servo Kit
Motor Driver
SRF005 ultrasonic sensor (preferred the idea of sonic detection to something that might get confused by sunlight!)
And the following non-standard parts for the chassis (from technobots):
Twin motor gearbox with wheels (not actually very good tbh)
Tamiya Ball Castor set (I'd recommend these, they are configurable to all kind of heights)
And some stuff for future products (also from technobots)
Some Red LEDS and some green
Two LDRs
A reflectance sensor
The main part that I had issues with was the gear box I bought.
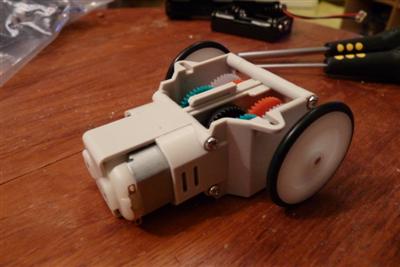
It was pretty cheap and does run, but there isn't much clearance between the supplied wheels and the body. The first iteration didn't seem to be able to grip properly and didn't really move straight (although this may have been due to my dodgy soldering!) If I was to buy again I would probably buy the tamiya gear box and some proper tamiya wheels to go on it.
Secondly I had some trouble getting a configuration of the parts together and straight. I initially used a second power supply to power the servos etc and as recommended by the paper work and I ended up with an upright configuration. After some dodgy soldering with a very dodgy soldering iron my bot looked like this:
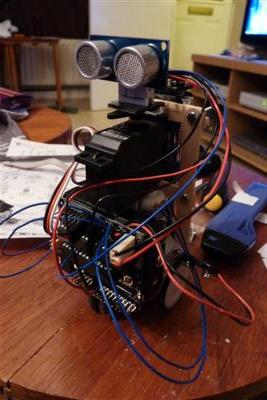
The second battery pack made the bot quite heavy which didn't help the gear box in moving well or consistently. In fact it was all a bit of a mess so I decided to re jig the whole thing. (You might notice I used lolly sticks as a chassis, works surprisingly well!)
Using sticky pads I ended up with a more horizontal design which seemed a bit more reliable. I got rid of the 2nd power supply so it was lighter. I also rejigged to the gearbox to a faster ratio:
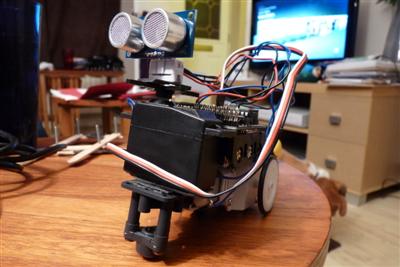
This ran pretty well once the code was uploaded.
The code was mostly what had been posted already plus the code from the SRF005 tutorial plus my own fiddling. This mosty went to plan except for an issue I found with the SRF005 code. It seemed to me that the SRF005 required a fairly big recharge time. The robot would often runforward and pulse for about a second and then stop pulsing (thus producing a small range and flagging danger). Increasing the wait time for the recharge seemed to fix the bug. Does anyone know anymore on this matter? I didn't get a data sheet with the part. The code is attached.
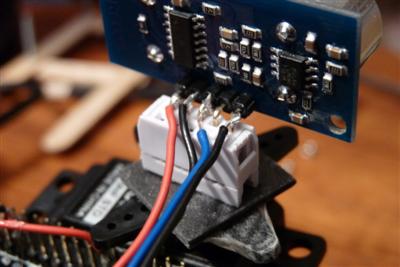
A tip for the SRF005 wiring. I tried using the head mounting tutorial but was unable to get the connector to bite properly on the wires so I soldered the wires onto the bend of the pins but still used the connecter as a mount. It ended up looking like this:
Well I think I'm going to call this robot it, bar a few tweaking with the settings in the code. Then I plan to move onto Mark II. Something that has a bit more of a reliable and tidy chassis, and that uses the LDRs, LEDs, and/or the reflectance sensor.
It had been good fun though and I love the picaxe chip and it versatility.
On a final note, make sure you get a fairly decent soldering iron, solder and flux. The crud I bought was really not very good because I'm a skinflint.