


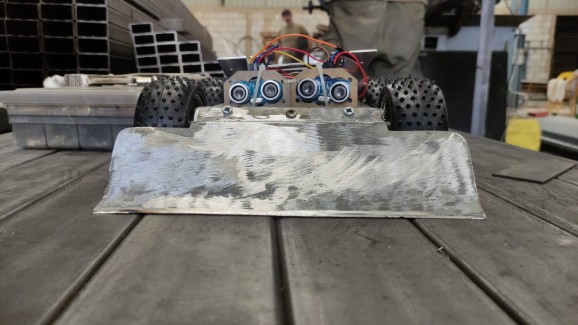
blade
The design of the front blade was one of the most challenging parts, the Robots strategy was to attack. Our objective was to build a blade that surpasses the front wheels of the robot, having a blade that touch the ground, be sure that the blade won’t affect the ultrasonic sensors and finally to protect the IR sensors. The most important part was to keep the weight of the robot under the maximum allowed weight (3kg).
Center of gravity
We focused on having the center of gravity of the robot in the center and at its lowest. Our opponent will be less likely to topple our robot or cause the wheels to lose traction if the center of gravity is lower and in the center.
Our main strategy was to find and destroy, we installed two ultrasonic on the front as shown in the picture above. We will get three ranges. If sensor 1 gives a lower distance from sensor 2, this means the object is in range 3 so the robot needs to go Right. If sensor 2 gives a lower distance from sensor 1, this means the object is in range 1 so the robot needs to go Left. If sensor 1 and sensor 2 are equal, the robot needs to go straight at full speed. In this step we have calculated the average of the two sensors and if the average of the two sensors is more than 0.5 meters the robot will go at a 50% speed (we used the PWM pins on the H-bridge). And if it’s below the 0.5 meters the robot will go at full speed. This step was one of the steps that made our robot succeed. The circle was too big, and the line was thin, so when the robot came at full speed the robot didn’t have the time to stop. And finally, driving at 50% of the speed will let us use the batteries for a longer duration. In the video below, we wrote a code to make the robot stay at a distance of 25 cm from the obstacle. Here we focused on the control part (right-left-straight). see the strategy picture in the attachment.
you can watch here this video to see the strategy
One of the biggest weaknesses that we had in our robot was the rear. We didn’t have any sensors in the back, and this made us lose sometimes in the competition.
The response of the object follower was a little bit slow, because of the ultrasonic. The ultrasonic didn’t have the best accuracy. This project needs to have a more accurate sensor like the sharp sensor. But the sharp will add to the cost (7$ is the price of the sharp sensor).
In this project, we evaluated the coding part, the mechanical part, and the electrical part. We have learned a lot in this project, designing a robot based on the cost, the weight, on the availability of the components and it was all new for us. And we got through all the problems we faced while building our robot. Like the famous quote says “If everyone is moving forward together, then success takes care of itself” – Henry Ford