


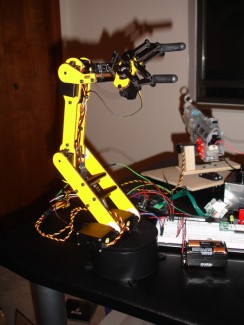
Steve, The Disembodied Robot Arm
Video Links:
- Manual Control
- Flailing Around
- Group Move
- Looking Better
- Stripped servo gear
- Stacking Batteries
- LetsMakeRobots!
2008/10/7
I'd always wanted to play with a robotic arm. I intended to build my own, but as I started looking into the complexity of the mechanisms for the rotating base and the grippers, and comparing the cost of buying the servos and materials myself compared to buying a pre-designed kit like LynxMotion's, I ended up deciding to just buy the Lynx 6 kit. I still feel the cost is higher than it needs to be, but the servos do make up about half of the kit cost, so it doesn't feel quite as excessive. Still, it's certainly not a cheap kit.
But it's oh-so-fun. The arm took about five hours to build, which was more than I expected. I bought the "no electronics" kit, which is about $125 cheaper but doesn't include their SSC-32 servo controller and RIOS Windows software. I didn't want this robot to be tied to a computer -- some of the ideas I have in mind for it would require it to sit and run on a table unattended indefinitely, and I didn't want to dedicate a computer just for that. So I ordered an Arduino and a Pololu Micro Serial Servo Controller instead.
I knew that this solution would require more work on my part, because the Lynx SSC-32 has some pretty advanced servo control features, and the RIOS software handles all the advanced calculations like inverse kinematics and recording motions for playback. I'd have to come up with my own solution from scratch.
At Frits' suggestion, I rigged up six potentiometers to let me easily input values for each of the six joints. Due to my affliction of Can-Never-Leave-Well-Enough-Alone-Itis, I ended up spending two days just on that input mechanism, building a fancy aluminum box and a PCB for it, and fashioning a wire harness complete with detachable connector. Overkill. But it does look kind of nice :)
When I run that function, the Arduino simply reads the six pot values, updates the joint positions to match, and prints the new values to the serial output on the computer. That makes it much easier to find the combination of values that position the arm where I want it. When I'm scripting a motion, I pose the arm with the pots, write down the six values, and add them to the code as a new 'pose' array. Then the code can simply move from one pose to another.
At first, I was using a 4x AA battery pack to provide the 6v for the servos, and the motion was really erratic and weak. It could barely pick anything up, and when one of the servos was straining (like when the gripper was holding onto something), the other servos often didn't move. It sounded like a problem with too little current. I couldn't find official numbers on how much current AA batteries can comfortably put out, but it sounds like it's only around 300ma (2C). I bought a 6v, 2.5A AC adapter at Radio Shack, and that took care of the problem. The motion is now crisp, fast, and powerful.
Coding smooth, reliable motion IS turning out to be a challenge, but I've made faster progress than I expected. At first the arm did tend to jerk around and knock stuff over, as you can see in the second video. The main problem was the fact that I was simply updating new positions for the six servos, and letting them all travel to their respective positions at their own rate. This meant that the arm would end up where you wanted it, but it was hard to predict what path it would take to get there. Also, at 6v with a healthy supply of current, these servos can move pretty fast, so rather than lift those 9v batteries up for my inspection, the arm tended to just fling them across the room. Fun, but needs work.
The feature I really liked about the LynxMotion SSC-32 servo controller is that it supports a mode called "Group Move," where it times each servo's motion so that they all reach the new positions at the same time. The Pololu servo controller I have doesn't support that feature, so I decided to implement that in the Arduino. It worked surprisingly well, and the third video shows a simple test of that feature. The fourth video is the same routine as the second, but using the Group Move feature and using 1 second for each motion. It works much better. This seems like a good start. I'm excited. Think of all the things I can pick up now!
Rather than flood this page with images, you can see photos of the assembly process etc in my photo gallery.
2008/10/11
Disaster! I've broken it. I noticed my Group Move tended to be a tiny bit jerky, which suggested that each iteration of the loop was taking too long. I know that floating point math is MUCH slower than integer math, so I was trying to optimize my Group Move algorithm to use only integers. Unfortunately, I didn't realize that so many of the values I was working with were less than 1.0 -- they got rounded down to 0, which wreaked havoc with the math. When I tested it, the arm flailed around like it was suffering from epilepsy, and it literally broke its wrist :)
I have a wrapper function for moving servos which makes sure that I don't send them to a position they can't reach, but in order to speed up the Group Move, I was bypassing that function and just sending direct positions to the servos. Apparently the wrist rotate servo was asked to do some unholy motion that it didn't like and it stripped half the teeth off of one of its gears (see video).
HiTec makes a metal gear upgrade pack for this servo, an HS-85BB, but my local hobby shop didn't have it and I was impatient, so I just bought the metal-geared equivalent, HS-85MG, and replaced the servo. Eventually I'll order a gear pack to repair this servo and have it available for a future project.
I had already been considering upgrading the gripper servo, an HS-81, to metal gears, because that was where I really noticed a weakness. Whenever I tried to pick something up, if I applied too much pressure, the gears would slip and it'd make a gross grinding sound. The hobby shop did have a metal gear set for that servo, so I bought that as well and upgraded it.
The difference is definitely noticeable. Now I can squeeze as hard as I want, and the gears don't grind. In fact, the limitation now is that when the gripper servo is straining, it apparently consumes enough current to cause voltage fluctuations or something, and the gripper occasionally twitches if I squeeze too hard. So I still have to be aware of how much pressure it's applying, but if I apply too much pressure all that happens is that whatever I'm carrying gets dropped, which is better than breaking gears.
I've also been doing more reading on kinematics, both forward and reverse. I implemented forward kinematics (calculating the X/Y/Z position of the gripper based on the angles of each of the joints), and it works great -- I can place the arm in any position, and it outputs the coordinates in inches. I've tested by measuring the actual position, and it's quite accurate.
I tried coding up inverse kinematics too (determining the joint angles you need in order to put the gripper in a certain position), and just like I'd read, it seems to be too heavy to be done on a microcontroller. I got something that sort of worked, but it took several minutes to move the arm to a point just a few inches away. I'm going to keep experimenting with it, but I've pretty much accepted that eventually I'll have to hook this up to a little Linux machine or something. I imagine eventually I'll mount it on a mobile robot so it can drive around and do interesting things, and I figure that robot will be controlled by some sort of onboard nano-ITX computer or something.
2008/12/2
As I mentioned earlier, I've come to terms with the limitations of trying to control an arm with a limited processor like a microcontroller, so I'm not going to put more effort into simple scripting. I'll set the arm aside until I can afford to buy a cheap laptop and webcam to set up the arm with vision processing etc. I think that will make for much more interesting programming possibilities. I'd also like to make it mobile, so that it can interact with more than just the little part of the world that's within its reach.
But in the meantime, I put together one last fun little video, which you can see above.
Flail around and knock over stuff
- Actuators / output devices: 4x HS-475HB, 1x HS-422, 1x HS-82MG, 1x HS-85MG
- Control method: Homebuilt wired remote control (6 pots)
- CPU: Arduino diecimila
- Power source: 6v 2.5A AC Adapter for servos, USB power for Arduino
- Target environment: Tabletop