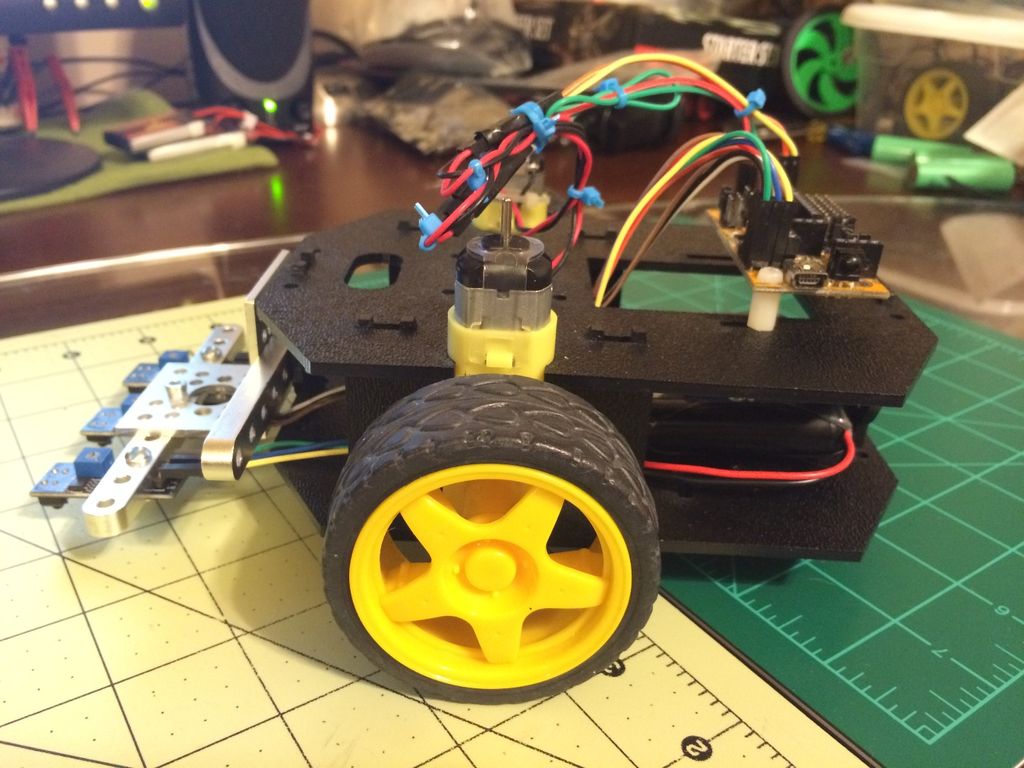
Simple Line follower robot using a Actobotics Runt Rover Sprout (SHR)
Next to obstacle avoiding robots, the most common beginner bot would be a line follower. I myself love line followers, and they are some of my favorite weekend builds. It's just so fun watching a little bot following little black line over and over, but that's just me :-). There are also many practical uses for line following on a robot. Simple fixed navigation, docking guides (i.e. finding a charging station) as well as competition and many other uses.
A basic line follower is not all that complicated in reality, and can be done with just one sensor, but for better results it's best to use at least three or more sensors - the old saying “The more the merrier” but only to a point! For me, anything past 16 is overkill for a normal line following function.
There are many ways to detect lines, infrared, normal light, cameras etc. In basic line following, you are looking for light and dark differences, in this case a black line on a white or light surface.
This little bot will use pre-made IR sensor based on the TCRT5000 IR Rx/Tx diode pair. This module is easy to mount and use. It’s also very inexpensive and can be found from many sellers on eBay and other online shops.
A line follower needs a good base as a starting point to build from, and for this bot I will use the Actobotics Runt Rover Sprout chassis. It’s has a great form factor for line following, and lots of mounting options. It is also very cost effective for budding robot builders. If you have another chassis already or prefer a different one, that will be fine as well and should not be a big problem.
The line follower we will build for this project will have three (3) sensors spaced about 5mm apart from each other. The controller that will be used is an Micro Magician Controller from Dagu, but an Arduino Uno or clone with sensor standard shield and some sort of motor controller should work with some code changes. I chose the Micro Magician because that's what I had on hand that matched this project best. It has a built-in motor h-bridge, male pins for sensors and power switch. It also has many other features.
Things you will need to download
- The Arduino IDE
- The Robot code below attached in the .zip file
MicroM library for the Micro Magician robot controller board
The Metro library
Parts List
- Actobotics Runt Rover Sprout chassis
- Dagu Micro Magician Controller board V2
- 3x TCRT5000 or similar module
- Female to Female Dupontjumper wires
- A 'AA' 4 slot battery holder (for alkaline) or a 5 or 6 slot (for rechargeable AA’s) or one lithium ion 2 cell pack (7.4v) and charger. For this bot I use a 6v NiMH battery pack
- 1x Actobotics 90° Bracket
- 2x 3.85” (11 holes) (part #585410) Actobotics aluminium beams
- 2x .5” long 6/32 or m3 screws with nut
- 3x .25” long 6/32 or m3 screws with nut
Parts Sourcing
All of the Actobotics parts like the chassis and beams can be gotten from ServoCity, Sparkfun, RobotShop or other Actobotics distributors. Check the web for more details. The Dagu Micro Magician Controller and other listed electronics can be gotten from RobotShop, eBay, Adafruit or other outlets.
Chassis Assembly
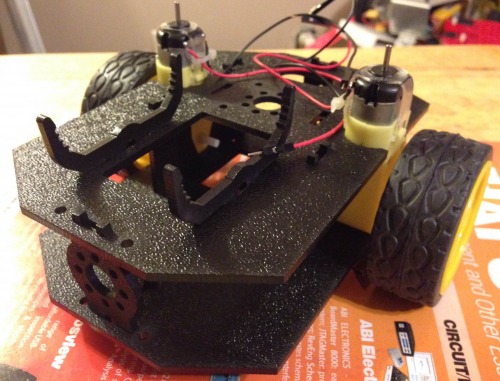
First assemble chassis following the instructions included with the chassis or video. After finishing you should have something like the image. Do all steps except keep the front ABS hole bracket for use in the next step (the one closest to the wheels).
Line Sensor bracket
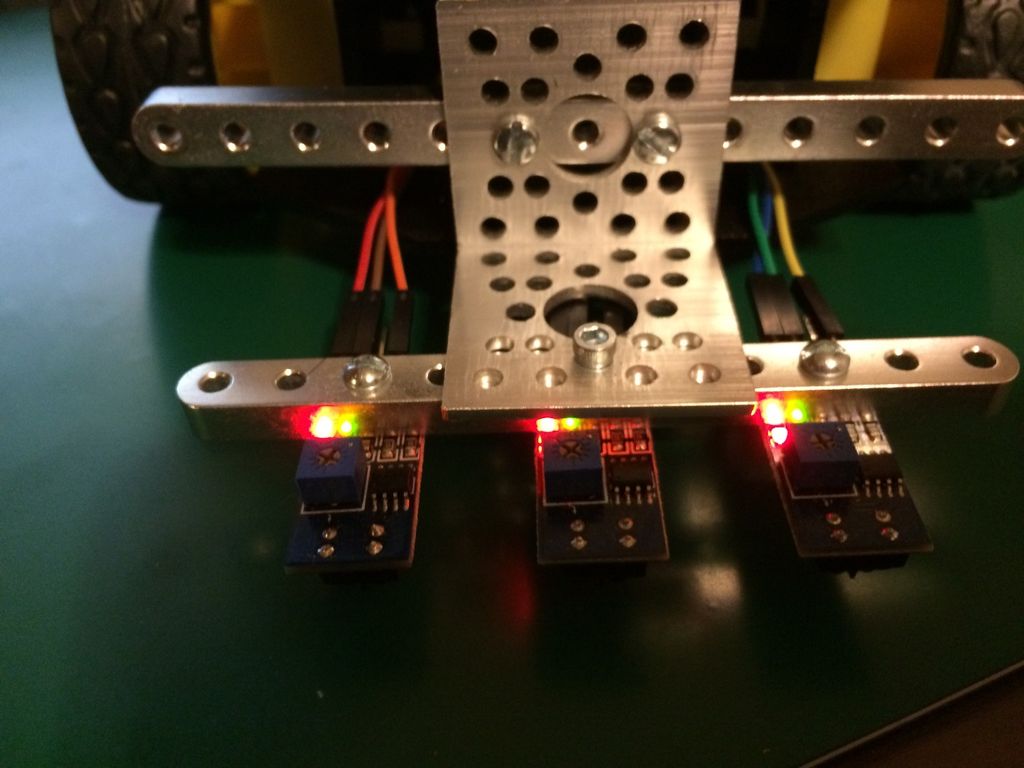
After the chassis is assembled, take the two Actobotics beams, metal bracket, ABS bracket and screws and put the line sensor assembly together as pictured. The three (3) .25” screws/nuts are used to mount the IR sensors to the beam. Mount in as shown (Though your beams may be shorter than pictured)


Once the sensor assembly is together, take the assembly and use the two .5” screws and nuts to mount it on the ABS hole bracket you kept off the chassis. Do as pictured.


Now place the ABS bracket in it’s place on the chassis, snapping it in securely.


Mounting the Dagu controller
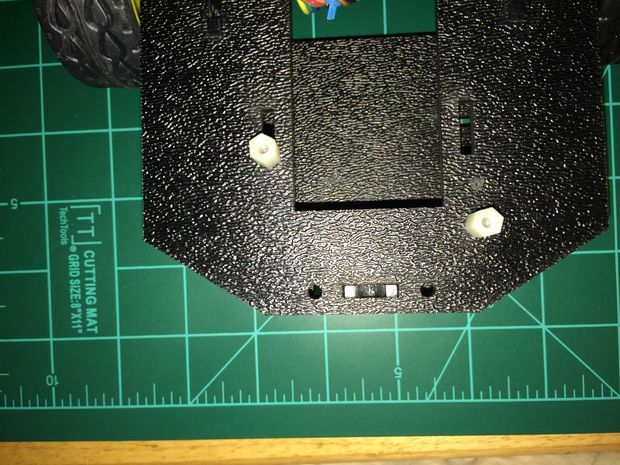
Next attach the Micro Magician controller board onto the screw mounts. You will have to make a hole for one of the mounts (I just use two standoffs on mine). This can be done with a drill or even a small screwdriver. You could also use double sided sticky tape to place it on the chassis.
Wiring it all up
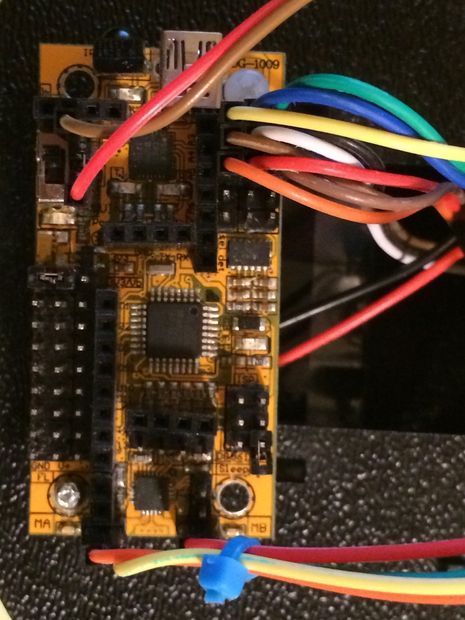
Now you can start connecting up wires to the different components. First connect the motor wires to the motor output pins on the Magician controller. For this bot the left side motor (with the rear of the bot facing you) will be connected to the ‘A’ channel. The black wire is in the first pin and the red the second pin. This leaves the right motor going to channel ‘B’, with with black again on the first pin and red in the second. See pic for more details. You may need jumper wires to plug the motor wires in (as in picture)
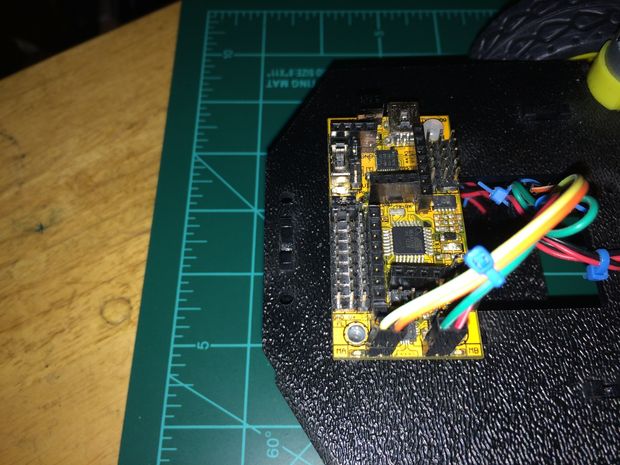
At this point you can also connect your battery.
After the motors are wired, you can connect the IR sensors up.
The left sensor (same side as the left motor above)
- Sensor VCC to the VCC Pin on the A3 row on the Dagu controller board.
- Sensor GND to the GND Pin on the A3 row on the Dagu controller board.
- Sensor AO to Pin A3 on the Dagu controller board.
The Middle sensor
- Sensor VCC to the VCC Pin on the A4 row on the Dagu controller board.
- Sensor GND to the GND Pin on the A4 row on the Dagu controller board.
- Sensor AO to Pin A4 on the Dagu controller board.
The right sensor (same side as the right motor above)
- Sensor VCC to the VCC Pin on the A5 row on the Dagu controller board.
- Sensor GND to the GND Pin on the A5 row on the Dagu controller board.
- Sensor AO to Pin A5 on the Dagu controller board.
DOUBLE CHECK ALL WIRING NOW! :-)
Loading the Code
Download and the attached file and unzip it to a location you can find it on your computer.
Open up the Arduino IDE and do a File->Open and go to the location you unzipped the file to.
Now click Tools->Board and select the Arduino Mini Pro w/Atmega328P
Then select your serial port and click the botton to upload the code.
If you have issues with the Arduino IDE go here or here for help. There you can find help on instillation and trouble shooting.
If you have issues with the Micro Magician or it's drivers, go here. I actually recommend reading over the Dagu controller Instructable before going forward with it's use here.
To learn more about the code, have a good read of it in the Arduino IDE or your favorite text editor. It's commented well and will give you a good idea how the line follower works.
Here is the actual code the robot uses:
/*
   Basic line follower.

   Goal in life...
      Finding lines to follow :-)

   Written by Scott Beasley - 2015
   Free to use or modify. Enjoy.

   NOTES: Before starting the bot up, place it where the CENTER sensor is on the
   line and the left and right is off.
*/a

/*
   Uses the MicroM library for the Micro Magician robot contoller board.

   Download from https://sites.google.com/site/daguproducts/home/arduino-libraries
   Unzip and copy to your Arduino library folder or follow the instructions
   here: http://arduino.cc/en/guide/libraries

   Uses the Metro libary as well. See http://playground.arduino.cc/code/metro
   for downloding and more infomation.
*/

#include "microM.h"
#include "Metro.h"

// Sensor pin defines
#define SENSOR_L A3 // Left sensor pin
#define SENSOR_M A4 // Middle sensor pin
#define SENSOR_R A5 // Right sensor pin

// Speed defines
#define ONLINESPEED 110 // Speed to move when the bot in on the line
#define FORWARDTURNSPD 100 // Turning forward speed
#define BACKWARDTURNSPD -85 // Backup turning speed

// Micro Magician uses 0 for no brake and 1 for brake
#define BRAKEOFF 0
#define BRAKEON 1

/*
   Globals area. Try to keep them to a minimum :-)
*

/ Create the motor and Metor objects with use to interface with
Metro sensorrd = Metro (5); // Timer for every 5ms

// Storage for the "calibation" numbers. Only using the online_avg
// but you may want to look at the offline one for compairing sake.
int online_avg = 0, offline_avg = 0;

void setup ( )
{
   // Do a SIMPLE calibration. Not a great one, but one.
   for (int i=0; i < 20; i++) {
      offline_avg += analogRead (SENSOR_L);
      offline_avg += analogRead (SENSOR_R);
      online_avg += analogRead (SENSOR_M);
   }

   online_avg = online_avg / 20;
   offline_avg = offline_avg / 40; // Average of the Left and Right sensors

   // Start moving the bot forward.
   microM.Motors (ONLINESPEED, ONLINESPEED, BRAKEOFF, BRAKEOFF);

   Serial.begin (9600);
}

void loop ( )
{
   // Read the sensors every 5ms and act upon it.
   if (sensorrd.check ( ) != 1) {
      return;
   }

   // Read all 3 senors and return line position condition
   byte direction = read_sensors ( );

   switch (direction) {
      case 0: // On the line Middle sensor. Keep moving forward.
         microM.Motors (ONLINESPEED, ONLINESPEED, BRAKEOFF, BRAKEOFF);
         Serial.println ("moving forward");
         break;

      case 1: // On the line Left sensor. Move right forward.
         microM.Motors (FORWARDTURNSPD, BACKWARDTURNSPD, BRAKEOFF, BRAKEOFF);
         Serial.println ("moving right");
         break;

      case 2: // On the line Right sensor. Move left forward.
         microM.Motors (BACKWARDTURNSPD, FORWARDTURNSPD, BRAKEOFF, BRAKEOFF);
         Serial.println ("moving left");
         break;

      case 3: // Lost! Move right (spin).
         microM.Motors (BACKWARDTURNSPD, 0, BRAKEOFF, BRAKEOFF);
         Serial.println ("lost!");
         break;
   }
}

// Read all the sensors and figure out where the line is
byte read_sensors ( )
{
   byte sensors = 3; // Init with lost setting and change otherwise.

   // Read Sensor in middle
   int mid_read = readSensor (SENSOR_M, 2) - online_avg;

   // Read Sensor on Left
   int left_read = readSensor (SENSOR_L, 2) - online_avg;

   // Read Sensor on Right
   int right_read = readSensor (SENSOR_R, 2) - online_avg;

   // Figure out line postion in regards to the 3 sensors
   // The sensor with the largest number wins!
   if (mid_read > left_read && mid_read > right_read)
      sensors = 0;
   else if (left_read > right_read)
      sensors = 1;
   else if (left_read < right_read)
      sensors = 2;

   // Return postion found or '3' if no line was found
   return sensors;
}

// Read sensor n times and return an average reading
int readSensor (int analog_pin, int sample_rate)
{
    int sum = 0;

    for (int i = 0; i < sample_rate; i++) {
       sum += analogRead (analog_pin);
    }

    return (sum / sample_rate);
}
Bot wire/motor trouble shooting
As said before :
DOUBLE CHECK ALL WIRING!
If you need to get your motor wiring correct, you can add a return at the very top of the loop ( ) function. This will allow you time to switch the motor wires around. Do this until the robot wheels are BOTH going forward. Once they are, you should be all set.
example:
void loop ( )
{
return; // Place return here and upload to test/set wires.
// Read the sensors every 5ms and act upon it.
if (sensorrd.check ( ) != 1) {
return;
}
.
.
.
Starting the bot line following:
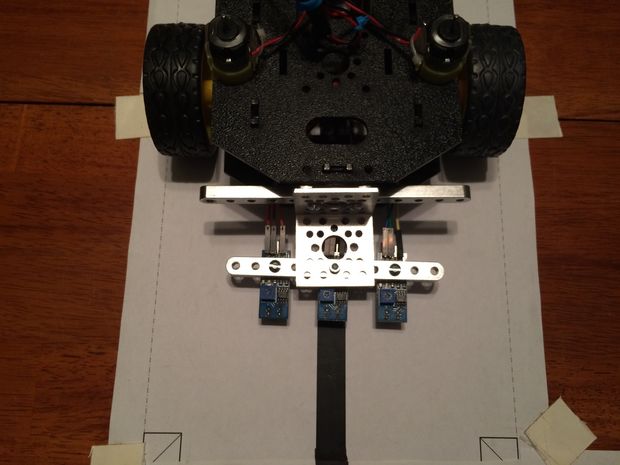
Before starting the bot up, place it where the CENTER sensor is on the line and the left and right is off the line. Once power is on, the code will do a quick and simple calibration. See code for more info.
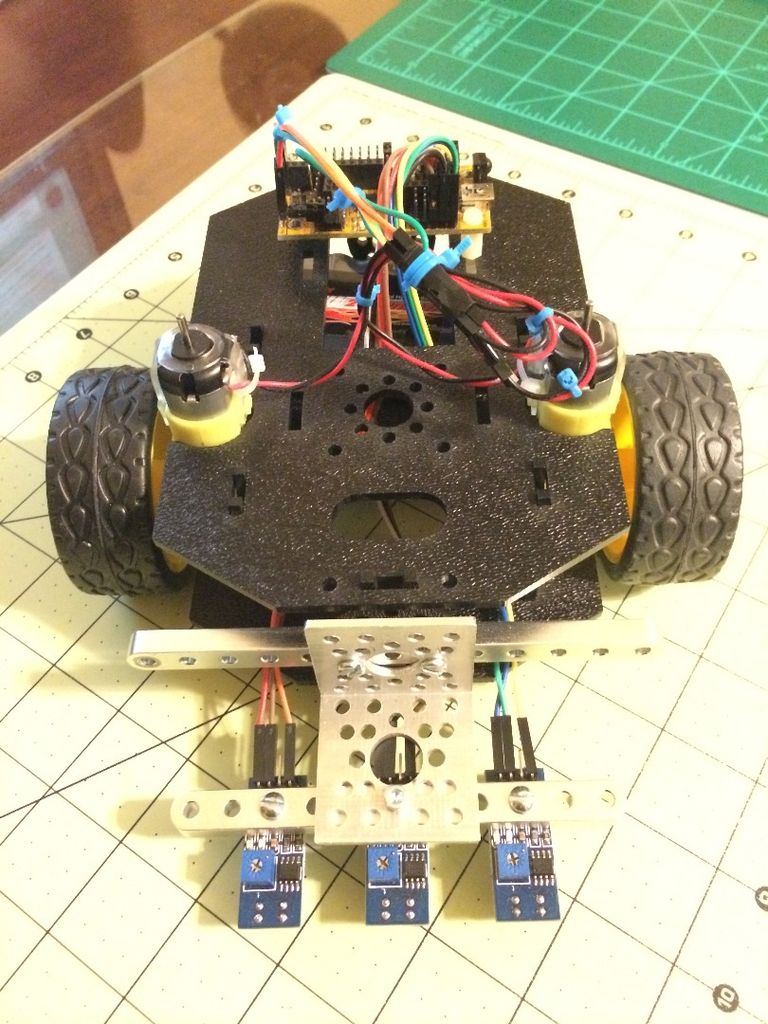
Line follower using three line sensors with a Dagu Micro Magician on an Actobotics Runt Rover Sprout chassis. Uses 6v NiMNH battery pack


