


SDD Mr. Lawng
I wanted to radically change the Mr. basic model, but still keep as much as possible of the original kit.
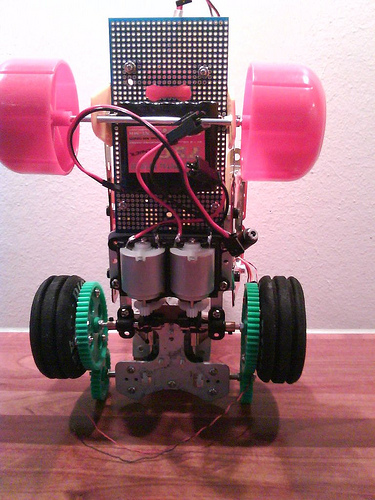
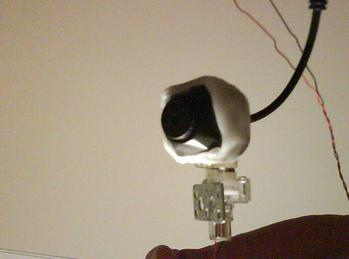
Starting from left on the main picture, you can see a big yellow water tank (and some of the orange water pump) above the red rear wheels. some Meccano parts are used to make a roof over it, and the electronics will be mounted up here. In front of the roof there's a wireless camera mounted on a GM10 motor. The camera motor is mounted on the back of the paint stick holding a SRF05 distance sensor. and beneath there's a small servo operating a water nozzle
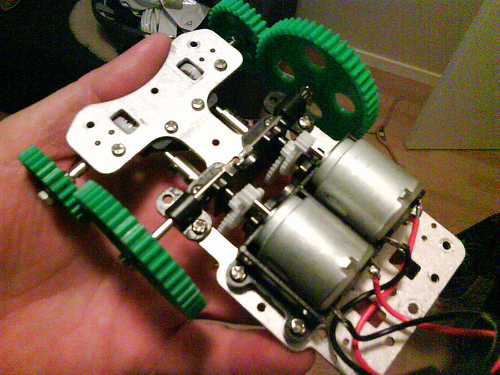
As seen in the picture below I've added some extra gearing (the gears was a gift from the very talented TheCowGod), and the drive wheels is mounted directly to the biggest green gear.
.
Racing foam wheels are fitted with self tapping screws through the plastic gears.
Back wheels are from a toy plane, I was thinking of using omniwheels, but never got around to fitting an axle.
The PCB is attached to the back of the Mr Basic chassis and adds almost 19cm of length.
Hopefully the 6volts battery pack between the backwheels will be sufficient to power everything.
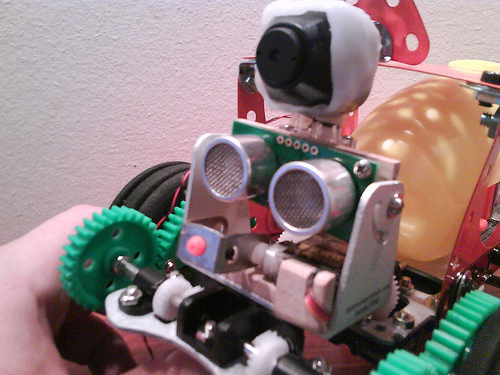
Here's the front assembly, two screw holding the black plastic gearbox are also holding the sensor mount in place, some paintstick is holding the servo controlling the orange nozzle with a piece of Meccano. another paintstick has the ultrasound sensor mounted on the front and a panning motor holding the camera on the back. Polymorph is used to mount the camera to the motor. See Below
As you can see I rely on LMR to get this project done:
- I wouldn't have known Picaxe 28X1 existed without LMR
- I wouldn't have used wood paint sticks without Fritsl
- I wouldn't have thought of water squirters without Oddbot
- I wouldn't have found polymorph if Inopia hadn't mentioned eBay in the forums
- I wouldn't have the aluminium tilt mount without Dagu
- I wouldn't have the necessary gears without TheCowGod
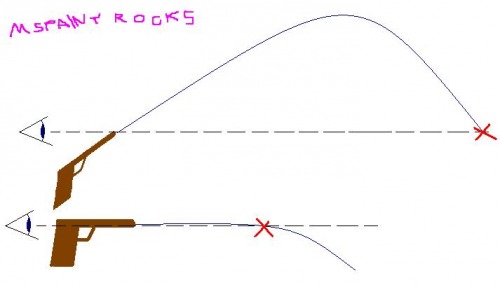
I planned to make it into a remote controlled vehicle with a panning camera and a remote controlled water squirter. The camera would look through a sight cross. A distance sensor should measure the distance to the target, and raise or lower the nozzle to compensate for the natural curved trajectory path of the projectile (water in this case). This is the principle:
The wireless camera should turn left and right based on the wheel movements, and center when vehicle is stationary.
That was in theory. In real life however, things are different...
First of all, SRF05 ultrasonic distance sensors are fragile things and will break if you don't pamper them. At least mine did, and I only found out 48 hours before the challenge deadline, so the whole "sensing distance and adjust trajectory hight"-scheme went down the toilet.
Second, the theory of connecting a spring-loaded GM10 self centering motor in between the two main motors is good K.I.S.S. engineering, but when you add PWM motor control into the mix, it muddles up. So even though the SDD Mr. Lawng still has a camera on top, I'm not using it. The camera movement is to unpredictable and jittery.
So, basically I've ended up with a remote controlled vehicle with a remote operated water cannon with tilt control.
As I write this I'm waiting for some wire glue to dry so I can take it out in the snow for a spin and some video shooting. I have finished working on the robot for the challenge deadline, but wont be able to hook up my phone cam to a computer until later in the evening. I hope my fellow competitors wont punish me too hard in their judgement for this latency.
CASTROBOT - Computer ASsisted Targetting Remotely Operated roBOT
- Actuators / output devices: servo, water pump
- Control method: RC
- CPU: Picaxe 28x1
- Power source: 7.2V 1500mAh RC battery
- Programming language: Picaxe basic
- Sensors / input devices: SRF05 Ultra Sound, RC Receiver
- Target environment: streets