


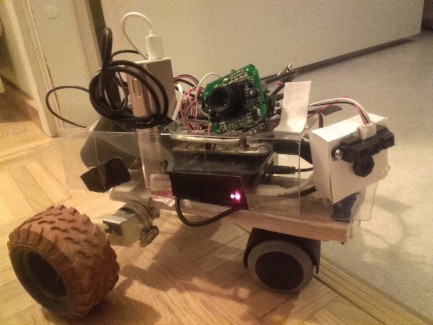
Scrapsberry Sucker
Scrapsberry Sucker is my second robot project. It's been a long while in the making, and the aim is to create a self-navigating mini-hoover robot. However, during the making process, I'm adding random features like two-way audio and video, web interface for driving around, playing music (mp3) etc. random stuff that's fun to do.
http://imgur.com/dIRdeF4
https://github.com/unelsson/scrapsberrysucker
Old test with wires in front of camera https://youtu.be/EKhF2rIt7zg
Outdoor driving https://youtu.be/wnKwwsu1tHQ
Feature demonstration (Finnish) https://youtu.be/-hSiQnmTCio
Hardware
- Raspberry pi 3
- Freeduino (Arduino Duemilanove)
- Basic 3-wheel chassis (2 x geared 1:120 dc motors, wheels from an old rc-toy, turning wheel from hardware store).
- L293B motor driver ---> changed later to DRV8833 motor driver
- Old logitech webcam x 2
- Microservo
- Laser
- Clas Ohlson 6000mah battery, 2 x 5V 1A USB (1 port wired for motor power, 1 port for everything else).
- 8 x 1.2V NiMH for motor power (could also use 6 x 1.2V)
Sofware features
- web interface to drive the robot
- gamepad support via html5 and websockets
- wasd -support via ssh interface, driving with html-buttons
- openvpn client, making it possible to use wifi from mobile phone (using raspberry as html server, but openvpn client)
- mjpeg-streamer and uv4l -combo that gives simultaneous video and audio (via uv4l's webrtc) to internet
- html user interface that drives python programs
- python programs that give instructions from raspberry pi to arduino
- arduino that interprets serial com instructions, and drives the motors accordingly
Robot Building Diary 20.6.2016
Feeling hopeful and satisfied. Announcement day for Scrapsberry Sucker here at LMR. I feel like this is actually going to work. I've went through some hard learning curve with my previous robot that had problems with bad soldering connections, bad batteries, dropping tires, destroyed gear-boxes, lack of memory and CPU speed and ineffective distance sensors. Today marks a day when I've succesfully tested everything needed for this new robot in separate tests and everything works!
I wrote a test code for running motors, lasers, webcam and servo and confirmed everything working. Pulled some hair earlier today with soldering connector wires to motor driver base, but the end result feels solid. Everything can now be connected with female jump wires, so it's easy to assemble and disassemble. I tested my webcam-laser -combo for trigonometric distance sensor, and the theory works and basic code for image sensing works. Some problems arise when pointing laser to glossy surfaces or red environments, but I should be able to filter out bad results with software. Red filter in front of camera enchances contrast of a laser dot in bright environments. Chassis holds and works, even if it's put together from scrap and held together by plumber's tape. Battery seems to be enough for running everything and a lot more at the same time. I've written a particle filter localization for virtual environment, and with decent sensor data it's extremely effective. Proper mapping will be a challenge, but I'm not aiming for a perfect SLAM anyway. Hoover will be built from 5V fan and some filter, and very likely will not be very effective, but that's not the main point is it!
Robot Building Diary 18.2.2017 part I
I haven't had time or energy to work on this project until today. Although individual parts are all tested, getting everything to work together is a big thing. Today I made a sturdier chassis from some leftover wooden sticks, and chiselled/sawed a hole for servo holding sharp IR sensor. Quest for getting wheels attached properly continues, as I had at some point lost the original screws, but hopefully glue will hold for now. Big thing on programming side was to connect Arduino to Raspberry Pi and get all Arduino coding environment working on Pi, but now it's all good, serial connection is piping IR sensor information to Raspi. Next thing would be to build code for Raspi to tell Arduino to do a full servo sweep scan, and send all those IR readings back to Raspi...
Robot Building Diary 18.2.2017 part II
Attached Servo to Arduino and coded a small Sweep test program (that seems to work fine), soldered (hopefully) everything that I need in the future... Laser-webcam system is put on hold, as there's a lot to do before that.
Robot Building Diary 18.2.2017 part III
Having problems with DC motors or DRV8833. VMM suddenly stopped outputting power, although it did work for a while and had to change Arduino power straight from VIN. Arduino works okay, but DC motors wont budge. I stripped my code down to troubleshoot, testing both analogWrites and digitalWrites, went through everything with a multimeter and it seems that Arduino and it's output pins are running fine, but DRV8833 outputs are most of the time low, but sometimes react with 0,3V. I've tried to test and check all wires to make sure I'm connecting arduino pinouts to A and B terminals respectively, and that motors are also properly connected to A and B. Tested the motors straight from battery, and they run without problems. Maybe there is something going on with computer fan connected to same power, is it somehow drawing all the power? Quite clueless with this one.
Robot Building Diary 20.2.2017 Part I
Made a better ground soldering connection and tested voltages across multiple configurations. Connecting power via VMM results in a voltage drop to around 4.5V and therefore Arduino won't even budge. Connecting power straight from battery (measured 8.4V when full) to Arduino makes it run, and surprisingly, motors started to turn slowly, and everything keeps running even when one motor stalls. Perhaps it indeed was about the bad ground connection who knows? Motors are geared 1:120 so even though I'm getting slow RPM, the torque might be just about enough to propel robot on ground. It should be about time now to build a code for operating logic, motors, fan and servo simultaneously and do some actual movement tests.
Robot Building Diary 20.2.2017 Part II
Motors indeed turn slowly, and there's too little torque for anything. Took off computer fan and made a separate power for servo from USB power supply just to make sure it's not about those. Took away one motor for testing, and straight from battery it runs well (around 8V). When I connect it to DRV8833, motors stall, DRV8833's IN is 5V(digital on), OUT is 0,5V even when voltage across VIN-Ground is 8V.
Robot Building Diary 24.2.2017
So, I've been troubleshooting the problem with DRV8833 for some days now. Got some great help from letsmakerobots community and Polulu's technical support. Thank you very much!
It looks like I had damaged my DRV8833 at some point, perhaps overcurrent or overvoltage. This DRV8833 unit has been around for quite a while, so it's after all more than likely. Close-up picture shows some melted plastic next to transistor and some crap at.. is that a diode? https://drive.google.com/open?id=0B52WVPgC7vE9N2xjUGphXzRHNXc
So it started to look like I needed another motor driver. Luckily, I had planned this out for a long time ago and bought some parts from local electronics store. It just turned out I had to do a bit more than I expected - build a board for mounting L293. It was a good day of inhaling soldering and plastic fumes, and getting close to mental breakdown, and after finding the last missing connection I was surprised to see that I had actually built a working system. Images below. Although it looks disgusting, it WORKS!
http://imgur.com/eMRpiDz
http://imgur.com/r01EKdW
Robot Building Diary 25.2.2017
I experienced wheels falling off yesterday, so used some epoxy mass to glue wheels properly. Now that wheels are tightly on motors, I assembled rest of the parts into one mess, made a github repository for the code, and enabled SSH for easy coding. In a movement test Scrapsberry propels forward mindlessy, while computer fan pushes dirt from the floor into air. I'm quite happy. :)
http://imgur.com/N2CECLa
Robot Building Diary 26.2.2017
Attached webcam for testing, and successfully managed to stream to udp with avconv. Functional command for streaming was finally: "avconv -f video4linux2 -s 320x240 -i /dev/video0 -f mpegts -ss 0:0:2 -t 30 udp://[LAN_IP_ADDRESS_OF_DESKTOPCOMPUTER]" and that took quite a while to figure out. Currently installing opencv3 for python to make some image processing, and additionally to get keyboard controls via wifi to drive Scrapsberry around via SSH. Wrote some basic (testing) code for Raspi to read IR sensor data sent from Arduino.
Robot Building Diary 27.2.2017
Worked for a while with getting serial communication work as it should. Combining serial com and webcam I have a fancy wifi/ssh controlled indoor-rover. Kind of works.
https://youtu.be/EKhF2rIt7zg
Robot Building Diary 28.2.2017
Though https://www.robotshop.com/letsmakerobots/pibot-ugv-observer had great see-through case, so built similar from scrap materials. It pretty much keeps the wires safe inside, and I was able to mount a webcam on it properly. Lost of accidents happened though - I crashed Scrapsberry into a wall, and a wheel dropped off, so had to glue it back on. Apparently not even epoxy mold will hold when you drive fast enough. Another accident happened when motor wire got between fan blades and snapped off. After resoldering I applied some more tape to hold wires in safe places. Third major accident happened while coding serial communication data, and testing opencv3's capability for outputting video stream online. I think I pressed ctrl-c while running python program I had coded for a long time, and the main core code file just disappeared. The bad stuff is that this time I wasn't working with git - git is full of useless tests and bad code, I wasn't able to upload the "good" code before it all vanished. Well... Even if it's lot of work for nothing, at least I now know how to implement what I want :/.
Robot Building Diary 28.2.2017
Rewrote the code for handling sensor ir data from Arduino. Wrote basic opencv2 -based code for mapping. Trigonometry took some thinking, but the basics are there for tuning.
First scan in a map... http://imgur.com/pAj50DC
Robot Building Diary 8.3.2017 Part I
Taped together first try of vacuum system. It's.. very cool.. but, pretty ineffective: Freely falling dust particles and small strands of hair are light enough to be pulled, but vacuuming a grain of rice is still beyond the capabilities of Scrapsberry. Sometimes Scrapsberry just ends up pushing dirt away instead of pulling it in. Air filter leaks a bit.
http://imgur.com/EDkCwc0
Found a way to capture images from mjpg-streamer webstream with python3's urllib.request.urlopen, just slightly modifying the code at http://www.pyimagesearch.com/2015/03/02/convert-url-to-image-with-python-and-opencv/ . This opens up a way for implementing robotic vision systems for Scrapsberry. I'm thinking of taking several key photos for recognizing different areas of apartment and then using opencv2's template matching to help robot with localization.
Robot Building Diary 8.3.2017 Part II
Worked on mapping code and tuned IR scans.. I'm getting better and better maps, yet still quite fundamentally flawed! :) Different scans from my apartment can be looked at http://imgur.com/IDzQMUT . Some indoor features can be recognized from these maps, but there are still way too many movement errors and scan errors present. Although it's probably too much to hope to get a good map, I think a lot can still be done on software side. Maps can be useful even when they are far from precise and exact.
Robot Building Diary 10.3.2017
Implementing basic particle filter... As is to be expected, map is totally useless in this phase. I'm not sure what kind of mathematical models I should use. Especially while mapping simultaneously with localization I tend to get a mess that is absolutely useless. Probably some improvement can be expected from tuning particle filter settings, but it feels like a very difficult task.
Python3's array's and integers give me a headache. Nothing in python3 seems to work out of the box, and things that python3 considers as errors feel very counterintuitive. Not everything works like in documentation and following tutorials I end up with errors, even in something as simple as creating or sorting an array has taken hours of programming time. I wonder if I'll ever get used to this.
http://imgur.com/7SoyRv5
Robot Building Diary 29.9.2017
I had problems with
a) Getting simultaneous webcam and audio. Through my logitech webcam simultaneous audio and camera (mjpeg-streamer and ffmpeg/avconf) resulted in garbled video, even though audio or video would work separately. Uv4l uvc driver wouldn't work with my old logitech webcam.
b) The chassis started to slowly break apart, rear axle and wheels had unwanted movement.
c) Motor driver wires were loose and unconnecting when crashing, moving or storing the robot.
d) The UI was lacking, and I wanted a webapp that could drive this robot.
e) The vacuum mechanism didn't suck dirt. It just sucked, actually most of the time it pushed dirt away.
I decided to fix those.
a) I installed another old webcam, so now having two webcams in place, one would act as a microphone and other as a camera. I started mjpeg-streamer on port 8090, then created a virtual video device with uv4l -driver mjpegstream, and I now have a working uv4l webrtc with audio and video! What a great success! :)
For me it took at least 8 - 12h to solve this problem, so if it helps someone, commands to start video with this setup are:
./mjpg-streamer/mjpg-streamer/mjpg_streamer -i "/home/pi/mjpg-streamer/mjpg-streamer/input_uvc.so -d /dev/video1 -f 30 -r 320x240" -o "/home/pi/mjpg-streamer/mjpg-streamer/output_http.so -w ./www -p 8090" &
uv4l --auto-video_nr --driver mjpegstream --uri http://192.168.0.10:8090/?action=stream --server-option 'port=8080'
And you need /etc/asound.conf to look something like this:
pcm.!default {
type asym
playback.pcm "plug:hw:1"
capture.pcm "plug:dsnoop:0"
}
b) Disassembling and reassemblying the chassis. I wanted to fix my custom-made motor driver and make it fit in a smaller space, but while doing this I accidentally broke a connection from my custom-made motor driver, and therefore it was easier to just reassemble everything and replace it with my broken pololu DRV8833 unit. I got an advice from Pololu that I could possibly power it with alternative method, bypassing the reverse polarity protection circuit. This luckily worked, so I got more space on frame, as DRV8833 doesn't really take much space.
Attached the rear axle with one bolt through the frame. Then attached the motors to axle with something like this
http://www.l-tuotanto.fi/WebRoot/vilkas02/Shops/20110617-11092-45331-1/5286/69B9/19C6/7444/DBFC/0A28/100B/81DC/Pudotusputken_kiristin.png
c) Then I resoldered all wires properly into DRV8833, and attached webcam wires etc. to frame, taking care to tape all wires properly to frame. Result is a rigid frame and good motor connections. My new tool, a soldering gun, made all the soldering pretty effortless.
d) Took ton of time to find proper way to connect python with html/javascript, but I found a nice working way via wsgi. Just installed apache2, wsgi packages from repository, used commands aen2mo and a2enconf to enable wsgi, python etc.
Here is a picture of my desktop when driving with the robot: https://i.imgur.com/j2PyPAN.png
Important configs were for example:
/etc/apache2/conf-available/wsgi.conf (e.g. to bind website address http://myipaddress/forward to start forward.py)
WSGIScriptAlias /test_wsgi /var/www/html/test_wsgi.py
WSGIScriptAlias /forward /var/www/html/forward.py
WSGIScriptAlias /backward /var/www/html/backward.py
WSGIScriptAlias /forwardsm /var/www/html/forwardsm.py
WSGIScriptAlias /backwardsm /var/www/html/backwardsm.py
WSGIScriptAlias /right /var/www/html/right.py
WSGIScriptAlias /left /var/www/html/left.py
WSGIScriptAlias /rightsm /var/www/html/rightsm.py
WSGIScriptAlias /leftsm /var/www/html/leftsm.py
And the codes are:
Index.html looks like this:
<html>
<head>
<title>Robotin ohjaus</title>
<script type="text/javascript" src="jquery-3.2.1.min.js"></script>
</head>
<body>
<table style="width:300px">
<tr>
<th>-</th>
<th>
<button type="button" id="fw" onclick="fw()">FORWARD!</button>
<button type="button" id="fw" onclick="fwsm()">tinyforward</button>
</th>
<th>-</th>
</tr>
<tr>
<td>
<button type="button" id="le" onclick="le()">LEFT!</button>
<button type="button" id="le" onclick="lesm()">tinyleft</button>
</td>
<td>
<button type="button" id="bw" onclick="bw()">BACKWARDS!</button>
<button type="button" id="bw" onclick="bwsm()">tinybackward</button>
</td>
<td>
<button type="button" id="ri" onclick="ri()">RIGHT!</button>
<button type="button" id="ri" onclick="rism()">tinyright</button>
</td>
</tr>
</table>
<script type="text/javascript">
function fw(){
jQuery.ajax({
type: "GET",
url: "forward",
success: function (msg) {
}
});
}
function bw(){
jQuery.ajax({
type: "GET",
url: "backward",
success: function (msg) {
}
});
}
function fwsm(){
jQuery.ajax({
type: "GET",
url: "forwardsm",
success: function (msg) {
}
});
}
function bwsm(){
jQuery.ajax({
type: "GET",
url: "backwardsm",
success: function (msg) {
}
});
}
function ri(){
jQuery.ajax({
type: "GET",
url: "right",
success: function (msg) {
}
});
}
function le(){
jQuery.ajax({
type: "GET",
url: "left",
success: function (msg) {
}
});
}
function rism(){
jQuery.ajax({
type: "GET",
url: "rightsm",
success: function (msg) {
}
});
}
function lesm(){
jQuery.ajax({
type: "GET",
url: "leftsm",
success: function (msg) {
}
});
}
</script>
<p>Napit liikuttelee Uotin robottia. </p>
<p>portti 8080 Kamera+mikki WEBRTC</a> </p>
<p>portti 8090 Suora kamerafeed</a> </p>
<div id="msgid">
</div>
</body>
</html>
And forward.py looks like this. Less would do, but at least this works! Had to add user www-user (or something like that)to group callout to give access to /dev/ttyUSB0. This is important, so that when apache runs forward.py, the apache is running forward.py as user www-user(orsomethinglikethat), sending commands to arduino via usb/serial (ttyUSB0), as arduino is responsible here for sending the commands to motor driver that finally turns the motors. What's important here are codes "ser = serial.Serial" and everything below it, and command ser.write(b'w') that tells arduino "w". Arduino will read "w" via serial com and drive the motors.
import time
import serial
ser = serial.Serial(
port='/dev/ttyUSB0',
baudrate = 9600,
parity=serial.PARITY_NONE,
stopbits=serial.STOPBITS_ONE,
bytesize=serial.EIGHTBITS,
timeout=1
)
def application(environ, start_response):
status = '200 OK'
output = b'Forwards!'
ser.write(b'w')
response_headers = [('Content-type', 'text/plain'),
('Content-Length', str(len(output)))]
start_response(status, response_headers)
return [output]
e) Took off the vacuum mechanism. I need to design better for this at a later time.
Robot Building Diary 4.10.2017
Added links to two videos (robot feature demonstration and outdoor test). Built a plastic case for sensors (camera and IR sensor) from lid of potato salad with help of hot glue. Shortened webcam wires (cut, peel, resolder, tape). Reconnected servo and IR-sensor, glued the newly made sensor box on top of servo. Set the wires as close to body as possible, and inside the case, if possible.
Robot Building Diary 14.10.2017
Added html5 gamepad-support via websockets (thanks to idea for using websockets from this robot https://www.robotshop.com/letsmakerobots/trekker-opencv-raspberry ). Coding took a while, as I had to learn a lot of stuff, but in the end it's not too complex. Committed all changes to git, if someone wants to copypaste snippets. I've tried to tidy up the code a bit, but definitely not the best still. Had some fun driving outdoors, as driving via webcam with gamepad control is SUPER DIFFICULT :D.
Robot Building Diary 17.10.2017
Improved the robot control by finding proper movement modes relating to joystick movements. Currently using the following movement modes for gamepad: Stop, Forward-right, forward-left, tank turn left, tank turn right, reverse-left, reverse-right. Especially a good find was a proper curve for translating gamepad values from 0 to 1 to pwm values 0 - 255. Using formula y = 2x-x² seems to give a nice curve, increasing the pwm value on low joystick movement, but giving lots of control on pwm values on higher end. Also implementing joystick deadzone, and cutting the power to half from tank-like turning modes helped a lot. The feel is now really nice, making driving the drone a pleasure! Racing between kitchen and living room has never been this fun!
But even so, racing indoor is nothing compared to racing outdoor, and so far that has been limited by my wifi range. To counter that, I tried to get robot work through android phone's shared wifi, but had no luck with that as my mobile ISP is blocking a lot of connections to phone from Internet. Some solutions were mentioned at https://www.robotshop.com/letsmakerobots/controlling-a-robot-from-anywhere
And for this robot, raspberry pi -based, it seemed obvious to try out controlling through VPN. Now... Researching VPN, there were lots of options... And the one that worked for me, was having openvpn server running on my desktop computer and openvpn client running on raspberry pi. I went through the Archwiki's tutorials for installing openvpn, generating and signing certificates (openvpn, easy-rsa), and forwarded some crucial ports from my local router. After hours of failing miserably, I succeeded in getting an openvpn connection, including open ports for the connections I needed. Just tape-along a cell-phone and Scrapsberry is now ready to conquer the world (at least until the battery runs out or mobile network fails). The best test so far got me almost to the sandpit, about 10m from my front door, until the camera failed for unkown reason - vpn and connection were still on however, so I was able to gamepad-drive my way back by looking out of the window.
drives around with wasd or gamepad control
- Actuators / output devices: 2 x 1:120 motors
- Operating system: Raspbian
- Power source: Ni-MH batteries (7.2v total)
- Programming language: Arduino, Python
- Sensors / input devices: Sharp IR, Laser rangefinder
- Target environment: indoor