


RUN! (My first object avoider/wall follower)
This robot was built more to prove to myself that I could do it than anything else. More on that further down after some specs.
EDIT:
I used to be slightly ashamed of this robot. Mostly because of the missing things like just stopping the outside motor to turn instead of doing a backup/turn. Then I went to this Arduino Hackathon and took my 10 year old son out of school to go with me. The bot was missing some components so I grabbed a couple of transistors from the available parts bin and had to slightly re-write the software and redesign the board.
We took thrid place and won a pile of Arduino swag. Now I love this robot and want to have it bronzed. ^_^
My son and I presenting RUN! http://www.flickr.com/photos/socalforsters/8693813701/in/set-72157633384044822
ORIGINAL:
Motors are from Solarbotics "Gear Motor 90 degree shaft" But I don't know what gear ratio. GM3, GM9 something like that. $10 each with a wheel. Technically they were a christmas present so they were free but listing as a cost anyway.
Arduino UNO purchased from Sparkfun ~$25
Mini bread board also Sparkfun ~$4
all other components are cast offs/salvaged items that I have either collected myself or been given. Geared DC Motors and the Arduino were an investment Otherwise I try and build my stuff with as many salvaged/free/cheap components as possible.
The Arduino code is simple. Enable both left and right outputs. If I recieve input from right bump sensor, disable left output for ~1.5 seconds. Likewise for right. Thus the wheel on the side of the robot which has encountered an object keeps rotating and the bot turns away from said object. There are a number of holes in this design but it is a v0.1 prototype and I deliberately avoided tackling them in order to simplify the design.
It also lights an indicator LED telling you that the robot is on.
Looking through my switch bin I was unable to find any leaf switches which I had planned to attach some long wires to as sensors. I do find some intermittent push button switches with long shafts and I have a few inches of titanium (aka first generation Mac Book case.) left over from a previous project. The switches are mounted to the front of the bot and the ~1/2 inch thick sheetmetal is mounted on a single screw in the center between the two switches and bent in two arcs so that contact with the sheetmetal bumpers causes them to trigger the pushbutton switches. The output from the Arduino output pins each opens a corresponding transistor used as a switch. This is needed due to the high current draw required by the DC motors. the two mirrored resistors are tie down resistors which prevent the arduino from randomly triggering due to things like high static windy days or EM interference caused byt the two DC motors (which is entertaining but makes the robot behaive badly.) The resistor in the center prevents letting the smoke out of the power indicator LED.
The body is a small hunk of plywood with holes drilled in it to pass the zip ties through which hold the motors gearboxes in place. The front skids are two strands of transformer wire salvaged from a TV degausing ring. They were bent in half and twisted together twice to give them some rigidity.
There are a number of flaws in the design. Most of which were left in to simplify the project. Imrovements to the design will be added to a subsequent bot. The most important being thus.
A) Rolling forward on the wheel that is on the side of the robot which has encountered an object has a pretty good chance of just driving you further into that object. I made the bump sensors as wide as I could with the materials on hand to mitigate this but the prolem is still there. A better solution would be to stop the motor on the impact side and turn the non-impact side backwards. Perhaps even backing up entirely for a brief moment before beginning the turn.
B) When encountering an object head on the bot has two flaws. The first being the obvious divot where it could collide with a thin object without triggering a sensor. The second is that the current code would simply end up disabling both mototrs. A better solution would be to detect when both sensors are triggered concurrently. Then back up completely for a given interval and turn in a random direction before proceeding again.
In addition to these the bots descedents will solve some of the basic electrical faults such as diodes to prevent reverse current when switching off the motor from letting the smoke out of my bot. Also a better motor driver such as a full H-Bridge will be required to reverse the spin direction of the DC motors.
I will probably not make another robot which uses physical bump sensors. Shortly after my successful test of the bot I cut out his brain and used the Arduino to experiment with IR and designed and built some very simple very low cost Infra Red proximity sensors which I will use on the next generation of machine. Eventually these will be used in reverse to steer a bot towards a detected object in order to shove it off of a robot sumo platform.
There is a story behind this bot. The bot itself is kind of dumb but it means something to me so I will share the story behind why.
Some years ago I built the line following robot from David Cook's "Robot Building for Beginners." on my breadboard prototyping station. Newer edition is here: http://www.amazon.ca/Robot-Building-Beginners-David-Cook/dp/1893115445
This is a fantastic book which gives you a good, low level education in basically everything that is involved. Electronics, robotics, testing methodology and more. I highly recommend it to new robot builders.
However at the time I was very short on funds and didn't have the money to spend on geared motors and straight brushed DC motors just spin too fast in that robots design to be useful so I never actually constructed the bot. I had it working with LEDs in place of motors but the sensor action was working fine and all other components where in place on the breadboard.
At this time my son is ~2 years old and my daughter < 6 months. Neither are terribly interested in robotics.
The prototyping station goes into the closet breadedboarded robot intact. Very shortly thereafter we move. Prototyping board/robot hybrid gets packed.
Flash forward about 5 years. In this period the sum total of any electronics work I have done in the interim is to change batteries in things. Halloween occurs and I decide to make the coolest pumpkin I have ever made. The wife and I are in the middle of the Battlestar Galactica reboot. The choice of pumpkin design is clear. I pull the prototyping station out of the garage, pull off the few electric components that haven't already been knocked off and proceed to re-teach myself electronics because I have forgotten which way to install a resistor by this point. ^_-
It works well http://www.flickr.com/photos/socalforsters/4062763291/in/set-72157626354250727
The components used in the original prototype are never found.
The electronics bug renewed a few months later I decide I want to find an electronics project I can do with the kids. "Hey guys, I have an idea. Do you want to build a robot?" My daughter is still too young to stay interested for more than five minutes however My son, now around 8 sticks with it. Cylon pumpkin is removed from the prototyping station and we get Robot Building for Beginners out and I start teaching my son how to use a DMM, read/draw a schematic, etc. We breadboard it up with LEDs in place of the mototrs and everything tests out perfectly.
I still have no geared motors. I do some experiments with my brushed DC motors rubber bands and very large wheels from a science toy kit my son recieved for Christmas. They go surprisingly well for short runs but are unstable and fall apart.
However, it's the Christmas season and my parents still haven't gotten me anything. Shortly thereafter a pair of motors arrive from Solarbotics. I begin soldernig together the Line follower circuitry and experimenting with some body designs made from scrap materials.. My job is stressful and the hours long so I don't get many chances to work on it.
It is somewhere around here where my son looses interest.
His interest lost, so do I.
A month or two later a friend recieves "Getting Started With Arduino" in the mail. Later that week a family member asks what happened to the robot we were building and I realise that I have mostly built the same robot twice over a period of ~8 years, I've designed (and lost) schematics for another from scratch and yet have never actually built a machine I could put on the floor and watch it do things.
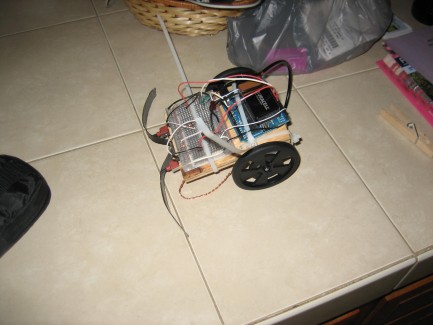
I order an arduino UNO from sparkfun and borrow "Getting Started With Arduino." The day it arrives I have a few minutes to go through the experiments in the book and understand it well enough to at least light LEDs and read input from pins. That week I come home from work, still late, sit down and spend four or five hours researching and writing a program that has two input switches, enables two outputs and turns one off for a few seconds if you bump a corresponding switch. The next night I come home and hack together the bot you see pictured. Motor disable duration has to be tuned because 3 seconds causes a 225+ degree turn. It works. It gets physically jammed under the edge of my kitchem cabinets some times but the bloody thing works.
I am now a robot builder. I am satisfied.
'Turns' when it bumps into something (quotes are intentional see extended comments)
- Actuators / output devices: 2 Geared motors unknown details
- CPU: Arduino Uno (atmega328)
- Operating system: Arduino
- Power source: 1 9v
- Programming language: Arduino
- Sensors / input devices: two slightly custom bump switches
- Target environment: The kitchen floor