Recycled MicroBot
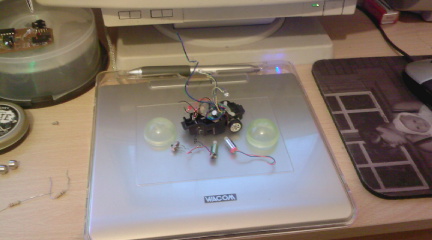
As this is make a recycled robot week, I have decided to put together a little object avoiding robot using a few bits ripped out of an old miniature line following "fire engine" toy and a micro radio controlled car that broke.

Parts used:
1 plastic sphere that used to contain a chewable toothbrush
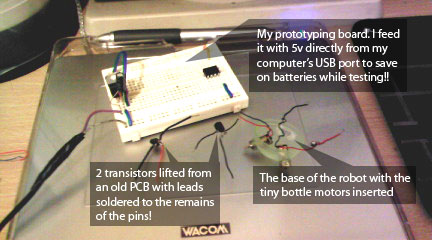
2 tiny bottle motors from an old line follower
2 transistors ripped off the radio control car handset board
1 UV led (I bought 100 of these off ebay for £5 a while back)
1 Microchip 12F675 microcontroller for the brain
3 1.5v watch batteries
A whole bucket of patience
A dead simple robot - it has whiskers to detect collisions and two motors for locomotion. When the left whisker detects an object, it turns off the right motor for a short period and the same on the other side, thereby turning away from any obstacles.
The little plastic sphere is in two halves which click together quite tightly, allowing me the easiest access to the innards. I started by drilling two holes in the base and poking the motors through so they sat nice and snug. I also drilled a hole in the top for the UV led which will flash while the robot is in motion.
The software was very easy to write using the bert libraries for JAL. JAL is a great little language with loads of libraries available. It is free and designed specifically for programming PIC microcontrollers, though I would recommend familiarising yourself with assember before you start to use it, just so that you get a better understanding of what is going on inside the chip.
 I assembled all the components, soldering them directly to the pins of the chip. You must do this as quickly as possible in order to avoid heat damage to the chips which can be quite sensitive to high temperatures. This was especially difficult as all the components are small and close together, and I only have a really crappy soldering iron so that didn't help....
The motors are driven directly from the power supply through the transistors as the PIC doesn't give enough current or something to power them (Note to self - really must learn about electronics instead of just leaping in at the deep end...!). Anyway, in order to slow themdown a bit, I used a bit of pulse width modulation on the outputs, this way they should still have enough power to pull the robot along but not turn too quickly that they have no traction or cause other problems. I also cleverly have the motors turning on and off alternately so the battery only has to power one motor at any given time!
So I managed to get everything working, put the whole thing together, it looks cute and is actually very small indeed. Only just over 2cm in diameter!! I connect the power and.......Nothing.
Dammit.
 Seems I tested the circuit running just one motor at a time and not both at the same time. I thoughtby alternating the on time of each motor I could overcome the drain but alas not. But never mind!! I run a cable directly to my prototyping board from the USB port of my PC that supplies a continuous 5v DC, so I can save on batteries while prototyping. I just modified this to run an umbilical to the robot, giving it a constant 5v with a bit more kick....I don't know if this is more amps, more watts or what. Perhaps someone could do us all a tutorial on power supplies - it sure would help me alot!!!
Anyway, the robot now goes, but he's too light at the front and the umbilical causes just a bit too much drag for him to cope with so he just sort of sits there jiggling about.
I definately need to get a better battery, but it will be tough finding one that small. I think I might have to dismantle a bluetooh headset or simliar to see what I can find inside!!!
In all, a bit of a failure at this stage. But I will improve on him as soon as I get a better power supply. I also think I will change his inputs to photoresistors to make him phototropic, perhaps varying the pulsewidth on each motor to give him a more organic feel when seeking out light sources... The possibilities are endless!
But lets get him moving first, shall we...?! anyway, it's 2AM now, so I'm going to bed, but check back soon for an update!!
Can anyone recommend a small and lightweight power source? I was thinking of using a supercap, but I can't get the one I salvaged to output a decent voltage...
Avoids objects
- Actuators / output devices: 2 motors
- Control method: autonomous
- CPU: PIC12F675
- Power source: 3 rubbish watch cells
- Programming language: jal
- Sensors / input devices: Whiskers
- Target environment: Desktop or floor


