


RalphBot
RalphBot has been in progress for about 3 years now and has gone through several revisions as I have had time to work on him. He started out as a quadruped bot, but quickly outweighed the servos ability to lift him!
I made a second modification which added a pan-tilt camera and a custom built (bodged) chassis out of the steel case from a PC CD-ROM drive which turned out to be a surprisingly stable platform. I burned out several drill bits making the mounting holes. The drive motors for this revision were recovered from a for-parts Roomba purchased off eBay very inexpensively. The motors are wired to a cheap dual H-bridge also purchased on eBay to allow simple skid steering.
The brains of the unit are an Arduino. In both of these revisions the Arduino was a Deumillaneuve and servo control was provided by a DFRobot shield with servo breakouts and and XBee socket. Both revisions were controlled by a hacked wireless GameCube controller. Towards the end of the second revision I added an Roving. Networks (now microchip) WiFly RN-XV XBee compatible wifi module. You can see both revisions in the attached youtube videos.
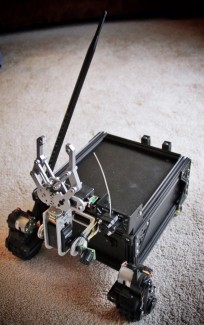
In the third revision of RalphBot I redesigned the chassis using OpenBeam after backing them in their initial kickstarter. I dremmelled the sides out of aluminum from an old AlienWare computer case that was anodized black and matched the OpenBeam I used. I also added a claw/arm assembly from Sparkfun, and removed the pan-tilt from the camera to use the servos in the arm.
In this revision I did some software work on the Arduino to decode OSC packets via the RN-XV. After playing with several libraries for both the WiFly and OSC, I decided to write my own code to reduce overhead and increase speed. I used TouchOSC to write an interface that sent the required OSC packets to RalphBot. The control worked quite well but I was getting infrequent dropped packets that caused the control to periodically spazz-out. I made sure the code stopped Ralph when not receiving the correctly formatted information from the WiFly.
In this revision I also added an i2c 16x2 character LCD display for debug and operation information. You can see most of the changes of this revision in photos here, but I didn't get a video of this revision.
In the next revision I upgraded the control hardware to an Arduino Uno and an Adafruit 16 channel 12 bit PWM shield for servo and drive motor control. This shield allowed me to switch to analog directional control in my software, which I hadn't previously implemented. I also added a transistor and high-powered LEDs for headlights connected to one of the PWM pins and the main 12V battery supply.
I also revised and shortened the chassis to allow for the eventual addition of two more Roomba motors for four wheel drive conversion.
I noticed that a lot of stress was getting put on the servo joint at the base of the arm, so I started looking for ways of re-enforcing the joint with a bearing. After playing with several options for a while I purchased a load bearing servo block from RobotShop.com. Mounting the arm to the new servo block proved to be more challenging than I had anticipated, but with a few pieces of Meccano the mount turned out to be very stable.
Moving forward I would like to complete the four wheel drive conversion. I'd like to switch from the cheap 2.4 ghz camera I currently have to a decent HD IP camera. I also plan on creating a custom controller using the Raspberry Pi a touchscreen to display/control the IP camera and a TI Launchpad or Arduino for analog reading of potentiometers. The Pi will encode the values in OSC packets to send to RalphBot to allow me to continue to use Touch OSC on my mobile devices. Eventually I'd like to make a custom laser cut acrylic case for the Pi and analog circuitry.
Revision 2
I made a second modification which added a pan-tilt camera and a custom built (bodged) chassis out of the steel case from a PC CD-ROM drive which turned out to be a surprisingly stable platform. I burned out several drill bits making the mounting holes. The drive motors for this revision were recovered from a for-parts Roomba purchased off eBay very inexpensively. The motors are wired to a cheap dual H-bridge also purchased on eBay to allow simple skid steering.
The brains of the unit are an Arduino. In both of these revisions the Arduino was a Deumillaneuve and servo control was provided by a DFRobot shield with servo breakouts and and XBee socket. Both revisions were controlled by a hacked wireless GameCube controller. Towards the end of the second revision I added an Roving. Networks (now microchip) WiFly RN-XV XBee compatible wifi module. You can see both revisions in the attached youtube videos.
Revision 3
In the third revision of RalphBot I redesigned the chassis using OpenBeam after backing them in their initial kickstarter. I dremmelled the sides out of aluminum from an old AlienWare computer case that was anodized black and matched the OpenBeam I used. I also added a claw/arm assembly from Sparkfun, and removed the pan-tilt from the camera to use the servos in the arm.
In this revision I did some software work on the Arduino to decode OSC packets via the RN-XV. After playing with several libraries for both the WiFly and OSC, I decided to write my own code to reduce overhead and increase speed. I used TouchOSC to write an interface that sent the required OSC packets to RalphBot. The control worked quite well but I was getting infrequent dropped packets that caused the control to periodically spazz-out. I made sure the code stopped Ralph when not receiving the correctly formatted information from the WiFly.
In this revision I also added an i2c 16x2 character LCD display for debug and operation information. You can see most of the changes of this revision in photos here, but I didn't get a video of this revision.
Revision 4
In the next revision I upgraded the control hardware to an Arduino Uno and an Adafruit 16 channel 12 bit PWM shield for servo and drive motor control. This shield allowed me to switch to analog directional control in my software, which I hadn't previously implemented. I also added a transistor and high-powered LEDs for headlights connected to one of the PWM pins and the main 12V battery supply.
I also revised and shortened the chassis to allow for the eventual addition of two more Roomba motors for four wheel drive conversion.
I noticed that a lot of stress was getting put on the servo joint at the base of the arm, so I started looking for ways of re-enforcing the joint with a bearing. After playing with several options for a while I purchased a load bearing servo block from RobotShop.com. Mounting the arm to the new servo block proved to be more challenging than I had anticipated, but with a few pieces of Meccano the mount turned out to be very stable.
Future Plans
Moving forward I would like to complete the four wheel drive conversion. I'd like to switch from the cheap 2.4 ghz camera I currently have to a decent HD IP camera. I also plan on creating a custom controller using the Raspberry Pi a touchscreen to display/control the IP camera and a TI Launchpad or Arduino for analog reading of potentiometers. The Pi will encode the values in OSC packets to send to RalphBot to allow me to continue to use Touch OSC on my mobile devices. Eventually I'd like to make a custom laser cut acrylic case for the Pi and analog circuitry.
Remote controlled telepresence rover
- Actuators / output devices: Roomba motors, dual h-bridge
- Control method: Wireless GameCube Controller
- CPU: Arduino
- Operating system: Arduino
- Power source: 3S LiPo
- Programming language: C++, Arduino
- Target environment: indoor