


Rad Robot 2.0 V2 (FPV based bot)
--------------------------------MOST RECENT UPDATE-----------------------------------------------------------
As of 10/06/2011 I've successfully gotten the robot working and brought it to maker faire. Was an interesting time meeting some of the Maker's from the site and recieved a few interesting ideas from other people's projects. Unfortunately I ran into some issues with the robot itself at the faire; the huge amount of wireless activity essentially jammed the wireless and paralyzed it. It did work pretty perfectly however at home and initially before all the people began arriving so it's been functional.
Prior to the Faire I bought a PS2 adapter cable from Lynxmotion which has made interfacing with controller a thousand times easier than via my shoddily soldered ultra-thin wire interface. I also modified the code to handle wireless lag far more effectively by modifying how it handled the time between wireless signals, or to be more accurate I fixed the immensely stupid and jerky system I had previously. :D
Following Maker Faire I drastically modified the chassis to be an open frame with a wooden (soon to be Lexan) sheet on top in order to give me far more room to build without having to worry about closing the thing up. In cutting the battery pack out of the frame I've also learned an important lesson, every DIY problem can be solved with a dremmel. I'll be posting updated pictures shortly and hopefully I'll be able to find some Lexan sheets and standoffs to make a multilevel platform for the hardware.
Beyond the Lexan, future plans mainly include switching to an Xbee for far more reliable wireless and using LiPo batteries instead of the current incredibly aged NiMH I'm using that came with the toy originally in 2000.
-------------------------------------------------------------------------------------------------------------------------------
Now back to my normally scheduled parts rant (WITH PICTURES)!
The camera is a CX-161 bought from CCTVOhio.

The camera takes pretty nice video and is also incredibly cheap as far as quality CCD cameras go.
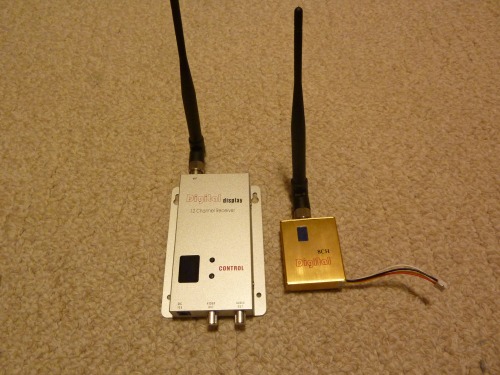
Next is the wireless video tx/rx pair from Sunsky. They're the 800mw units they sell and according to others they have 3 mile range with the stock antennas. I haven't had a large enough open area to test this, but the range IS long. Found HERE: http://www.sunsky-online.com/view/13087/1.2GHz+800mW+8+Channel+Digital+Wireless+AV+transmitter+%26+receiver.htm
The motors are driven by Sparkfun's TB6612FNG driver board, works great and takes only minimal effort to drive.
and finally we have the RF links, which are also from Sparkfun.
http://www.sparkfun.com/commerce/product_info.php?products_id=8946 and
http://www.sparkfun.com/commerce/product_info.php?products_id=8949.
Overall they work great together, have pretty nice range (Although VASTLY shorter than the video transmitter) and are dirt cheap. Using the Arduino Virtualwire library makes controlling them pretty easy as well. In the future I plan to get a pair for Xbee Pros in order to have control range as long as the video feed.
Oh, and I almost forgot the pan/tilt kit from Dagu that aims the camera. Found HERE on LMR. Overall it works nicely and it's cheap, although I had a LARGE amount of trouble putting it together as using the regular instructions (or maybe my own stupidity) resulted in ALOT of friction from the screw heads craping the metal. I added an extra washer though and it works pretty nicely, although the Y axis servo can't align perfectly, it tends to only get 1 or 2 steps away from the destination before being unable to move such small increment and the motor will get stuck attempting (and failing) to move that last step. Honestly I don't think its a big problem as long as it doesn't get worse. I also had to grind off some excess plastic from the servo collar/bracket as it was preventing it from screwing flat into the metal. The grinding fixed ALL problems in that case.
---------------------------------EVERYTHING BELOW THIS LINE IS OLD AND KEPT FOR REFERENCE-----------------------------------------EDITED August 1st, 2011:
As of a month ago I finally got EVERY individual part working and a number of them working together. Right before I left for the current 40 day vacation I'm currently on I was able to finish up the wireless coding and the motor driver code has been done for months now (It works too!). My only issue is that I've been finishing individual parts because the small boarduino I'm using in the finished project, a regular arduino is too large, isn't programmable over USB and since I moved to a modern gaming rig of a computer it lacks such antiquated things as serial ports :( By the time I get back however I'll have myself a USB-Serial cable and will likely be finally completely totally finished in a day or two.
--------------
I'll throw up more pictures when I get the chance, but I'm already almost complete with the build. The first thing I had done was take the chassis from a Rad Robot toy and simply remove everything but the base, leaving a hollow cavity for anything I'd want to add, mounts on the top for my video transmitter and camera pan/tilt (from Dagu), and most IMPORTANTLY it leaves me with a fully working motor and drive system. I'll get more details up on parts and the programming soon as well as more pictures, and HOPEFULLY a video of the fully working thing tomorrow. Currently EVERY part works fine by itself, I just need to get them all interconnected properly, as well as finish the wireless packeting and the controller (Currently going with a PS2 controller.) After an excessive amount of troubleshooting I found out both that using a PS2 controller requires a pullup resistor on the data line, and that using Bill Porter's PS2 library for Arduino requires that the ORIGINAL pins must be used, changing the pins in the sketch made it not work at all for me. Anyway, as it stand I know have a working controller and just need to finish coding. Most of the code is done already so I should be finished today or tomorrow!
As of 9/22/10 I seem to only need to use a different servo library to get it working completely. Apparently the Virtualwire and the standard servo library conflict with eachother. So one more day likely and a bunch of tweaking (Like transmission rates, time between transmissions, and variables like how fast the POV mount moves.)
As of 10/6/10, after a huge number of AP class related tests, homework, and projects I am finally back to working on the robot as of last night. I fixed the servo issue by using the SOFTWARE servo library and I found another problem (now fixed) with the VirtualWire library. Turns out the VirtualWire library uses a Push To Talk button for radios that goes HIGH when you send data, something completely not used on my TX/RX pair. This PTT used Pin 13 which was also used as part of my PS2 controller wiring. I took out the code and it now works fine.
Right now I only really need to do/fix two three (Who am I kidding, I'm bound to find more) ∞+3 things.
- Finish soldering parts/wires onto the protoboard that holds the receiver and servo headers. I'm wiring everything in such a way that it should take the smallest number of wires on the Arduino as possible to control everything. I think this will be finish by tonight (10/6/10). FINISHED
- The FINAL thing to do is finish the part of the code that drivers the motors. I already have a previous bit of code that could move the robot forward, left, right, and in reverse so I just need to merge the two codes and fix any pin conflicts.
- The FINAL final thing I need to do is find another 9v barrel plug. I'm so used to only needing to power one Arduino for projects, or running one off USB and one off 9v that I never bothered getting another one. I'll probably just salvage the clip cap from an old RC controller and solder that to a barrel plug from some random wall cart laying around
Multipurpose manually controlled platform with wireless video.
- Control method: 434mhz RF links
- CPU: Arduino Duemilanove
- Operating system: N/A
- Power source: 6v 800mah NiCD, 12v 1800mah Li-ion, 9 volt Alkaline
- Programming language: Arduino C++
- Target environment: indoor, Outdoors