


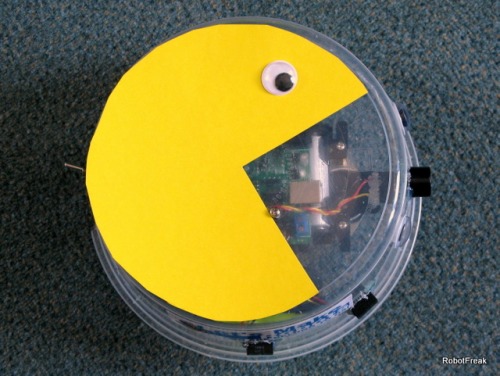
Pacman - Beginners Robot Chassis Challenge
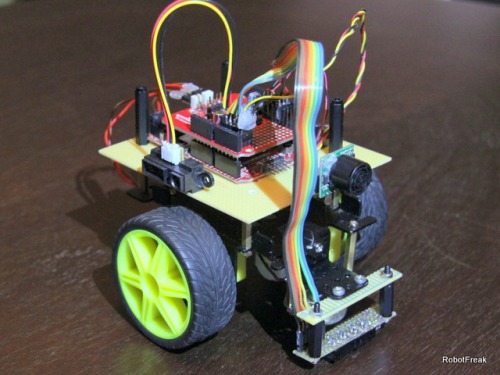
This is my entry for the DAGU "Beginners Robot Chassis Challenge". It is prelimary named Pacman, but the name maybe change in the future. Pacman was my first idea, because this year is Pacmans 30years aniversary. So its time for a revival. The challenge is similar to the Pacman game: follow lines and walls, avoid obstacles (ghosts).
Videos
The 1. video shows task one for the challenge: line following. I hope to get the rest finished before the deadline for the contest (09.09.2010)
Update 2010-09-06: The 2. video shows the complete challenge. Line following and obstacle avoiding :-)
Update 2010-09-08: The 3. video shows an improved obstacle avoiding algorithm. Line following is going more faster, thnaks to Oddbot and Gareth for the PWM frequency trick.
Update 2010-09-09: Pacman now has a new look. Hope you'll like it.
Partslist:
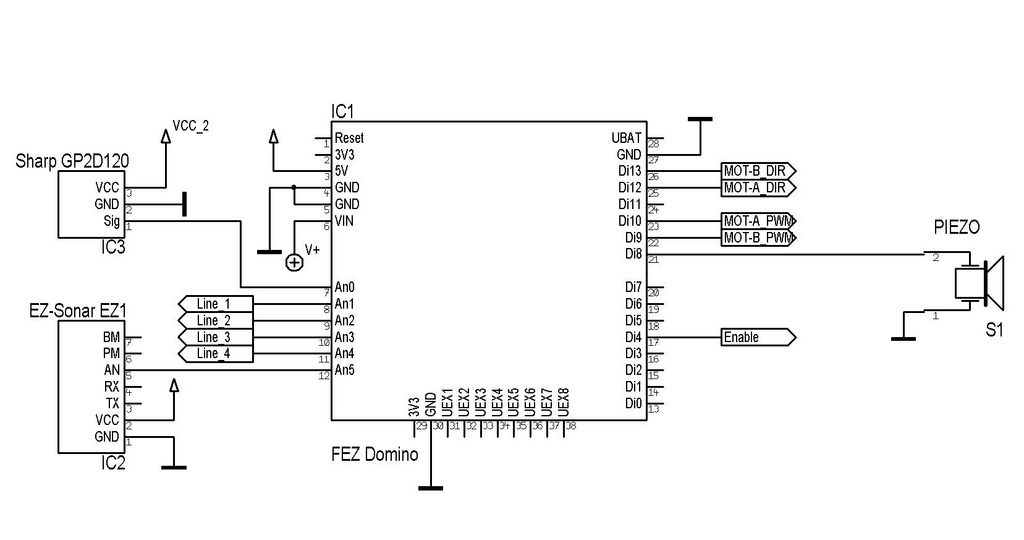
- FEZ Domino board
- ArduMoto board from Sparkfun
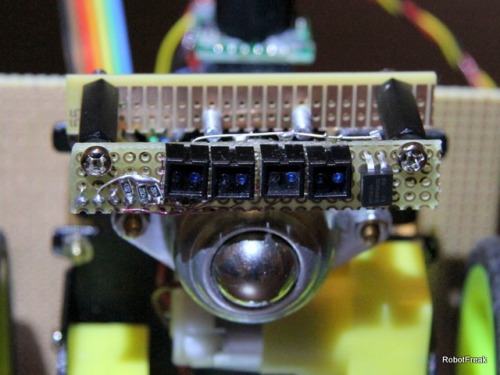
- selfmade line sensor board with 4 x CNY70 IR reflective sensors
- Sharp GP2D120 IR sensor for wall following
- Maxbotix EZ1 ultra sonic sensor for front object detection
- DAGU 2WD Beginners Robot chassis
- piezo speaker for sound generation
Controller
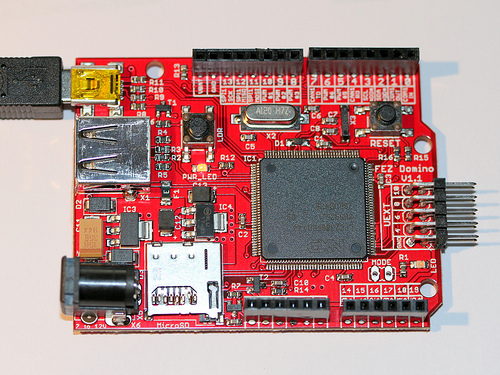
Startet with the DG_Arduino board from Dagu. But then I stumbled across the FEZ Domino. So it's time for a change. The FEZ Domino has a Arduino compatible pinout. Some more features:
- USBizi controller running .NET micro framework at 72MHz
- buildin USB Client & Host
- onboard microSD Card slot
- IO headers are Arduino shield compatible
- 8 extra IOs
- I2C, 2xSPI, 3xUART
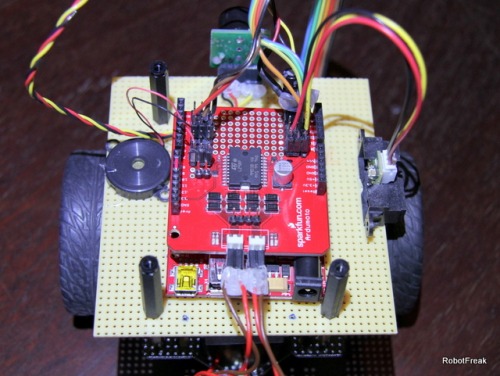
Motor Controller
The Sparkfun Ardumoto is a nice motor controller for this robot and the FEZ Domino. With a tiny modification (Pin 11 hasn't PWM capability, reconnected to Pin 9) it works great. The small breadboard space is good for some 3pin headers of all free IOs. No extra Shield is needed.
Advantages:
- featured dual H-Bridge (L298) with flyback diodes
- 2 IOs per motor needed, 1 for direction, 1 for PWM
- PWM capablity
Disadvantages:
- no extra motor power connector
- unusual motor connectors with 3,7mm spacing (with some help a 2pin 2,54mm header will match)
- for Arduino users the used pins is a PITA (Pin13,12,11,10 are used) you will need 2 timers and can not use the standard servo lib. On FEZ Domino only Pin 11 is a problem, needs to reroot to Pin 9.
Sensors
For obstacle avoidance detection 1x Maxbotix EZ1 ultrasonic sensor and 1x Sharp GP2D120 distance sensors has been choosen. The Maxbotix is placed in front of the robot for detecting distance of obstacles. The Sharp sensor ison the right side for wall detection.
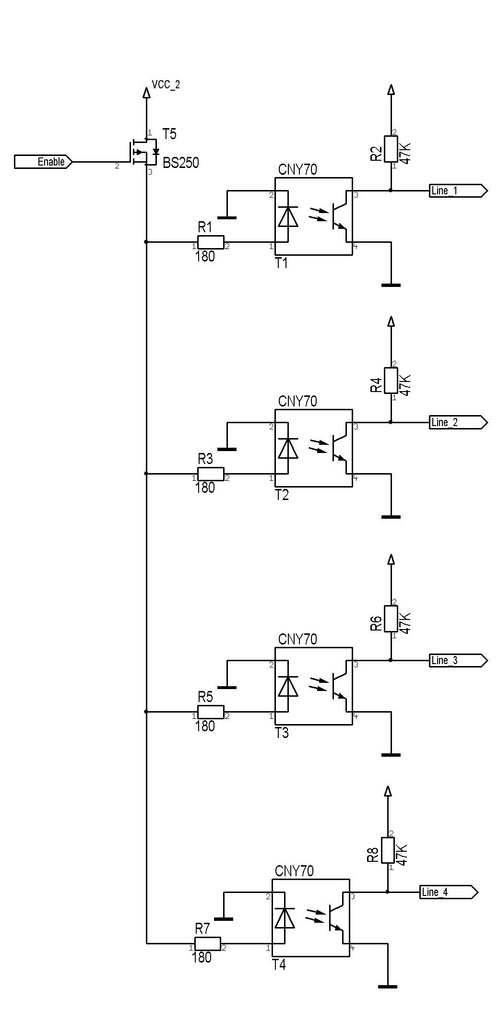
The line sensor is a selfmade board using 4 CNY70 IR refective sensors with analog output. Unfortunatly after assembling the board only the inner 2 sensors are working. The outer sensor LEDs doesnt work, what a sh... At the moment the line sensor with 2 sensors works well.
Actors
The Beginners Robots Kit has 2 geared motors with unknown specs (looks like Solarbotics GM8 clones) . The robot is powered by 6xAA accu cells or a single LiPo akku with 7,2V. A piezo speaker has been used as sound device. It can play RTTTL music and act as sound feedback for the distance sensors.
Schematics
Skin
The robot skin is made of an empty sweets box. Oh man, 1kg of my favorite sweets needs to be demolished in the name of science.

This is an early design study. The finished robot will have a different look.
Obstacle Detection & Avoidence
To detect obstacles the front Maxbotix EZ1 Ultrasonic sensor is used. It is attached to an analog inputs and his output voltage is linear to the distance ob an obstacle (10mV pro inch). When it reach the obstacle as close as possible (minimum detection range is about 12cm) the robot makes a sharp left turn. Now the Sharp sensor has been used to follow the obstacle wall in a middle distance of 6cm.
The robots begins to drive small curves (closer to the object, when distance is greater then 6cm. Away from the object, when the distance is closer than 6cm). This priciple is called a bang-bang controller, like a thermostat for a heater/cooler system.
~\Eigene Dateien\Visual Studio 2010\Code Snippets\Visual C#\My Code Snippets\obstacle.cs.html public static void AvoidObstacle()
{
float distance;
int line;
sbyte speed_l = 0;
sbyte speed_r = 0;
byte delay;
while (true)
{
// read front sensor
distance = front.GetDistance_cm();
if (distance < 20.0) // object distance < 12cm?
{
Debug.Print("Front Distance: " + distance);
// turn left
speed_l = 0;
speed_r = 40;
delay = 5;
motors.MoveRamp(speed_l, speed_r, delay);
}
else // no front object
{
// read line sensor
line = ReadLineSensors();
if (line != 0) // line detected?
break; // abort process
// read side sensor
distance = side.GetDistance_cm();
if (distance < 8.0) // object distance < 6cm?
{
speed_l = 0; // move left
speed_r = 30;
}
else // object distance > 6cm
{
speed_l = 30; // move right
speed_r = 0;
}
delay = 10;
Debug.Print("Side Distance: " + distance);
Debug.Print("Speed: " + speed_l + " " + speed_r);
motors.MoveRamp(speed_l, speed_r, delay);
}
Thread.Sleep(20);
}
}
Line follower
The line follower sensor detects the reflected light of the surface. On a darker surface less reflections should be detected, this means a higher level on the A/D input.The software checks continously the level of the A/D inputs. If both middle sensors detect the line, the robot will go straight. If the line is more left, the robot will steer to the right and vice versa. If no öline is detected the direction of the last line signal will be used, to move back to the line.
Maybe later a PID controller will be added to improve the line follower behaviour.
~\Eigene Dateien\Visual Studio 2010\Code Snippets\Visual C#\My Code Snippets\linesensor.cs.html public static void FollowLine()
{
float distance;
byte line = 0;
byte last_line = 0;
sbyte speed_l = 0;
sbyte speed_r = 0;
while (true)
{
// read front sensor
distance = front.GetDistance_cm();
if (distance < 15.0) // object distance < 15cm
{
break; // abort process
}
else // no object, follow line
{
// read line sensors
line = ReadLineSensors();
switch (line)
{
case 3: // on line, go strait
speed_l = 40;
speed_r = 40;
break;
case 2: // line left, go right
speed_l = 30;
speed_r = 40;
break;
case 1: // line right, go left
speed_l = 40;
speed_r = 30;
break;
default:
if (last_line == 2) // last detected line on left, sharp turn right
{
speed_l = 00;
speed_r = 40;
}
else if (last_line == 1) // last detected line on right, sharp turn left
{
speed_l = 40;
speed_r = 00;
}
else // else, turn on place
{
speed_l = -20;
speed_r = 20;
}
break;
}
if (line != 0) last_line = line;
Debug.Print("Line: " + line + " " + last_line);
Debug.Print("Speed: " + speed_l + " " + speed_r);
motors.MoveRamp(speed_l, speed_r, 2);
Thread.Sleep(20);
}
}
}
Follows a line and avoid obstacles, Make sound with a piezo speaker
- Actuators / output devices: 2 geared motors, piezo speaker, L298
- CPU: USBizi
- Operating system: .NET micro framework
- Power source: 6xAA
- Programming language: C#
- Sensors / input devices: Sharp GP2D120 IR sensor, Maxbotix EZ1
- Target environment: indoor