


Ostrichbot v1 construction + first movements + first steps
EDIT: The robot walks more or less properly now, as you can see in the new youtube videos. A bit shaky still, in particular when taking the left steps, but it's as good as I hoped :-) This will be all for version 1 of this robot: I will continue with building a version 2 that carries its own batteries (probably getting 10 to 15 minutes out of them) and thus doesnt have to be tethered anymore :-)
By the way, I made two more small change to the robot: I glued small pieces of grip tape (for a tennis racket) to the feet, which works very well, and the feet have a square profile after all, because the two triangles made it nearly impossible to keep balance while walking.
# Original Post
This is my first post here on this great site, hope you like it! Many of the technical details of this robot are inspired by stuff I read here, so this robot truly wouldn't be possible without LMR :-) I would be happy to hear any suggestions for improving this robot and also feel free to copy this design if you like it!
## Intro
I was thinking about walking robots some day, looking at movies of Big Dog and Cheetah and the like, when it struck me that even a primitive bipedal animal such as an ostrich or a human could outrun those machines. Why use 4 legs if 2 should be enough? I'm mostly interested in autonomous machines, so I got interested in building a bipedal robot that can not only walk but also stand up when it falls over. I currently don't have a job, so it should also be done as cheaply as possible.
When browsing around I found many 2, 3 and 4 servo bipedal walkers, but those are really quite helpless when they fall over. We'll have to add some more servos, but not too many, otherwise programming becomes insane and we could just as well have built a spider-like robot. So, I decided to settle for 6 servos for this robot and see how far I'ld get. Next I checked on different servo sizes, and I was very happy to find out some of the smallest and cheapest servo's (9 gram ones; I got TG9z from HobbyKing, but HXT900 is probably better) also have some of the highest torque to weight ratios. So, a cheap, lightweight, autonomous and bipedal robot may actually be possible!
## Construction
As I decided to use those tiny servos, I had to spend quite some time on devising a light weight construction. First off, I went to search something to make the feet off. Being Dutch, I ended up at an old bicycle, and found out that the spokes of the wheel would exactly fit the mounting holes of the servo. In the picture you can see how I bent the spoke into a foot. I tried many shapes, and this is not perfect, but at least reasonable. If you want to do this yourself, make sure you use steel spokes that are not completely rusted, and try beforehand if the size is right (some spokes have a different diameter). Note that the bottom of the foot does not form a square, but two triangles that are at an angle to one another; that way the robot can be stable with the leg making two different angles to the ground. The steel is somewhat flexible, which is perfect in my opinion.
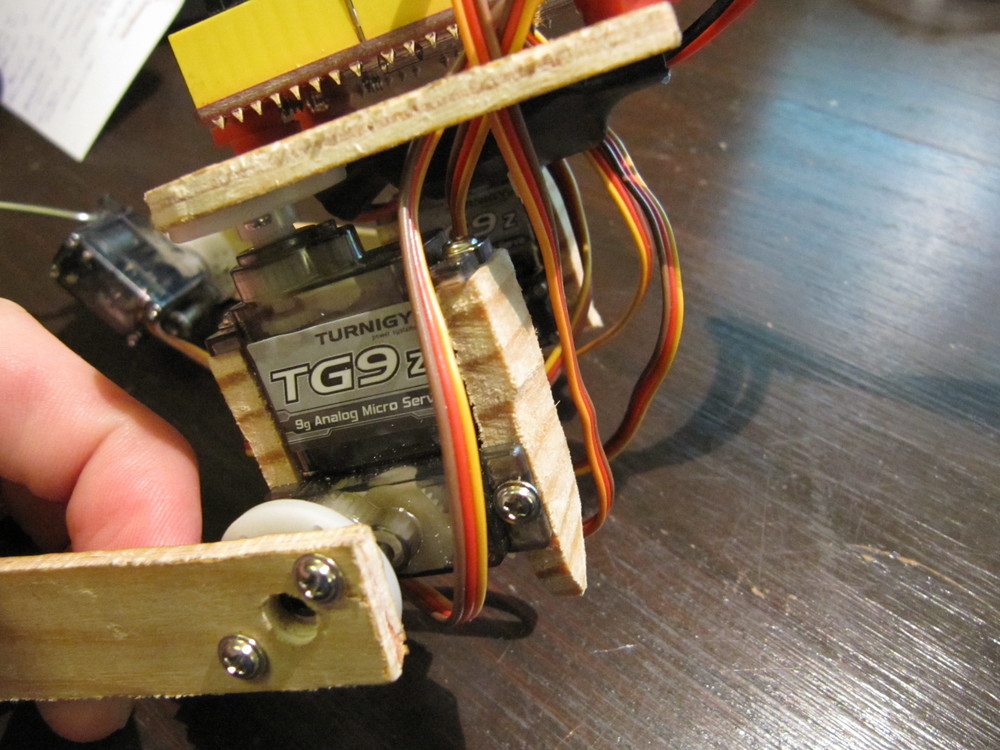
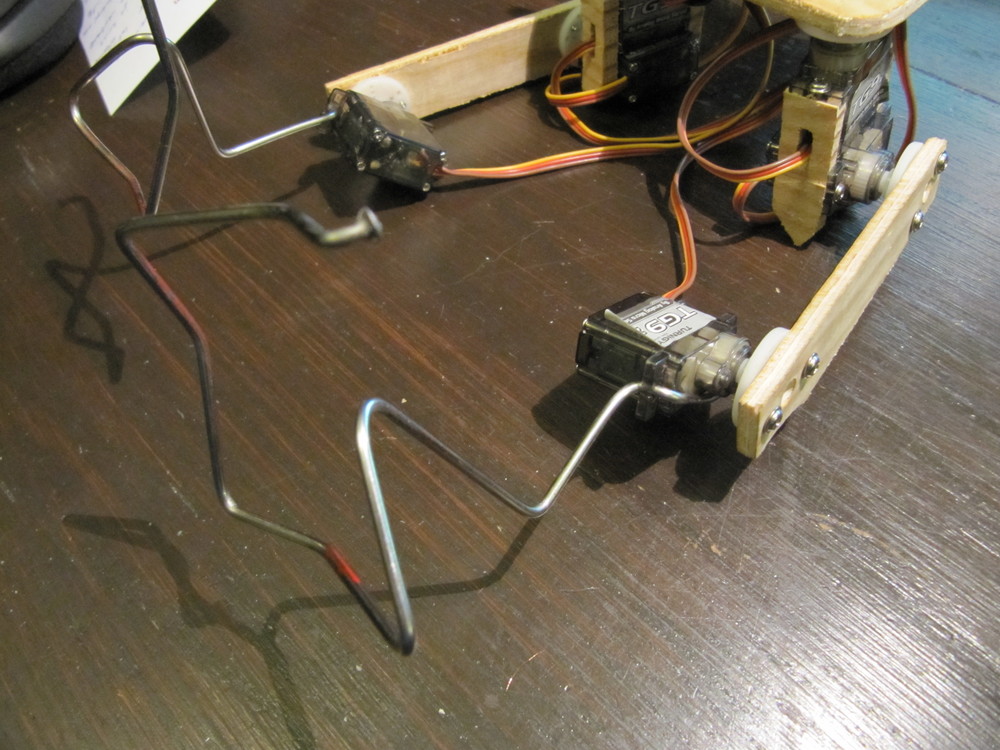 The servo that is mounted to the spoke has its standard horn mounted to a scrap piece of triplex, using the screws that are included for use with the mouning holes. This way it should be easy to swap out the servo when it breaks (didnt happen yet, but Im quite sure it will break at some point). The other end of the piece of triplex is mounted in the same way to one of the servos of the hip joint; there's about 10 cm between the axes of the servos. Some more pieces of scrap wood (don't use triplex here though) are used to hold the two hip servos together; see the photo. One of the pieces has to have a hole in it for the wires of one of the servos.
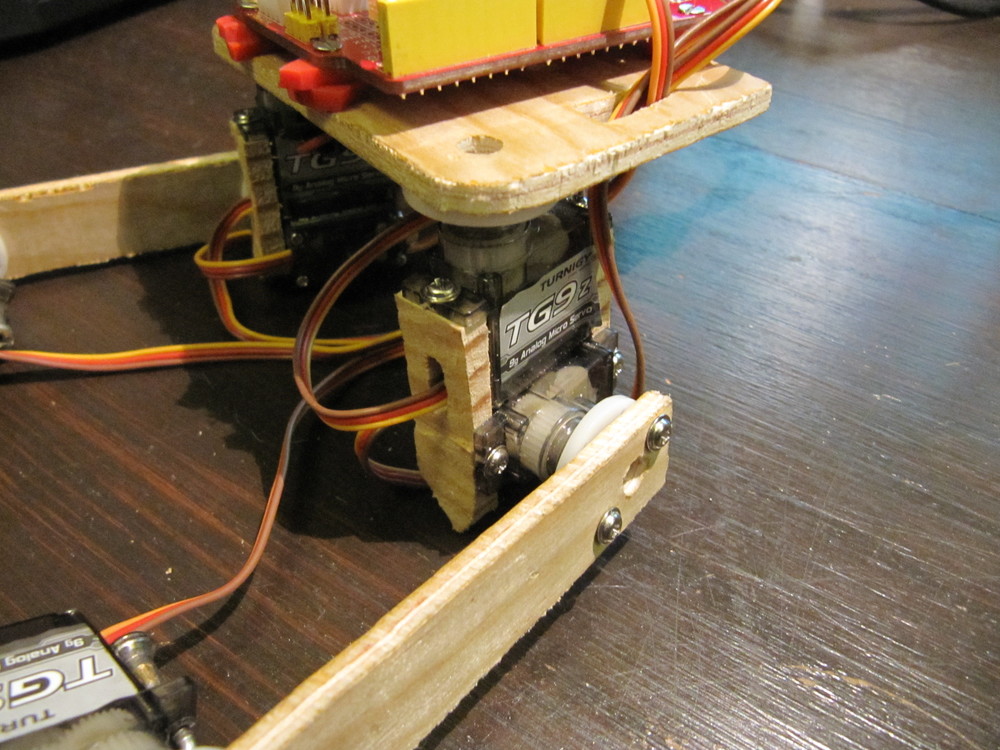 After the two legs were made I could join them together by mounting them both on the final piece of triplex. I made some holes in it to organize all the wires a bit and to make it possible to unscrew the servo horn from the servo without unscrewing the servo horn from the wood (is this understandable at all?? I hope so..).
 The servos allow a little more than 180 degree motion, so it's not hard to set them up in such a way that it should be able to walk. Make sure that the legs can be pushed 'inside' enough to allow the robot to stand on one leg. Without the electronics, the robot should be able to stand on one leg unpowered in some positions, which makes it reasonably easy to set the servos up properly and adjust the legs if necessary.
## Electronics
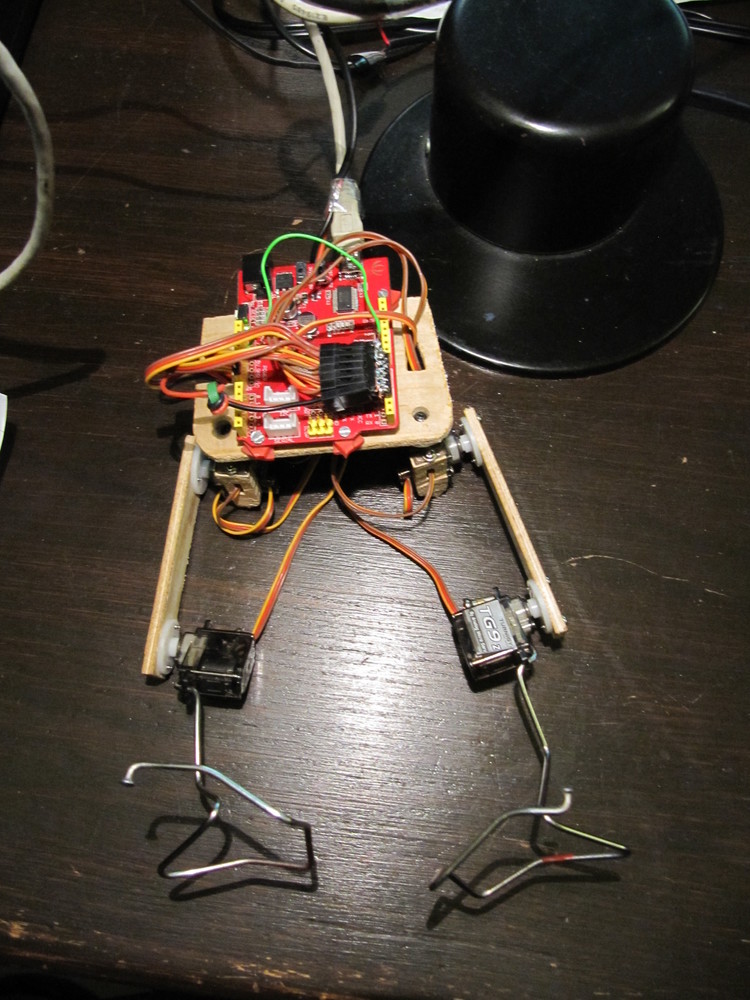
The servos require 4.8 to 6.0 V power and draw something like 0.7A stall current. I first thought it would be easiest to run them directly of a battery, but I think that would result in the motions being very dependent on how full the battery is exactly (because voltage slowly drops). So I added a cheap 5V 5A BEC (from HobbyKing again, I think its called U5; only _just_ able to keep up, it didnt work with 6 servos when supplied with 10V, but on 15V it works) to ensure a constant power supply and mounted it on the back of the robot. Eventually I also want to add a small battery to make the robot walk for like 10 minutes on its own, but for now I dont want to recharge batteries all the time and run it tethered to a power supply.
The servos allow a little more than 180 degree motion, so it's not hard to set them up in such a way that it should be able to walk. Make sure that the legs can be pushed 'inside' enough to allow the robot to stand on one leg. Without the electronics, the robot should be able to stand on one leg unpowered in some positions, which makes it reasonably easy to set the servos up properly and adjust the legs if necessary.
## Electronics
The servos require 4.8 to 6.0 V power and draw something like 0.7A stall current. I first thought it would be easiest to run them directly of a battery, but I think that would result in the motions being very dependent on how full the battery is exactly (because voltage slowly drops). So I added a cheap 5V 5A BEC (from HobbyKing again, I think its called U5; only _just_ able to keep up, it didnt work with 6 servos when supplied with 10V, but on 15V it works) to ensure a constant power supply and mounted it on the back of the robot. Eventually I also want to add a small battery to make the robot walk for like 10 minutes on its own, but for now I dont want to recharge batteries all the time and run it tethered to a power supply.
 The servos are controlled by an Arduino (Seeduino in my case), which is connected to my pc for now, as I run the robot tethered anyway. In v2 of this robot I will replace it with a much smaller (and more powerful) Teensy. That's all!
## Software
I only just completed the hardware and only wrote a very simple program to make the robot stand up, which can be seen in the youtube clip at the top of this post. It's hardcoded, will only work on my desk (smooth surface) and with the tether I suppose, but it shows that the design of the robot is sound. Also I'm quite happy that the robot seems rather robust :-) Hopefully it won't be too painful to make the robot walk as well!
## Next Steps
There's lots of stuff that I still have to do! (EDIT: some of these will be addressed in version 2 of this robot :-)
* Replace Seeduino with Teensy
* Modify the servos to get access to potmeter values, so that we can find out our current position in the software. Maybe replace all servo control with something more sophisticated (eg for precise control of forces), but I'm not sure about that yet.
* Add an accelerometer in order to keep balance
* So, also lots and lots of programming for more intelligent walking and getting up and so on with the extra sensors (secretly thinking about evolutionary methods, but that would probably be easier if I make a computer model of the robot)
* Find the ideal foot shape for standing up and for walking
* Maybe make the robot more symmetric, legs are slightly different now
* Remove tether and add battery
The servos are controlled by an Arduino (Seeduino in my case), which is connected to my pc for now, as I run the robot tethered anyway. In v2 of this robot I will replace it with a much smaller (and more powerful) Teensy. That's all!
## Software
I only just completed the hardware and only wrote a very simple program to make the robot stand up, which can be seen in the youtube clip at the top of this post. It's hardcoded, will only work on my desk (smooth surface) and with the tether I suppose, but it shows that the design of the robot is sound. Also I'm quite happy that the robot seems rather robust :-) Hopefully it won't be too painful to make the robot walk as well!
## Next Steps
There's lots of stuff that I still have to do! (EDIT: some of these will be addressed in version 2 of this robot :-)
* Replace Seeduino with Teensy
* Modify the servos to get access to potmeter values, so that we can find out our current position in the software. Maybe replace all servo control with something more sophisticated (eg for precise control of forces), but I'm not sure about that yet.
* Add an accelerometer in order to keep balance
* So, also lots and lots of programming for more intelligent walking and getting up and so on with the extra sensors (secretly thinking about evolutionary methods, but that would probably be easier if I make a computer model of the robot)
* Find the ideal foot shape for standing up and for walking
* Maybe make the robot more symmetric, legs are slightly different now
* Remove tether and add battery
The servo that is mounted to the spoke has its standard horn mounted to a scrap piece of triplex, using the screws that are included for use with the mouning holes. This way it should be easy to swap out the servo when it breaks (didnt happen yet, but Im quite sure it will break at some point). The other end of the piece of triplex is mounted in the same way to one of the servos of the hip joint; there's about 10 cm between the axes of the servos. Some more pieces of scrap wood (don't use triplex here though) are used to hold the two hip servos together; see the photo. One of the pieces has to have a hole in it for the wires of one of the servos.
After the two legs were made I could join them together by mounting them both on the final piece of triplex. I made some holes in it to organize all the wires a bit and to make it possible to unscrew the servo horn from the servo without unscrewing the servo horn from the wood (is this understandable at all?? I hope so..).
The servos allow a little more than 180 degree motion, so it's not hard to set them up in such a way that it should be able to walk. Make sure that the legs can be pushed 'inside' enough to allow the robot to stand on one leg. Without the electronics, the robot should be able to stand on one leg unpowered in some positions, which makes it reasonably easy to set the servos up properly and adjust the legs if necessary.
## Electronics
The servos require 4.8 to 6.0 V power and draw something like 0.7A stall current. I first thought it would be easiest to run them directly of a battery, but I think that would result in the motions being very dependent on how full the battery is exactly (because voltage slowly drops). So I added a cheap 5V 5A BEC (from HobbyKing again, I think its called U5; only _just_ able to keep up, it didnt work with 6 servos when supplied with 10V, but on 15V it works) to ensure a constant power supply and mounted it on the back of the robot. Eventually I also want to add a small battery to make the robot walk for like 10 minutes on its own, but for now I dont want to recharge batteries all the time and run it tethered to a power supply.
The servos are controlled by an Arduino (Seeduino in my case), which is connected to my pc for now, as I run the robot tethered anyway. In v2 of this robot I will replace it with a much smaller (and more powerful) Teensy. That's all!
## Software
I only just completed the hardware and only wrote a very simple program to make the robot stand up, which can be seen in the youtube clip at the top of this post. It's hardcoded, will only work on my desk (smooth surface) and with the tether I suppose, but it shows that the design of the robot is sound. Also I'm quite happy that the robot seems rather robust :-) Hopefully it won't be too painful to make the robot walk as well!
## Next Steps
There's lots of stuff that I still have to do! (EDIT: some of these will be addressed in version 2 of this robot :-)
* Replace Seeduino with Teensy
* Modify the servos to get access to potmeter values, so that we can find out our current position in the software. Maybe replace all servo control with something more sophisticated (eg for precise control of forces), but I'm not sure about that yet.
* Add an accelerometer in order to keep balance
* So, also lots and lots of programming for more intelligent walking and getting up and so on with the extra sensors (secretly thinking about evolutionary methods, but that would probably be easier if I make a computer model of the robot)
* Find the ideal foot shape for standing up and for walking
* Maybe make the robot more symmetric, legs are slightly different now
* Remove tether and add batteryonly basic bipedal walking and getting up movements