


n8dm
(8/25/08)
Material are being gathered for my Yellow Drum Machine morph. I plan on making this with my 7 and 4 year old sons. Therefore the drumbot will need to take on a Wall-e look. The two ultra sonic eyes will work nicely with some strategic masking or holder. Not sure how the arms will work as drum stick yet…
Current expenditures:
Techsupplies.com (8/21/08):
Ultrasonic Range Sensor £11.99
20s Sound Recorder £10.90
Shipping Method £12.50
Total £35.61 ($69.09US)
Solarbotics.com (8/22/08):
Gear Motor and Tread Package SKU: GMTPkg $39.95
Gear Motor 10 - Geared pager motor SKU: GM10 $9.75 X 4 $39.00
Shipping $8.55
Total $87.50
Sparkfun.com (8/22/08):
H-Bridge Motor Driver 1A $2.35X2 $4.70 (hope these work…)
PICAXE-28X Starter Pack $37.95
Shipping & Handling: $4.70
Total: $47.35
Radio Shack (9/2/08)
I forgot to track this probably $20...
Gravitech Electronic Experimental Soulutions (10/13/08)
Jumpers M/M (100) $4.99
Jumpers F/F (24) $7.99
Jumpers M/F (24) $7.99
Solderless Breadboards (3) $9.99
Shipping $7.40
Total $38.36
Total so Far: $262.30
NOTE world-educational-services.net has both the Picaxe (for $32) and the Ultra Sonic eyes (for $38) a little less…
Now we play the waiting game... Ah, the waiting game sucks. Let's play Hungry Hungry Hippos!
(8/23/08)
TV stopped working. Good thing I didn’t wait to order the robot parts otherwise I don’t think could justify spending the money after having to buy a new TV.
(8/25/08)
Well didn’t have to wait long the wife called and said I got a package. The power units came today from Solarbotics. The wife questioned the declared value clearly shown on the box. Arggg you customs…
| Picture left out | A rather uninterested 7 year old playing with the robot parts. He actually interested he’s just tired from spending the day at the zoo and playing with a friend… |
|
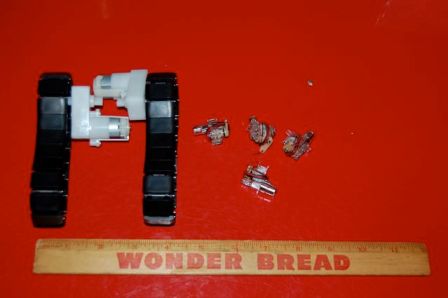
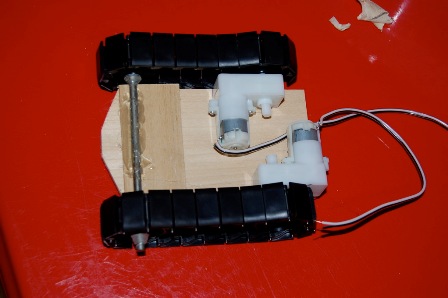
| The first step or is it the forth step… Who cares. The treads are assembled (only one was damaged in the assembly process…). Now I need to find an axle for the free end and develop some sort of body. I’m looking to make the body 2 ¼” wide by 6” long more or less… The search for materials begins… |
(8/26/08)
Took apart an old Epson printer looking for robot parts. I got a bunch of gears some motors an couple dozen screws but no axle. I was hoping for some sort of rod I could use as an axle. Quote from Carolyn, “this is for that crazy robot of yours; you should be working on my kitchen.” She can be so supportive.
(8/27/08)
Cut out a board to use as the main base between the treads. I suppose I should take a picture and include this as a caption… Carolyn picked up a new TV nothing on TV but democratic convention.
(8/28/08)
No robot work today. Carolyn admitted to knocking the box if robot parts from the printer down the steps. She said she found all the parts including two screws… Yet prior to telling me about loosing my robot parts she was complaining about me wasting time on the robot and not remodeling her kitchen.
(8/29/08)
Received the order from Sparkfun.com. The Picaxe starter set and the motor drivers. I’m not satisfied. I miss read the website and the Picaxe Starter Pack does not include a connection cable. Not much of a starter pack if you can’t get started with it. Additionally the Picaxe manuals all refer to the Starter Pack as including a download cable. I think sparkfun.com should name their pack something different… Apparently I’m easily confused. All in all I’m fairly annoyed at Sparkfun for this and probably won’t give then another try… Oh well. I noticed the old lap top has an RS232 port so I guess I’ll just make my own connection cable.
(8/31/08)
|
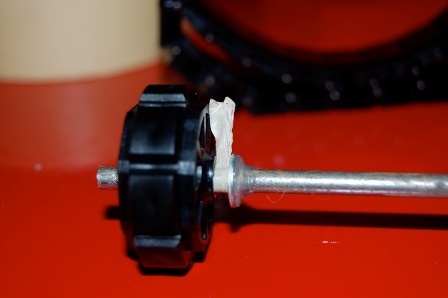
| Found an axle in the basement. It’s a little looser then I want but it seems like it will work. I think it’s aluminum, it was an old store display package hook (it came with the house). I used four small washers and a little hot glue to hold the tread cog in pace. I used masking tape to hold the washer in place and prevent the glue from going under the washer. I wrapped the tape a couple of loops around the axle and then used the washer to push the tape down and hold the washer in place. |
|
| End view of hot glue and washer holding cog / wheel in place. |

|
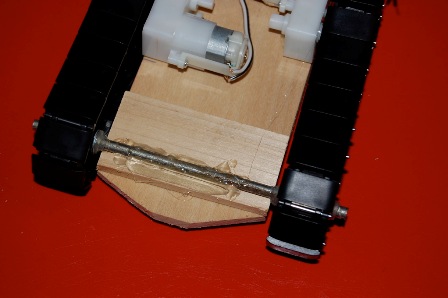
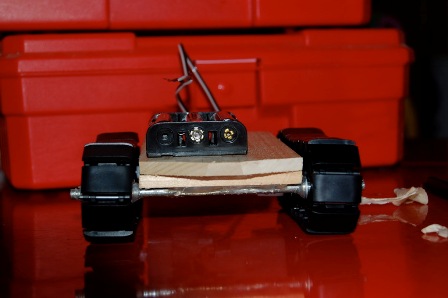
| Drive motors were glued on first then the front axle was positioned to provide some tension in the treads. Note the space block required to level out the chassis. The level block was not thick enough so the front end is slightly lower then the back. |
|
| Assembled. |
|
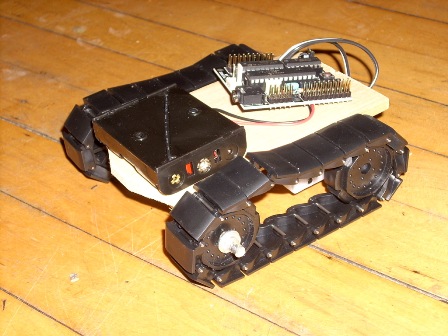
| Up side up. And wired for a test drive. The three battery pack came with the picaxe starter set. |

|
| Head on view. |
Finally I installed the picaxe processor in the board. This takes a little work since the pins need to be bent slight ly in to fit into the socket. This is accomplished by pressing one side of the chip on the table to bend all the legs slightly. Then repeat on the other side. Finally I installed the picaxe software on an old laptop that I found (I have a Mac). Hopefully I can figure out what all the errors are when I start the computer up and why it tells me to turn it off and on at least once every time I start it. My guess is it’s a battery issues (it doesn’t have one) and some sort of internal memory is getting lost. Regardless I was able to write my first program a short series of subroutine to make the robot turn and move. I still haven’t wired up the robot to the picaxe.
(9/02/08)
No robot work completed today… I gathered up material to make a serial cable to connect the picaxe. I found a couple old female serial plugs and an old set of headphones. I plan on hooking it up tonight (9/03/08) and getting the first basic program to work. I’m going to go to Radio Shack at lunch and probably pay too much for a couple of things. I need some jumper cables mail headers and a socket for my motor driver. Then maybe some lead free solder, flux and even one of those cold heat solder irons. What’s a project but an excuse to buy tools…
(9/3/08)
Radio Shack sucks. They had the 16 pin socket for the motor driver and that about it. I also bought a little IC circuit board to connect the socket to. They didn’t have the headers or jumper which I really needed but did without. I inserted H bridge motor drive into the picaxe circuit board. This drive will hopefully control the drive motors. Then I soldered the drive motors to the A B spots on the picaxe circuit board. I will probably either unsolder or cut these to put some sort of connector in in the future, I’d like at least some header pins.
I made a connection cable out of parts I found around the house. It took three trys to find a D9 plug that had the right sockets used. This may be partly due to my confusion of pin numbering and which side of the socket I look at… Anyway I ended up using my old HP48GX cable and an old headphone. The HP cable had a D9 plug that I installed in the past. Since I no longer have the HP this is not a critical item to have. I did keep the end that plugs into the HP incase I need it in the future. I sent about 30 minutes looking for one of my two multimeters to test which wires go with which pins but I never found one. So I used an LED and the 3 AA battery pack that came with the picaxe to test determine which wire are which. So I put two pieces of het shrink on the head phone jack (two sizes) and then soldered the wire put little pieces of electrical tape and slid over the first piece of heat shrink and shrinked it. The second piece of heat shrink covered evertything but was a little too big to make a tight fit over the head phone wire.
So the motor driver uses pin out 4 5 6 and 7. I started my computer (not an easy task and involves at least one restart). I wrote a simple program to move one drive wheel
HIGH 4
LOW 5
I plugged the cable into the computer and the picaxe. I hit I think it’s run and got an error message saying the COM port was in use. I nearly cried. Well I did some investigative work and found out the serial port is COM5. I stumbled across the settings for the picaxe software and noticed it was using COM1 I think. I changed it to COM 5 and hit run again. I got another error message saying I was using picaxe 28 and should be using picaxe 28x1 or something like that. I almost cried again. Anyway it asked me if I wanted to change the picaxe 28x1 and I said sure. Shortly after the left tread started moving forward. I tried another program
HIGH 6
LOW 7
And the right tread started moving backwards. I revised my previous program to use the proper pinouts and sent it to my bot. I think it moved forward slightly. I revised the program slightly more and sent it again and it made the series of turns but rather quickly, I was using PAUSE 250 which isn’t very long apparently I think it’s a quarter of a second. So I revised the program again to include an pause length global variable and ran the program again. It does about 6 things. It turn right and left two ways one using just one track with the other track stopped and two using both track going in opposite directions. It also goes forward two ways one using the global variable
HIGH LFORWARD
HIGH RFORWARD
PAUSE 2500
LOW LFORWARD
LOW RFORWARD
LFORWARD and RFORWARD are defines with the SYMBOL command like SYMBOL RFORWARD = 4. And the other using the binary callout
LET PINS = %10010000
PAUSE 2500
LET PINS = %00000000
I didn’t see much difference in the operation of either forward command. I suppose the bottom line is which requires less memory. I’m not sure right now. NOTE ALL CODE ABOVE IS FROM MEMORY…
The home support continues with Carolyn showing no interest in the robot unless it washes the dishes…
|
| The operational robot ready to do my bidding. Bwahhhahahah. |
I took a movie of it making it's first movements but I can't get it off my mobile me account into my smoething like google movies but I'll get it later...
(9/4/08)
It's burrito night so not much was done on the robot beyond showing it off to guests.
I did however get the video uploaded to google video and embedded above.
(5AUG2008 the other date is confusing this is what I use with genealogy)
Friday I started work on the motor driver for the eyes. I soldered a socket to a Radios Shack board for ICs. Then I soldered some jumpers and wires and hooked everything up to the Picaxe and nothing happened. Argh. My soldering was a little sloppy I tried to figure out what was wrong but nothing appeared wrong.
(6AUG2008)
The wire I have is a little stiff and hard to use. I also wanted some jumpers and break apart headers to redo the motor driver. I decide to go to the local Radio Shack which is bigger then the one on the near south side of
I give up on the robot for today. Not after looking up the jumper cables and it turns out that tiny bag of 100 jumpers is $38. More then I would have wanted to pay…
(9/7/08)
First thing in the morning I build a second motor driver board with terminal blocks to attach the wires to. I think it turned out nicely if I say so myself. I don’t have time to test it before the kids are awake and demand breakfast. Since my work table is the kitchen table I pack everything up for later. I make pancakes which the 4 year won’t eat…
Evening once the kids are in bed and get out the computer and the robot and my nice new motor driver board hook everything up and the nothing happens except the H Bridge IC get really hot. I notice I hooked the positive and negative wire up backwards, doh. I get it hooked up right but still no movement tin the motor… I check to make sure the motor works, it does. I check my Picaxe program by hooking an LED to pins 0 and 1 they flash. I figure I burned out the H Bridge so I switch it with the one on the Picaxe board but the tank treads still work and the second IC doesn’t make my motor driver board work. Unfortunately, I still haven’t been able to locate either of my multimeters so it’s a bit tough to trouble shoot. I use an LED to check for shorts but nothing pops out. So I pack everything up go watch season 4 Alias with my wife… So I spent a good six hours this weekend and didn’t really get anywhere. I might have to try this L298 Compact Motor Driver Kit. But I'd like to think I could build my own motor driver.
|
| Backside of the second motor driver |
|
| front side of the second motor driver |
(10/16/08)
After a month off for a funeral and to clean the 44 inches of water in my basement (good thing my robot work shop is at the kitchen table and not in the basement like the wife wanted…) and to watch season 4 and 5 of Alias I’m back to working on the robot.
I received an order from Gravitech for the solderless breadboard and jumper cables. I like the jumpers cables they seem to been fairly high quality and they make hooking things up very easy. I pulled the hbridge from my old soldered motor driver and wired it. Then I hooked it up to a battery and tested it to see if it would work. It appears to work just peachy. After reading a little bit more about hbridges I think the problem may have been that I only soldered up half of the chip. I left bare the v2 or v0 on the side of the bridge I didn’t need. I will probably go back and try to hook these pins up and try to get the circuit board to work. It’ll be more permanent then the breadboard. I'll experiment with pulling wires from the breadboad hbridge first to see if it stops working.
(10/19/08)
I pulled out the little guy and the computer and the hot glue gun for some more fun today. I was able to jumper in the motor to control the eyes using pins 0 and 1. I hooked it all up wrote a little test routine and the head did nothing. I swore at it but that didn’t fix anything… I then noticed that the pins were all high. I then noticed I had the board upside down and plugged the motor into the input pins… So I moved everything to where I wanted them and ran the program again and the head turned one way and stayed… I swore some more… The magic of the breadboard let me push two LEDs in to see if anything was happening. One glowed and the other one just blipped shortly. So I reviewed the code and it turns out you need to remember to put the pauses between setting the pin high and then low… So I revised my code and now I get the little guy to look right and then left. Well he doesn’t’ really look anywhere since the sensors aren’t hooked up and the motor isn’t mounted anywhere yet… I did notice that the LEDs hooked up in parallel with the motor were lit when the pins were low not high. Not sure what’s causing this yet. So I switched the pins to be high all the time and move them to low when I want the head to turn.
Upon the success of the head motor I decided to try and get a drum stick working. I’m starting with the base drum. I jumpered it straight the picaxe. Technically I used a jumper cable but only to hold the motor wire to the pin. I stuck the hire into the female jumper plug and then pushed it onto the pin so the jumper plug holds the wire to the pin. Anyway this worked fine and after some coding I was able to figure out that a pause of 75 gave a pretty good kick on the motor. Since I still hadn’t found anything very good to use as a drum stick I trimmed a bamboo skewer to about 4 or 5 inches long and hot glued it to the motor. Then I hot glued the motor to the robot. After a little bit of coding I got my first drum beat. After a little more coding I got it to do three slow beats then three fast beats. After a little more coding I got the head motor to look around then the three slow and three fast routine twice and the head motor to look around again. I was pretty proud of myself. I brought it to my wife to show off my accomplishment. She was unimpressed. I shouldn’t have belittled her home made greeting card earlier in the day that she had made at the stamping party she attended… She made some comment about me just copying something somebody else did (I guess I shouldn’t have said that about her fancy card that had a slidy thing that spun)… Arghhh. She also wondered why the kitchen remodel wasn’t complete if I had all this time to build robots… (disclaimer, incase she reads this, although my wife may have made the comments alluded to above they were in no way as mean as I make them sound…)
I got no snippets of code or pictures (I forgot about pictures) to include here at this time…
(10/20/08)
So I get home form work and go to show my oldest the new drum beat. I tell him about it and get it out he says cool. I attach the battery and it plays it’s little drum beat. I look over and he’s watching TV. I push him and he goes what… So I reset the robot and it plays it’s little drum beat. Noah more or less says and looks, “that’s great dad is that all it does,” and goes back to watching TV. Argh Maybe the one year old will like it…
After pulling some wires from my breadboard motor driver I determined that the reason my soldered motor driver wasn't working was I didn't connect up the V2+ on the side of the driver I wasn't using. So I heated up the soldering iron and soldered in three little jumper wire on the bottom across the chip to connect pines 1 to 16 (V2+), 8 to 9 (V2+) and 4-5 to 12-13 (0V). Upon returning to the robot I noticed I left the battery plugged in and they were more or less dead… argh. I need to remember to loop the programs so I have to remove the power to stop it… Well there was still a little power in the batteries and I was able to get a left turn out of the motor with the soldered driver board. So I’m happy I got that to work… Either the battery is too dead t o turn the head left or that one solder joint I thought looked bad and was close to the adjacent pin was in fact touching it… Should be easy enough o fix.
|
|
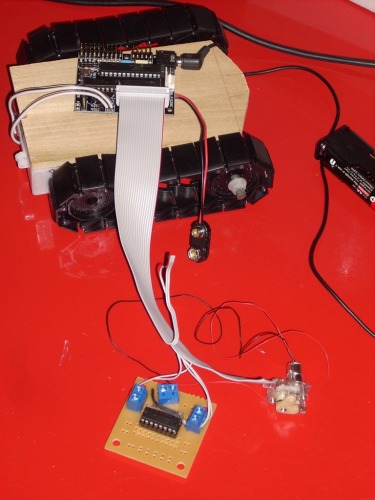
Top of my newly completed and potentially operational motor driver board. The board, screw posts and IC socket came from Radio Shack. |

|
| Underside of the boad. I'm only passable with sodler... [and spelling] |

|
|
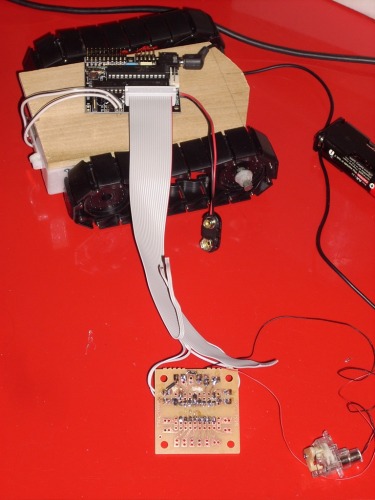
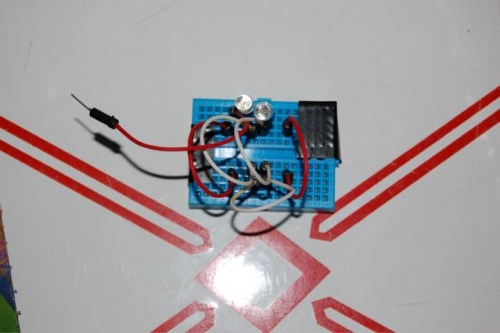
This was the solderless breadboard I used as the motor driver. I removed the IC and put it into the socket on the soldered board. The jumper cables got unplugged and attached to the screw posts on the soldered board.
|
|
|
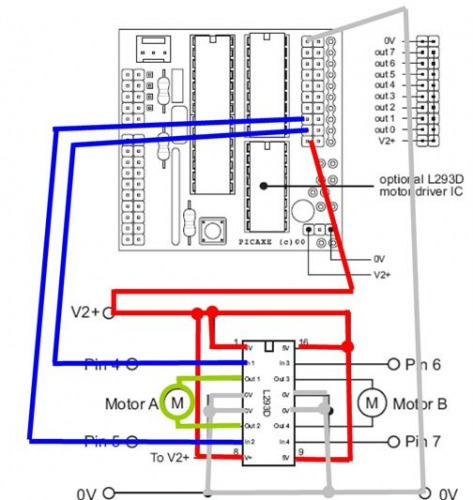
This is how the motor driver chip is wired up and connected to the Picaxe board. Note motor B is not used but I still have the voltage leads powered up. I've got some ideas for using the driver still but I want to get the robot moving first... Also note I'm not using the L293D chip I'm using an hbridge motor driver chip with the same pin outs.
|
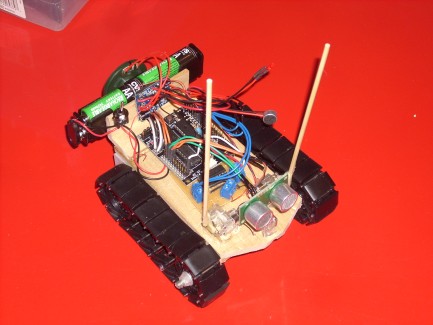
(11/02/2008)
I've gotten a good bit done recetly that i will have to come back and document. But as you can see in the new movie I have the drum sticks working, the voice recorder working and the range finder mounted and looking around, but not wired in to take readings yet. That's a rather trivial task to hook up but programming will be slightly more difficult.
Hopefully play drums
- CPU: Picaxe 28x1
- Sensors / input devices: none yet