


My first robot, and a work in progress
Hi, LMRers!
LMRites?
Hmmm...
Anyhow, I'm a raw beginner at this, and have little grasp of electronics. However, I figured I'd give it a shot, since I'm interested and I have a little free time these days.
I'm not entirely sure what this little 'bot will do when complete (if it ever is). My first task is to get it to move reliably.
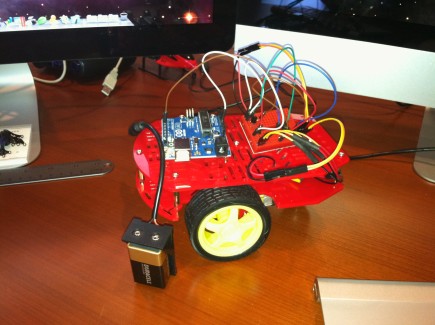
I started with the Magician Chassis (Dagu) from Sparkfun. It's handy in that it's inexpensive, and comes with gear motors. Just add batteries, sensors and a controller! It's AA battery pack is rather useless, though. In any case, I prefer rechargeable LiPo batteries, so I just left that off.
Here's what I've got so far:
One chassis
One Arduino UNO (overkill, I know)
One tiny solder less breadboard
Two 3.7V 850mah LiPo batteries
One 9V battery, holder, and connector (to power Arduino)
I hooked everything together today, and got some unreliable movement. It looks like the connections through my breadboard are loose, but that's probably not its fault. I'm guessing I just have too many connections. I'm awaiting a small PCB to put a lot of this together (it was in the order I picked up today, but one item in the order was mistaken for another). This should help me with my loose connections.
A problem I've heard about with this chassis is that the motors (and hence the wheels) don't spin at the same rate. I figured I would use some monitoring of some sort to equalize the spin rate in the software. If anyone has any tips or suggestions on this, I'd be grateful for them.
Also, I have a distance sensor on its way. That should help make this little thing a little more autonomous, instead of just running through a program with no response to its environment.
Ultimately, I may either buy another battery like the ones I have, or I may upgrade to a single 11.1V LiPo and get a voltage regulator to drop it to 8- or 9V. I think that would increase my chances for consistent voltage through the life of the battery. Or I may be totally wrong on that.
Also, I expect I'll replace the Arduino with something cheaper and less generalized.
I'd love to add nifty LEDs and more obstacle sensors, as well as make it follow movement. I'd also like to build an attractive cover for the whole thing when it's finished.
Well, that's where I am at the moment. If I get my stuff in the mail shortly, I might have more updates by this weekend.
Tasks:
1. Replace breadboard with soldered PCB.
2. Figure out how to use and integrate TB6612FNG motor driver (oh, yeah. Forgot to mention I have this).
3. Add some sort of environment sensor and make it work.
4. Figure out the battery thing.
And then I'll start playing with things.
------------------------------------------
UPDATE February 23, 2012
------------------------------------------
I've now integrated the motor driver, and it's pretty nifty. I haven't implemented speed control, but I've at least implemented the basic functions for spinning, moving forward, and moving backward. And stopping, of course. I'll have to play with it a bit.
It's not autonomous, but I can have it run through a programmed set of movements.
I'll be cleaning up the wiring, although it seems good enough for testing at the moment.
My ultrasonic PINGy thingy arrived, and I'll be trying to integrate that over the next several days. I'm assuming I'll either use interrupts, or just check it regularly, and have a couple distances where I choose to slow down or stop (perhaps steering while slowing, or something like that). I do have a small servo I can mount it on if I feel like I need to pan. Any suggestions on coding?
I've attached my code, so far. It just spins left and right, so I could make sure my motors were wired correctly.
I've basically just wired the motor driver directly in, without resistors or capacitors or anything. Is that bad?
Thank you for your support and encouragement! This is getting pretty fun!
Spins in place, or moves a bit (but not straight)
- Control method: non-autonomous for now
- CPU: Arduino UNO with ATMega328p
- Power source: 2x3.7V 850mah LiPo
- Programming language: Arduino
- Target environment: indoors, flat surface