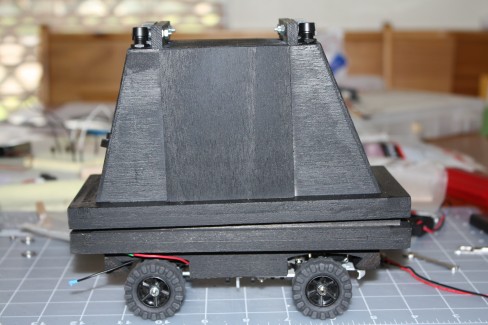
Mr Mouse Droid - Ericski's Mr Basic Contest Entry
Update July 1, 2009
As Rik pointed out, some more details would be helpful.
Firstly, more pictures can be found at http://picasaweb.google.com/eric.fialkowski/MrBasicLMRContest including some of my original chassis ideas (not a mouse droid.)
The shell is made from balsa and spruce that I have lying around from some of my other various hobbies. The plan is an "Mark 1 Eyeball" design based on looking at the one 3/4 profile image that shows up in my teaser video. A coat of black krylon spray paint gives it that "Imperial" look.
The wiring is pretty straight forward. 4 Sharp IR sensors wired to the analog inputs. The code for distance uses two libraries I wrote (based on code I found around the 'net) to include multiple sampling with smart averaging (drops min and max) and smoothing of the sensor readings. Two GP2Y0A21s point forward and two GP2D120's point rearwards to check for room when backing up. I found that the GP2Y0A21s seem to be noisier than the 120's but they do have the longer range.
For motor control I use a Pololu Qik2s9v1 serial motor controller using a library I wrote that is available on Google code at http://code.google.com/p/qik2s9v1arduino/ This requires 3 arduino pins and provides PWM speed control for the motors with a low voltage drop.
For power I have 1 9V for the Arduino and 3 Alkaline AA's for the motor. My kids jacked all my rechargeables plus I really would rather have 4.5V for the motors.
The LEDs are each attached to their own digital output pins to allow me to tell which sensor (top/bottom) detected an object and which way the bot decided to turn (more on the motion control in a bit.)
For fun I added a peizo buzzer that will make random noises while moving and beeps depending on the turn it will take. An start up plays a really crappy rendition of the Imperial March. I have no musical talent. Probably explains why I listen to some of the stuff I do. ;)
For motion control, I do the simple move until something is in front of me. I mix it up a bit by having it accelerate when it hasn't found anything blocking it. The sensor "danger" range increases when the speed increases. Once an object has been detected, the bot first checks to see if anything is behind it. If there isn't it will backup a random amount. It will then turn to a random direction and turn a random amount. Nothing really fancy but it is fun to watch it move around.
Besides playing around with Arduino libraries (which are very helpful for say sensor code that you use on all bots,) I also used multiple tabs for the sketches which splits the sketch up into multiple files. This allows a separation of logical areas of the code that probably don't need their own libraries. I split up my LED routines, motor routines (the layer on top of my library,) and the peizo routines away from the main loop and the motion routines. It is nice but I really would like an IDE more like Eclipse or Visual Studio. Or at least some helpers like "go to definition"and "find all references" would help.
Future plans for Mr Mouse Droid unfortunately include a lobotomy. I have other bots I want to use the brains/sensors for, plus I want to try a "logic only" line following bot that I think the Mr Basic chassis would be great for.
I'm planning on posting my libraries somewhere but I haven't figured out where that is. I'm a little leary after we've had what appears to be code leachers floating around here a few weeks back.
Update June 22, 2009
New video showing the full robot. Calling it done since I won't have anytime to work on it before the end of the contest and because there isn't much more to do with it.
I have a couple of other ideas to try with the chassis when I have more time like a non-microcontroller line follower.
Update: OK, cat's out of the bag. Or should that be mouse droid..
My entry is a version of the Mouse Droid from Star Wars. Currently I'm soldering up all the connections from the sensors, LEDs, batteries, and switches. I expected to be much further along with that task but turns out it is a little harder than just sticking wires into a breadboard. Reminds me of rewiring my old '58 chevy truck, though.

Update June 7, 2009
New video uploaded. It moves! Basic wiring & programming done.
- Control method: autonomous
- CPU: Arduino Decimila
- Sensors / input devices: Sharp IR's
- Target environment: indoor


