


Mini Sumo Robot.
UPDATE*
Well this project is pretty much screwed.Its like a year old. I think it was due to lack of proper planning on the circuit which eventually led to its "downfall". I've also stopped using the basic stamp and migrated to PICs which are more powerful (though the bs2 is somewhat a pic) haha. Anyways, It was a great learning experience for me and helped me understand alot of concepts. I fee kinda crappy that i lost 2 of the 4 wheels that I had someone machine for me. I should have kept it safely. This has helped me alot for my micromouse project I am working on now. Maybe soon I will make a minisumo but now I do not really see the point of it as it does not really have that "intelligence" I am looking for in a robot. Maybe and probably a line follower after my Micromouse. Out. :)
-------------------------EDIT---------------------------------------------------------
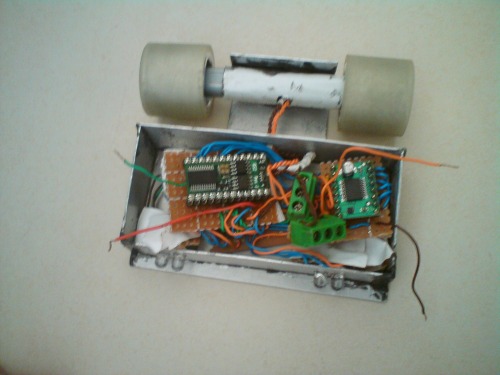
I found a way to mount the motor, though i mounted it too high. I busted one of my motor some how but at least i know my sensor and program works. Uploaded a video of it and picture ( super messy internals)
------------------------- EDIT ------------------------------------------------------
FINALLY! i got my wheels done :D. ok, now its all about insulating the metal ( if i paint it will it insulate?) and mounting the motor to the chassis. lol! The wheels look pretty good . hehe. hope that you guys can help with the code, i think it really sucks :(
3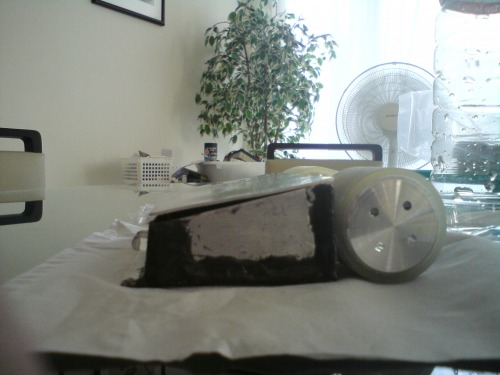
-------------------------------------------------- EDIT -----------------------------------------------------------
I think i will show you guys my program, take a look, maybe tell me how to make it work better. Im not so good at this. still learning.
' {$STAMP BS2}
' {$PBASIC 2.5}
'------------ DECLARATIONS -----------
'in5 = left servo
'in6 = right servo
'in8 = pushbutton 1
'in9 = push button 2
'in10 = push button 3
'in11 = pushbutton 4
'in12 = left opponent detector
'in13 = right opponent detector
'in14 = left edge sensor
'in15 = right edge sensor
'---------------- VARIABLES ------------
light VAR WORD
light_2 VAR WORD
val VAR WORD
val_2 VAR WORD
val_3 VAR WORD
det VAR WORD
det_2 VAR WORD
det_3 VAR WORD
det_3_1 VAR WORD
time_right VAR WORD
time_left VAR WORD
counter VAR WORD
'--------------- SYMBOLS --------------
back_ir CON 3
back_det CON 4
leftservo CON 5
rightservo CON 6
push1 CON 8
push2 CON 9
push3 CON 10
push4 CON 11
left_det CON 12
right_det CON 13
left_edge CON 14
right_edge CON 15
'--------------- MAIN -----------------
startup:
IF push1 = 0 THEN huntnorm
IF push2 = 0 THEN huntfar
IF push3 = 0 THEN huntleft
IF push4 = 0 THEN huntright
'-------------- STRATEGY ---------------
huntnorm:
FOR counter = 1 TO 150
PULSOUT leftservo,1000
PULSOUT rightservo,1000
PAUSE 20
NEXT
GOSUB basic_strategy
huntfar:
FOR counter = 1 TO 75
PULSOUT leftservo,1000
PULSOUT rightservo,1000
PAUSE 20
NEXT
GOSUB basic_strategy
huntleft:
FOR counter = 1 TO 100
PULSOUT leftservo, 800
PULSOUT rightservo, 1000
PAUSE 20
NEXT
GOSUB basic_strategy
huntright:
FOR counter = 1 TO 100
PULSOUT leftservo, 1000
PULSOUT rightservo, 800
PAUSE 20
NEXT
GOSUB basic_strategy
'--------------- BASIC STRATEGY ------------
basic_strategy:
GOSUB edge_det
GOSUB ir_det
GOSUB behind_det
'------------- FRONT DETECTION ------------
ir_det:
HIGH left_det
RCTIME left_det,10,light
WRITE val, light
HIGH right_det
RCTIME right_det,10,light_2
WRITE val_2, light_2
calibrate:
IF val = 0 THEN main
IF val > 0 THEN main_1
calibrate2:
IF val_2 = 0 THEN main_2
IF val_2 > 0 THEN main2_2
main:
HIGH left_det
RCTIME left_det,1,det
PULSOUT leftservo, 800
PULSOUT rightservo, 1000
IF det > 0 THEN calibrate2
IF det = 0 THEN calibrate2
main_1:
HIGH left_det
RCTIME left_det,1,det_2
PULSOUT leftservo, 800
PULSOUT rightservo, 1000
IF det_2 > val + (val/(val/10))THEN calibrate2
IF det_2 < val -(val/(val/10)) THEN calibrate2
IF det_2 < val + (val/(val/10)) THEN calibrate2
IF det_2 > val -(val/(val/10)) THEN calibrate2
main_2:
HIGH right_det
RCTIME right_det,1,det_3
PULSOUT leftservo, 800
PULSOUT rightservo, 1000
IF det_3 > 0 AND det > 0 THEN foward
IF det_3 > 0 AND det = 0 THEN right
IF det_3 = 0 AND det > 0 THEN left
IF det_3 = 0 AND det = 0 THEN calibrate
main2_2:
HIGH right_det
RCTIME right_det,1,det_3
PULSOUT leftservo, 800
PULSOUT rightservo, 1000
IF det_3 > val_2 + (val_2/(val_2/10)) AND det_2 > val + (val/(val/10))THEN foward
IF det_2 < val_2 -(val_2/(val_2/10)) AND det_2 < val -(val/(val/10)) THEN foward
IF det_3 > val_2 + (val_2/(val_2/10)) AND det_2 < val + (val/(val/10)) THEN right
IF det_3 > val_2 + (val_2/(val_2/10)) AND det_2 > val -(val/(val/10)) THEN right
IF det_3 < val_2 -(val_2/(val_2/10)) AND det_2 < val_2 -(val_2/(val_2/10)) THEN right
IF det_3 < val_2 -(val_2/(val_2/10)) AND det_2 > val -(val/(val/10)) THEN right
IF det_3 < val_2 + (val_2/(val_2/10)) AND det_2 > val + (val/(val/10)) THEN left
IF det_3 > val_2 -(val_2/(val_2/10)) AND det_2 > val + (val/(val/10)) THEN left
IF det_3 < val_2 + (val_2/(val_2/10)) AND det_2 > val -(val/(val/10)) THEN left
IF det_3 > val_2 -(val_2/(val_2/10)) AND det_2 > val -(val/(val/10)) THEN left
IF det_3 < val_2 + (val_2/(val_2/10)) AND det_2 < val + (val/(val/10)) THEN RETURN
IF det_3 > val_2 -(val_2/(val_2/10)) AND det_2 > val -(val/(val/10)) THEN RETURN
IF det_3 < val_2 + (val_2/(val_2/10)) AND det_2 < val + (val/(val/10)) THEN RETURN
IF det_3 > val_2 -(val_2/(val_2/10)) AND det_2 > val -(val/(val/10)) THEN RETURN
'------------- BACK DETECTION ---------
behind_det:
HIGH back_ir
RCTIME back_det,1,val_3
WRITE val_3,val_3
IF val_3 = 0 THEN basic_strategy
IF val_3 > 0 THEN turn_about
'------------- EDGE DETECTION ----------
edge_det:
HIGH right_edge
RCTIME right_edge, 1, time_right
IF time_right > 0 THEN back_left
IF time_right = 0 THEN edge_det2
edge_det2:
HIGH left_edge
RCTIME left_edge, 1, time_left
IF time_left > 0 THEN back_right
IF time_left = 0 THEN edge_det3
edge_det3:
IF time_right > 0 THEN edge_det4
IF time_right = 0 THEN RETURN
edge_det4:
IF time_left > 0 THEN straight_back
IF time_left = 0 THEN RETURN
'---------------- MOVEMENT -----------
foward:
RETURN
right:
RETURN
left:
RETURN
back_left:
RETURN
back_right:
RETURN
straight_back:
RETURN
turn_about:
GOTO basic_strategy
------------------------------------------------- EDIT -------------------------------------------------------------
OK.... i got my motors working but guess what?! my bs2 just fried itself. wthhhh. Thats so crappy. I gotta get a new 1 ==. Anyway, i just finished my chassis of the robot. and still waiting for the wheels to be done.
--------------------------------------------------- EDIT ------------------------------------------------------------
Finally! my motor and moto controller has arrived! I just need a few days to understand how it works. I have on issue that going on I got someone to help me make my wheels and mold the tires but i would have to build the body my self - i dont have the tools and i cant find alluminium anywhere in singapore. ( my local hardware store :P) anyway i just posted a forum topic on the motor driver, hope you all can help me.
------------------------------------------------------ EDIT -------------------------------------------------------------
After some experimenting, i decided to use the sharp gp2y0a21k it sensor for the back instead of the pna4602m. I wont be using a ADC chip as i would only need a " isit infront?" reading( 30cm) .
My motors are coming in about a few days and i would be meeting the man that would help me build the body :D
--------------------------------------------------- EDIT ---------------------------------------------------------------

These are the two IR edge detectors that I soldered and sawed myself, tried to cram everything together
These 2 are my front detectors, they give a range of about 20-30 cm once i "calibrate" them well enough, maybe even further when i get shrrink tube :).
will cont to add more stuff
This is my mini-sumo robot which is almost at its completion, just waiting for a few items to arrive ( motors + motor controller + my dads fren who may help me machine it). I want to thank robologist for all the help he gave me. Basically, it runs on a basic stamp 2, qrd114 edge sensors, pna4602m back sensor, 2 diy range sensor ( 20 cm range? ), 2 mini metal highpower geared motors and a pololu motor driver.
Basic stamp 2:
There are four strategies to this:
- normal attack
- move forward a little, if no opponent detected, move in circles looking for the opponent.
- long attack
- opponent is place far to the end of the ring, move forward alot and fast, if no opponent detected then move in circles searching.
- left attack
- opponent placed robot down second on the left, search to the left immediately if no opponent found, go in circles.
- right attack
- opponent placed robot down second on the right, search to the right immediately if no opponent found, go in circles.
if anyone has more ideas please feel free to share.
- Actuators / output devices: 1:150 highpower mini metal gear motor
- Control method: autonomous
- CPU: Parallax Basic Stamp 2
- Power source: 9v x 2
- Programming language: pbasic 2.5
- Sensors / input devices: QRD1114x2, pna4602m, diy ir sensor
- Target environment: Sumo Ring