


IR Obot: Infrared remote controlled robot
*Note: Fritzing Schematic, and Arduino Sketch attached as Zip.*
This is a 2 motor robot controlled with an Infrared remote control. Arduino needs the IR Library included, you can get it from: http://www.arcfn.com/2009/08/multi-protocol-infrared-remote-library.html
There is no Fritzing part for the Motor Control shield I used, a freeduino that I got from NKC for $12. (http://store.nkcelectronics.com/freeduino-arduino-motor-control-shield-kit.html). The shield lets Arduino control the direction and speed of 2 DC motors with just 4 pins (9,10,12,13)
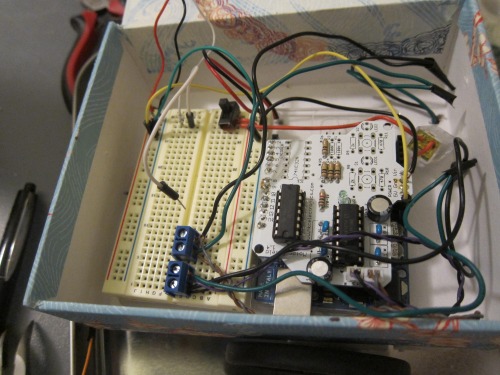
The whole Robot is built into a nice cardboard box that used to hold stationary. The DC motors run two wheels, there is a castor wheel for balance. The IR sensor is mounted on top of the BOX. The IR Remote is from my ROKU, but any IR Remote control will do. A 6AA Battery pack provides 9v power. Connected to Arduino Vin.
The IR sensor reads the button press from the remote, I have a line in the sketch that prints that to the Serial output so you can watch it on your output. When you put this together, you have to modify the IR codes in the sketch to reflect the codes that you are getting from your own remote. For Example, upload the sketch to the Arduino, have the IR senso hooked up. Open the Serial Monitor, NOW when I press the UP button on my remote, i see that UP sends a HEX number: 57439867 So, you can see in the sketch, I include that in an IF statement: if (results.value == 0x57439867) { //UP forward Inside the IF statement, there are the speed and direction commands to make both motors go Forward. Use the serial monitor to decide what codes are associated with your remote. Then, replace my codes with your codes. You might find that the sensor can wiggle one digit either direction, just add more than one UP command to cover the different codes. 57439867, 57439866, 57439868 all come from the UP arrow and tell the robot to go forward.
Remote Control robot controlled with InfraRed Remote.
- Actuators / output devices: 2 geared motors
- Control method: Infra-red remote controlled
- CPU: Arduino
- Operating system: Arduino
- Power source: 6 AA batteries power everything
- Sensors / input devices: IR
- Target environment: home