I.M.P. - Intelligent Mobile Platform
Hello LMR! I am a Mechatronics Engineering student in Canada. This is one of my current projects - IMP. He is the result of the voices in my head exchanging cookie recipes. This project is more for self indulgence as I chose to forego some good engineering principles for design reasons/to appease my creativity/satisfy the voices in my head. I welcome any suggestions you guys may have for this project. I am still working on it but have purchased the majority of parts/thought it out in my head. The idea is to build a quadrapod that can also tuck its legs underneath itself and drive around on wheels. This project is going to be stretched over a long period of time as I am always either busy with work or school (and its going to be like this for at least another 4 years) so its hard for me to devote as much time to this as I should.
To Do
- Develop a gait
- Add all sensors (Infared, Sonar, GPS, Accelerometer, temperature)
- Making him remote controlled
- Build a tail
- Build 4 H-bridges for motors
- Add wheels and program a method to change the method of locomotion
Long-term Goals
- Build a speech circuit (Based on SpeakJet chip and text-interpretation chip)
- Add a power consumption sensing circuit
- Develop/program the appropriate inverse kinematics
- Add a web camera
- Stop using DIP parts and develop SMT boards for everything used.
So far IMP is only able to hold himself up + 7.5 pounds (he can hold 150% of his own weight on slippery hardwood floor). I think he can lift up to 10 pounds but I worry about burning out the servos. I will update this blog up more as I get more done. Here is my progress so far;
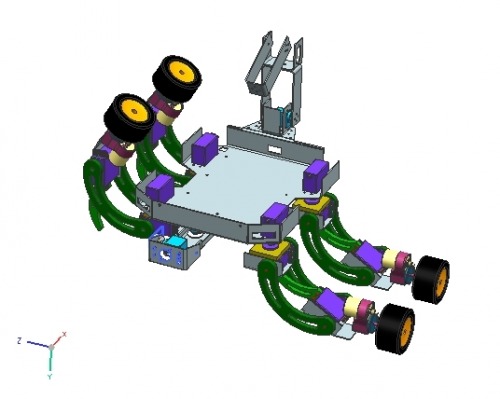
The design was done in Siemens NX 6.0 (CAD program) and Siemens Aero (smaller program that’s part of NX that deals with sheet metal construction). 586 objects present in the final assembly. For every hour of machining I spent 1.5 hours designing.

Figure 1. Nearly Full Assembly from the Front.
Figure 2. Nearly Full Assembly from the Back.
Figure 3. Blueprint of Leg in Walking Position

Figure 4. Blueprint of Leg in Driving Position
Once everything was designed I machined all the parts, mostly using a bandsaw, drill press, various punches, metal shears, hammer and any other useful heavy machinery in sight. (done in university machine shop). The chassis is made of aluminum and Lexan plastic. 
Figure 5. Legs After Being cut and Polished
One easy way to make parts is print them out on paper in a 1:1 ratio and glue them on to your raw metal, plastic or whatever. Then machine your parts and let them soak in water. Use a dish scrubber/metal wool to rub off the glue and paper. Tell people you eyeballed it ;) 
Figure 6. Legs that I Machined by Eye-balling .....dam I'm good ;)
After everything was done I put it together. 
Figure 7. Legs Assembled and Thread Sealed
Here you can see me finish up putting him together - you can even see me try on one of the wheels that will be mounted on him later.
Figure 8. IMP Laying on his Back While I Attach the Legs
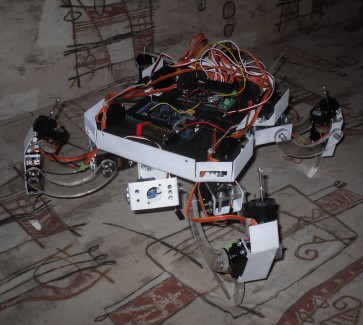
After the subassemblies where done I lubed it up and epoxied anything that looked sketchy. The result was IMP. Here you can see him dangling while I test/program everything individually. And yes that is an Arduino Duemilanove on my desk.

Figure 9. Imp Hanging Out
Here is the latest image of him standing on my floor and holding 7.5 pounds for 30 seconds without slipping (after 30 seconds I removed the weight b/c I was worried about the motors). Please note the cable only provides power to logic. The servos where holding this weight using onboard batteries (attached to belly). As of right now the computing is shared between an Arduino Mega clone and a Lynxmotion SSC-32 board.
Figure 10. Imp Holding 7.5 Pounds on a Slippery Floor
Lessons Learned from This Build
- Be very sceptical of Chinese data sheets that seem too good to be true. I had to replace 8 of the servos because the first ones I bought where not what they where speced to be.
- Buy parts from China. I am a student and this is an expense out of my own pocket. No fancy Hitec servos for you.
- Threadseal gets everywhere and deteriorates plastic. It ruined the mounting brackets on the previous servos and made some of the lexan plastic parts brittle.
- Beware the Arduino 0018 environments. I had some port trouble with it. Wasted a day trying to fix it, reinstalling USB drivers, reading forums, and scanning the source code. Gave up and went back to the tried and tested 0017 - all my problems dissapeared. My machine is a Lenovo w a T5800 and 4GB ram running 64bit windows 7. (PS I know 0019 is out but im sticking with 0017 for now)
/* All my work is distributed under the Creative Commons Attribution-NonCommercial-ShareAlike 3.0 License or any subsequent version of that license. Details here "http://creativecommons.org/licenses/by-nc-sa/3.0/". You don't need to give me any credit but any derivative works must remain free and open source to the community. All code, media, diagrams and details are provided on an "as is" basis with no expressed or implied warranties for suitability to any purpose - don't blame me if something breaks. */
NOT A REAL UPDATE
Sorry LMR I needed to take this project out of “drafts” to show a potential employer the type of projects I pursue on my own time. As it is right now, I.M.P. is hanging in my room back home and I am at university. All the parts have arrived and I will begin integrating them as soon as the study semester is over. While at university I am trying to find a professor that can help me with the IK code.
Stands, Navigates (to be programmed)
- Actuators / output devices: 12 MG995 digital servos, 4 HY 370 motors with 1:4 gearbox
- Control method: autonomous, RF wireless (to be added)
- CPU: ATmega1280, Lynxmotion SSC-32 board
- Operating system: Arduino
- Power source: 2 6V 2200mAh power, 7.2V 3800mAh logic
- Programming language: C++, Arduino, C
- Sensors / input devices: accelerometer, 2 Sharp IR, SRF02 Ultra Sound, GPS (all to be added)
- Target environment: indoors, Simple outside terrain


