


Hurby toy
(See last update (June 2nd) at the end of the page: designing behaviours).
This is Hurby, my current freetime project. It will be a "Hacked Furby" and I must admit that the original idea came from one my daughters last week. I was working on POPSTAR robot and she was helping me, when she told: Dad, why don't you build a Furby for us??. And that night, when I went to bed, I started thinking about it. "Perhaps it isn't a bad idea!..." And the day after I started to study how to accomplish such project.
In a first step I listed what I wanted to do:
- I should use a lowest cost plush furby, skinned it and replace its eyes with two LCD displays (as the original one).
- Develope all the electronics to allow: ears, mouth, body and feet movements.
- It'd be also capable of talking and listening.
- And, it should detect when someone wanted to play with it or let it sleep.
- The most challenging task for me is that it should have its own personality which could evolve as my daughters play with it. Wow!!! this points to be very atractive challenge!!.
In conclusion, build a replica (more or less accurate) of the original one (by Hasbro) but done enterely from scratch and with low cost materials.
Then, a couple of days later, I wondered what could I need:
- A Furby... well, a plush furby (as cheapest as possible), obviously.
- LCD displays to replicate their wonderful eyes
- Servos for ear, torso, body and feet movements
- Sensors: contact, IR, gyroscope, temperature...
- Microphone and speaker
- Remote link (bluetooth smart)
- A skeleton... well, popsicle sticks works properly in my previous project, so this time could also be a very good (cheap) solution.
- And, of course... a CPU (mbed board is my favorite).
That seemed to be a very good start point, so I decided to draw a first sketch:
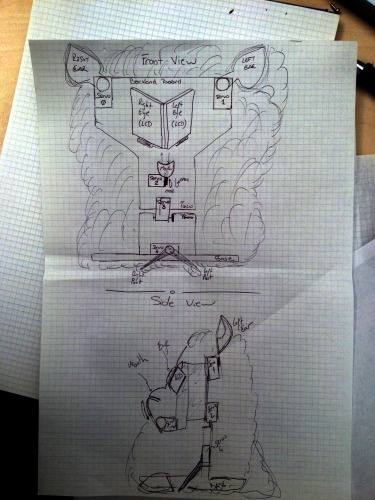
The first thing I bought ( a couple of days ago) was the plush furby (11 €), look at it:
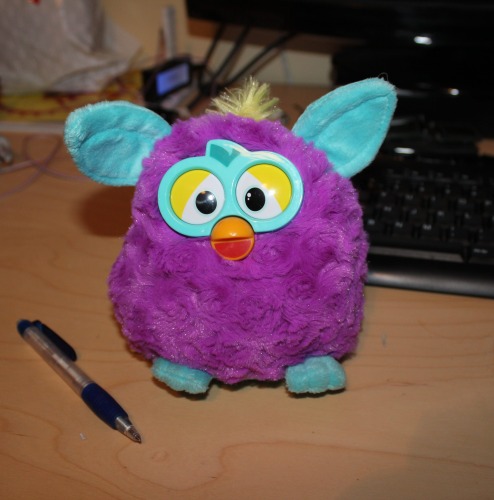
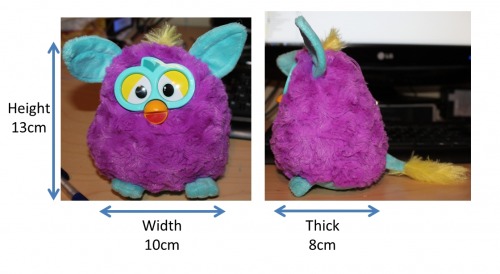
Its dimmensions are similar to the original one, so I wouldn't have problems to put inside all the electronics.
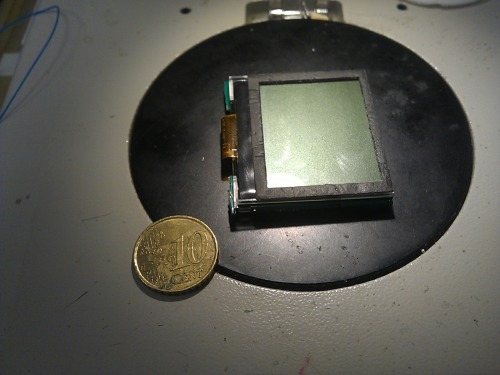
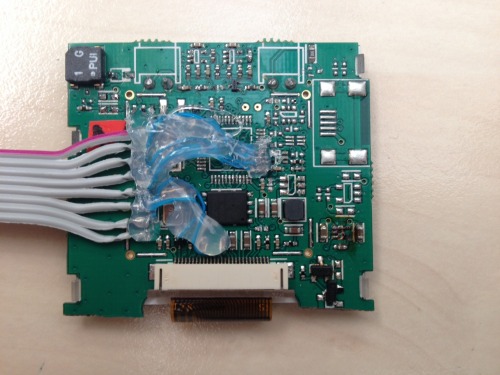
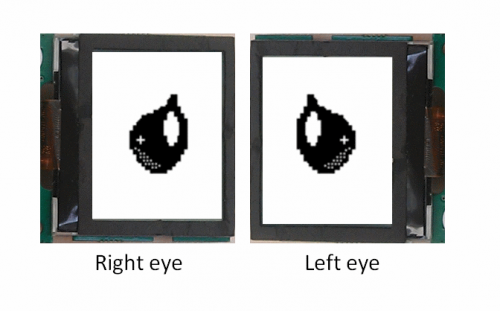
Next step was to select which LCD displays I would use to replicate their wonderful eyes. Yesterday, I picked two defective units of a remote controller from the company I work, and which I designed on 2011 (firmware).
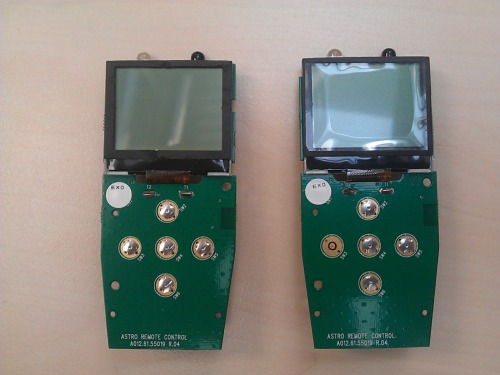
The remotes have a monochrome LCD with white backlight and a resolution of 128x100 pixels... I thought enough for my purposes. They have a visual area dimmension that fits perfectly into the furby eyes. So the next step was to hack those remotes to get both LCDs.
I studied the schematics and one hour later I started to cut the pcb boards to isolate the displays. Now I have 2 eyes like this (figure below) for my Hurby.
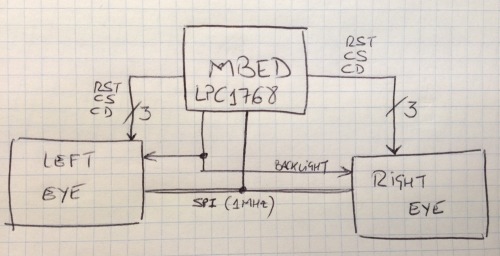
I will connect them to my mbed board and control them via SPI with 7 extra IO lines. I hope to have first result within next days.
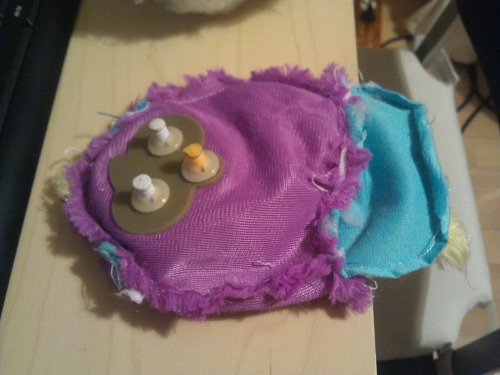
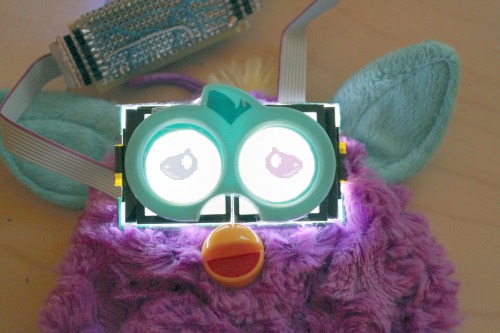
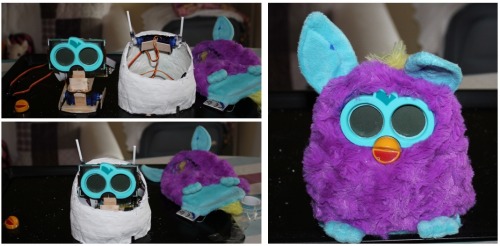
This morning I've skinned the furby and studied the way to replace its eyes with my LCDs. It seems easy. I think I can unplug its eyes and replace with my displays.
On next update I will show a video in which Hurby will move its new wonderful eyes...
UPDATE March 20th, 2014
Well ... that's done!! I've attached a video showing Hurby's first sight (link to video). It took me a bit of low level work. Here comes the details.
1) I removed the eyes from the Furby and drilled both eyes.
2) I adapted my remotes to be controlled from the mbed board. So I had to isolate the LCD interface from the rest of the circuitry and redirect those lines to a dip connector in one side of the pcb. I put a dot of silicone to avoid cable breaking.
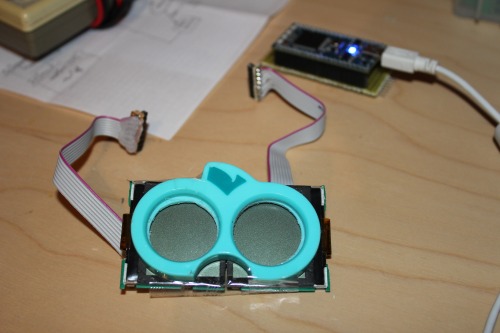
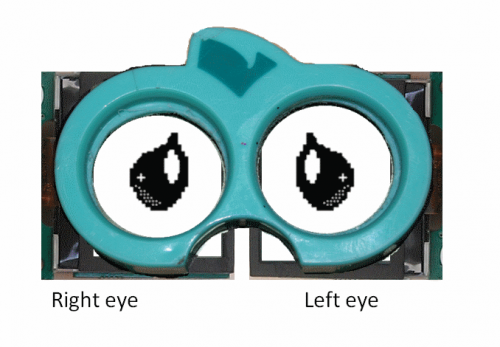
3) Once both eyes were ready, y place the Furby's eyes above them and fixed for a test with a bit of adhesive film.
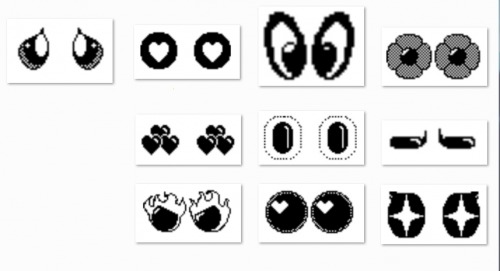
4) I've collected several Furby's eyes from the web. I will format, scale and rotate them to be used in my Hurby.
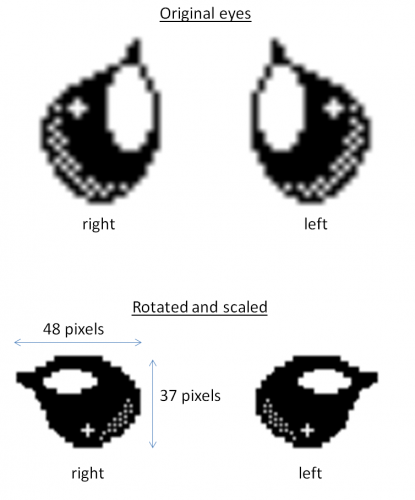
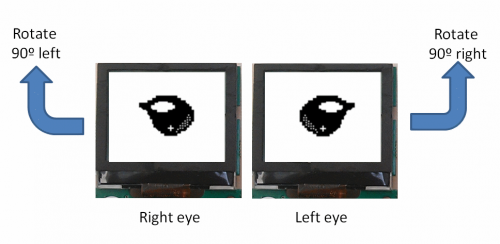
5) For the first test, obviously, I've started with the first one. My LCD displays have 128x64 pixel resolution, so I've decided that these eyes must be around 48x37 pixels. Furthermore, as LCDs are rotated (right eye is rotated 90º to left and left eye, 90º to right, I had to rotate both images. Here is the result:
6) This would be the final result... if everything goes well ;)
7) I'd like that Hurby could blink its eyes, so I had to create a pattern of blinking, and the result was a collection of images that once animated will generate such blinking.

8) After a bit of coding, finally I got the final result.
9) Future work: Well, I have to format the rest of the eye types I've found. I like to create wondeful animations with them, jumping from one side to the other, scaling them...
In next update, you will see Hurby moving its eyes, and I'll have a first prototype of the skeleton.
UPDATE, March 31st, 2014
Hi again, I've got a first prototype of the Hurby's skeleton. Now everything fits inside it. There is only one thing to solve: insert a servo for mouth movements... that will be solved in next update... at least I hope it.
Ok, let's go.
In a first step I decided to build a popsicle stick skeleton, but I need a structure for the Hurby. After discarding several alternatives, I decided to build from plaster bandgages, so I went to the pharmacy and bought one, and I used another plush furby as a mold.
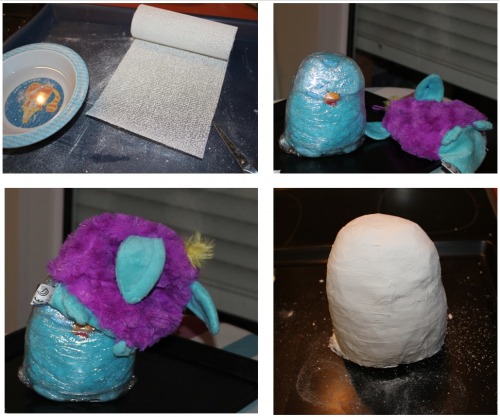
Once the structure for the skeleton was ready, it was time to start building it. the next step was to define which movements can Hurby does. Finally I decided to build this base with two servos that allow movements to: left, right, ahead and back. Also that base will be the Hurby's eyes support.
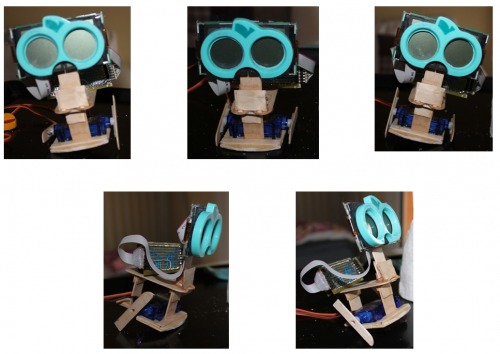
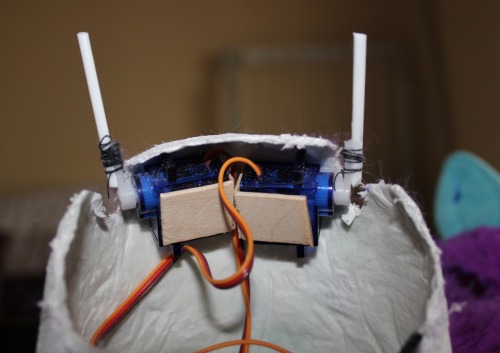
Servos for ear movements will be inserted directly inside the plaster structure.
The final result was looking as shown below:
Finally to test different eye configuration, I loaded a short demo. See video.
In next update I hope will be capable of animate eyes with fast and slow movements, move ears and body.
UPDATE: April 3rd, 2014
Hi again, this time I add a small update. Now Hurby can move its eyes around. Here (see video) you can see it following my finger.
Along this weekend I'll post a new update showing it moving ears and body.
UPDATE: April 9th, 2014
Hi guys!! Hurby can dance now!! I've prepared a test dance program to show how it can move its ears, eyes and body servos with a periodic rithm (see video).
However, there are lot of things to improve. Now I'm working on higher level behaviours which imply combination of eyes-ears-body movements, like fear, happiness, unhappines, anger or sleep.
Also, yesterday I received the EasyVR 2.0 module for voice recognition and speech synthesis, so I hope that in a couple of weeks I could start testing it. First I have to design the Hurby's mouth. Attach another servo to it, and include different sensors like: touch, gyroscope, IR.
UPDATE: May 9th, 2014
Hi guys!! Woowww!!, just a month after the last entry. April is not a good month for hobbies, a lot of holidays to do stuff outdoors: sports, childrens, friends, beers, ...., beers,... ;)
Last week I've started with pending stuffand now I have integrated several of them:
- Touch sensors in head, ears and tummy.
- A gyroscope attached to the skeleton.
- A mouth with its servo.
Ok. Let's start with touch sensors.
The first question I wonder, was the way in which I could place different touch sensors along the Hurby's body. In Orbis (the company I work) we have a certification laboratory to carry out EMC compliant tests and there we have a paper film with a metalic termination. It is a conductive paper that, when I saw it, I knew it would be the best and cheapest solution for this kind of sensors. Next figure shows this kind of film.
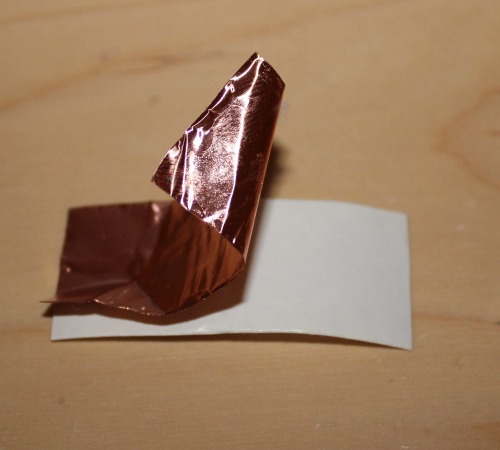
Then I proceed to build the sensors. With two layers of these films, separated by isolating paper, I glued them to the Hurby's skeleton, and connect a cable to each conductive layer, creating something similar to a pushbutton.
In the tummy, I build a large film size touch sensor, to detect tickling. Here is it:
When somebody starts ticking the toy it should switch to a tickle state, moving ears, eyes and mouth and emitting sounds similar to laughs.
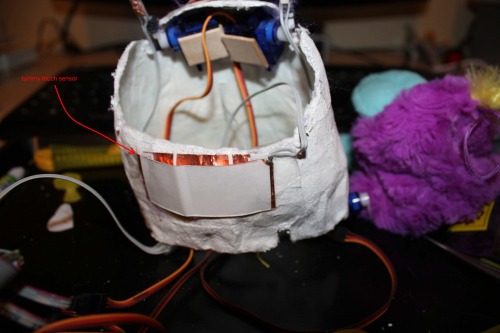
In the ears, I build a thin touch sensors along the ear skeleton, to detect when somebody pick up the toy by the ear. In this case, Hurby will get angry (moving ears fast, eyes, mouth and emitting anger sounds/talks), as it didn't like be picked on this way. Here they are both sensors:
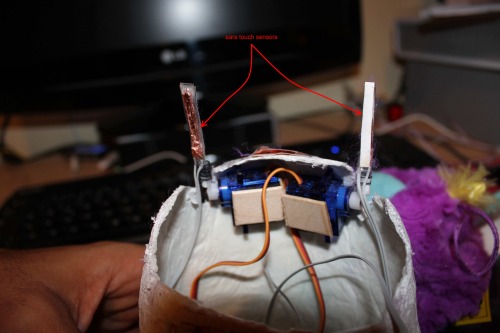
The last one, on the head and a bit smaller that one placed on the tummy. It will detect when somebody starts caressing the Hurby's head. In this case, Hurby will react with happy actions (moving lovely eyes, slow ears movements, mouth and emitting calm and happy sounds/words/phrases).

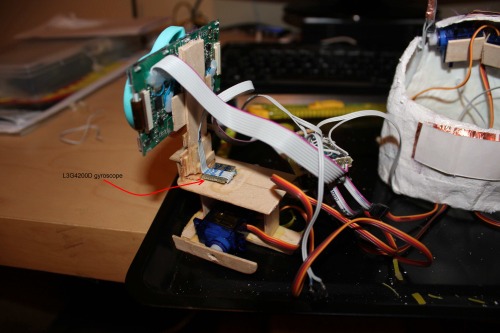
Once, integrated these touch sensors, it was time to give Hurby the ability to detect when it is balanced/inclined to different positions. So I decided to use a 3-axis gyroscope attached to its skeleton. In this case I've used an old friend (from POPSTAR robot). It is L3G4200D gyroscope from ST and can be controlled via I2C port.
I've attached(glued) the sensor to the popsicle stick skeleton, look:
Ok, now I had: touch sensors and gyroscope. Next item in my list of pending tasks was to build Hurby's mouth.
In this case, and after several wrong decissions, finally I found a ultra cheap, easy and funny solution to build it. In this case I used a tube of Lacasitos (lacasitos are sweets like M&M's), look the tube:

Even the color of the tube was quite similar to my plush Hurby's mouth. So I cut a piece of the tube with the form of the bottom side of the mouth. I bend the piece and glued to the popsicle structure. Look:
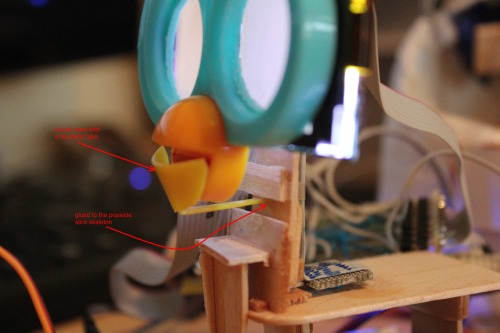
With a servo placed on the left side of the mouth, I would be able to replicate mouth movements simulating the Hurby talking.
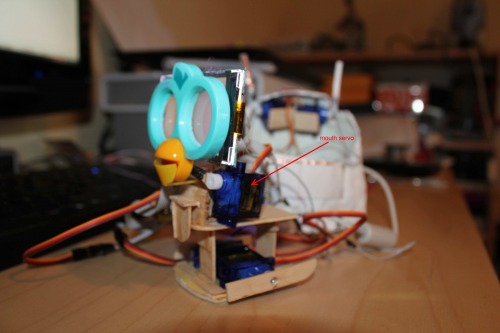
Once the servo was glued to the skeleton it was time to check the work done. I dressed the Hurby and started doing differente tests:

Here (see video) in this video you can see mouth tests done previous servo mounting and once Hurby is dressed.
And that's all folks... by now.
In next updates I will start playing with the EasyVR (voice recognition and text-to-speech) module, to provide voice to my Hurby toy.
See you. Bye!!!
UPDATE June 2nd, 2014
Hi again folks!
I've been quite busy during the last month, and now during last two weeks I've started to think about Hurby's behaviours.
I've been reading a lot about it, and now I think I got it. I'm designing a Subsumption architecture but with a special feature. As some inputs like "time since last activity" or "playing time trend" are ambiguos, and as I am an enthusiast of AI and fuzzy logic, I've decided to develope Hurby's behaviours as Fuzzy Inference controllers.
I want to detail all the design and development process, carefully, adding source code and whatever I could add. So, I've decided to detail all these stuff in paralel blogs.
I've started defining the subsumption architecture that Hurby should follow. You can read it in this blog entry "Behaviour-based design. Subsumption architecture".
After that I will explain the internals of happiness behaviour, and once done I'll publish a video showing this basic behaviour (subsumption level 0), and how Hurby can change between unhappy - happy state as I play or not with it.
See you. Bye!!!
It behaves similar to original Furby. Moving ears,eyes, mouth, torso and feet. Also has its own personality.
- Actuators / output devices: (5) small 1kg/cm servo motors
- Control method: Autonomous. Feed via bluetooth smart link.
- CPU: mbed LPC1768 board
- Operating system: Own Event Framework
- Power source: 4xAA batteries
- Programming language: C++
- Sensors / input devices: contact, temperature, gyroscope, IR and light sensors
- Target environment: Indoor or outdoor