


HomeMade IR Sensor Controlling Robot...Proof of Concept
I saw a tutorial that Ro-Bot-X did on controlling a robot with homemade IR Sensors so i decided to try it. I am using two 38KHz IR Reveivers from RadioShack and two IR LEDs from Radio Shack.
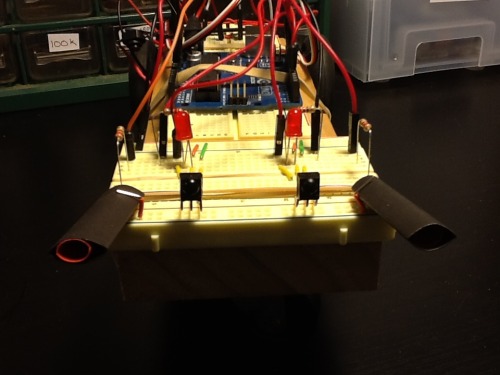
The total cost for the sensors was around $9.00. It took a little time to figure out how to use the sensors because i am very new at electronics have no prior programming knowledge. I have used PING))) ultrasonic sensors and the sharp IR sensors and I have to say....this was the best method of controling this bot. He is kinda ugly right now as he was just a proof of concept to see it I could do it. basically, he drives forward using an arduino and two servos as wheels. If an object is detected to the left, he turns to the right till it is not detected anymore. If an object is detected on the right he moves to the left till it is not detected anymore. both sensors detect an object, it means there is something in front of him. He will Stop, Backup, and turn to the right till the object is not in his sensors anymore then he drives straight again. It will pick up objects as skinny as a chair leg.
There are drawbacks to this as it does not work outside, but if you are only going to use your robot in the house, this could be a good method. Below is the code that I used to get him going. Feel free to comment on it and if you can think of a way to make it better let me know.
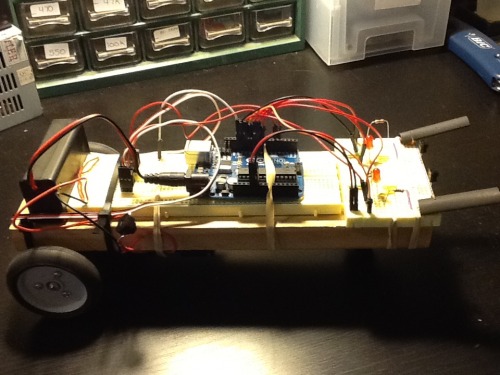
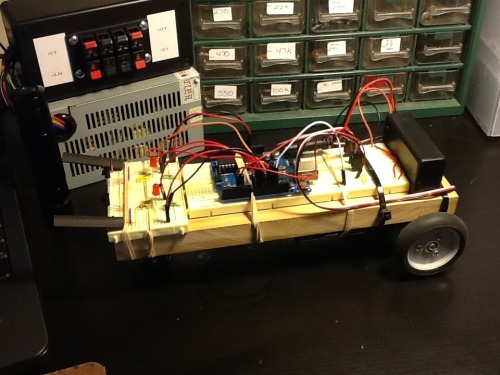
Items used:
Arduino Uno
2 - Futaba S3003 Servos modified for Continuous Rotation
2 - Wheels for Tamya motor
1 - Small Castor wheel for the front
2 - RadioShack 38KHz IR Receivers
2 - RadioShack IR LEDs
4 - 220Ohm resistors
2 - Red LEDs
1 - 9V power supply for Arduino
1 - 4xAA battery pack for servos (6v)
2 - Breadboards (one small, one large)
Misc Hookup Wires
CODE FOR OBSTACLE AVOIDANCE WITH IR SENSORS AND SERVOS
//Include Servo Library
#include <Servo.h>
//Define Pins for the Sensors and LEDs
#define LsensorPin 9
#define RsensorPin 8
#define LeftTransPin 10
#define RightTransPin 11
#define LeftledPin 13
#define RightledPin 12
//Constants for driving servo
const int RForward = 0;
const int RBackward = 180;
const int LForward = RBackward;
const int LBackward = RForward;
const int RNeutral = 92;
const int LNeutral = 92; //0 Speed
//Name the Servos for Left and Right Motor
Servo LMotor;
Servo RMotor;
//Take Reading from Left IR Sensor
void LeftIRled(){
for(int i=0;i<=384;i++){
digitalWrite(LeftTransPin, HIGH);
delayMicroseconds(13);
digitalWrite(LeftTransPin, LOW);
delayMicroseconds(13);
}
}
//Take Reading from Right IR Sensor
void RightIRled(){
for(int i=0;i<=384;i++){
digitalWrite(RightTransPin, HIGH);
delayMicroseconds(13);
digitalWrite(RightTransPin, LOW);
delayMicroseconds(13);
}
}
//Controling Servo Directions with Functions
void Forward(){
RMotor.write(RForward);
LMotor.write(LForward);
}
void Backup(){
RMotor.write(RBackward);
LMotor.write(LBackward);
}
void Stop(){
RMotor.write(RNeutral);
LMotor.write(LNeutral);
}
void Left(){
RMotor.write(RForward);
LMotor.write(LNeutral);
}
void Right(){
RMotor.write(RNeutral);
LMotor.write(LForward);
}
//Declare INPUT and OUTPUT for each Pin connected
//to Arduino Uno and set them to LOW
void setup(){
pinMode(LeftTransPin, OUTPUT);
digitalWrite(LeftTransPin, LOW);
pinMode(RightTransPin, OUTPUT);
digitalWrite(RightTransPin, LOW);
pinMode(LeftledPin, OUTPUT);
digitalWrite(LeftledPin, LOW);
pinMode(RightledPin, OUTPUT);
digitalWrite(RightledPin, LOW);
//Attach the Servos to Arduino Uno Pins 4 and 5 and
//drive forward
LMotor.attach(4);
RMotor.attach(5);
Forward();
}
void loop(){
/*Drive forward until you reach an obstacle on either the
right side, left side, or both together(something in front of
you). If the left sensor goes low, he turns right, if the right
sensor goes low, he turns left. if both turn on at the same time
he stops, backs up, and turns right till he is out of danger
*/
int rstate;
int lstate;
LeftIRled();
lstate = digitalRead(LsensorPin);
delay(50);
RightIRled();
rstate = digitalRead(RsensorPin);
delay(50);
if (lstate == LOW && rstate == LOW)
{
digitalWrite(LeftledPin, HIGH);
digitalWrite(RightledPin, HIGH);
Stop();
delay(100);
Backup();
delay(500);
Stop();
delay(100);
Right();
delay(500);
}
else if (lstate == LOW)
{
digitalWrite(LeftledPin, HIGH);
Right();
delay(500);
}
else if (rstate == LOW)
{
digitalWrite(RightledPin, HIGH);
Left();
delay(500);
}
else
{
Forward();
}
digitalWrite(LeftledPin, LOW);
digitalWrite(RightledPin, LOW);
}
Please let me know what you think......
Navigates with IR Sensors
- Actuators / output devices: 2 servos
- Control method: fully autonomous
- CPU: arduino uno
- Power source: 9v battery, 6v battery pack
- Programming language: Arduino
- Sensors / input devices: Homemade IR sensors
- Target environment: indoor