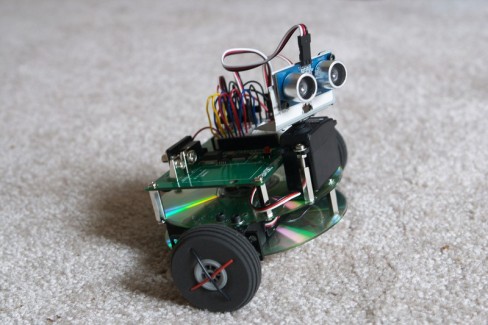
Harry the Discbot
Harry is my current project, and he's a work-in-progress. My first goal was to simply build a nice differential-drive mobile base for my Basic Stamp so that it could drive around on my carpeted floors. Now that that's done, I have to figure out something for him to do :) I may try to use this to attack the Chair Challenge.
Mobility is handled by two low-end standard-size servos, modified for continuous rotation (control boards removed and wires soldered directly onto motor's + and - terminals, and the plastic stop cut out). A third servo is mounted on the upper platform with a bracket to hold the PING))) sonar sensor. The two drive servos are controlled by two H-bridges built on the breadboard (using eight 2N2222 NPN transistors). The power for the three servos comes from four recharcheable AA batteries in the two dual-AA battery holders soldered up in series, mounted on the lower level between the servos. This provides 4 x 1.2v = 4.8v to the servos. The microcontroller, sonar sensor, and sonar servo are powered by the 9V battery on the Basic Stamp's board.
At the moment, I have it programmed to wander around the room at random, taking 3 measurements with the sonar every once in a while, and trying to avoid running into things. As you can see in the video, it doesn't work very well yet (it drives right into the wall), but to its credit, it does eventually get itself out of trouble and continue on its merry way. Definitely needs more coding work though, and maybe some touch sensors to supplement the sonar and let it figure out when it has run into something.
The code is still under regular development, so I won't bother posting it yet.
Pictures
Fabricating the bracket for the sonar sensor was probably the most difficult part of the whole project.
Most of the breadboard (and half of the I/O pins) are taken up by the two H-bridges for the drive servos, leaving just a little space on the right for the hookups for the sonar. It's definitely more efficient to use a separate motor controller, and I've got one on order.
I didn't want to glue the wheels to the servo horns, because then I'd have no way to screw/unscrew the horn from the servo, so I used this approach instead. This way, I can still slip a small screwdriver through the axle hole in the wheel to unscrew the servo horn.
When all you have is a soldering iron, everything looks like a circuit.
Rear view. The nice thing about using CDs to build the body is they even provide a convenient hole in the middle for routing wires between levels.
Front view. I don't have anything to serve as a tailwheel, so Harry just drags his butt around like a dog. It actually works surprisingly well, even when backing up on carpet, but I want to figure out something better.
Changing the batteries requires a bit of disassembly but not too bad.
As inspired by Fritsl, a speaker (ripped from an old 486 PC) makes it a lot easier for the robot to tell you what it's doing with beeps and boops. Unfortunately, I can't think of anywhere to mount it, so I just have to carry it behing the robot like a wedding train.
Wander around at random, avoid running into things
- Actuators / output devices: Two servos modified for continuous rotation
- CPU: Basic Stamp 2
- Power source: 4 AA batteries for motors, one 9V battery for MCU and sonar
- Sensors / input devices: PING))) sonar
- Target environment: indoor


