


Fluffy
Update 25 October 2013
Today I worked some more on Fluffy and I guess he/she is almost finished. I got to test drive him and he works like a charm. Doesn't bump into anything and nicely turns whenever he needs to.
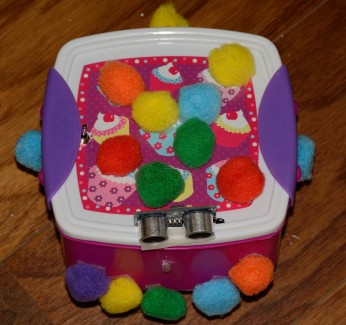
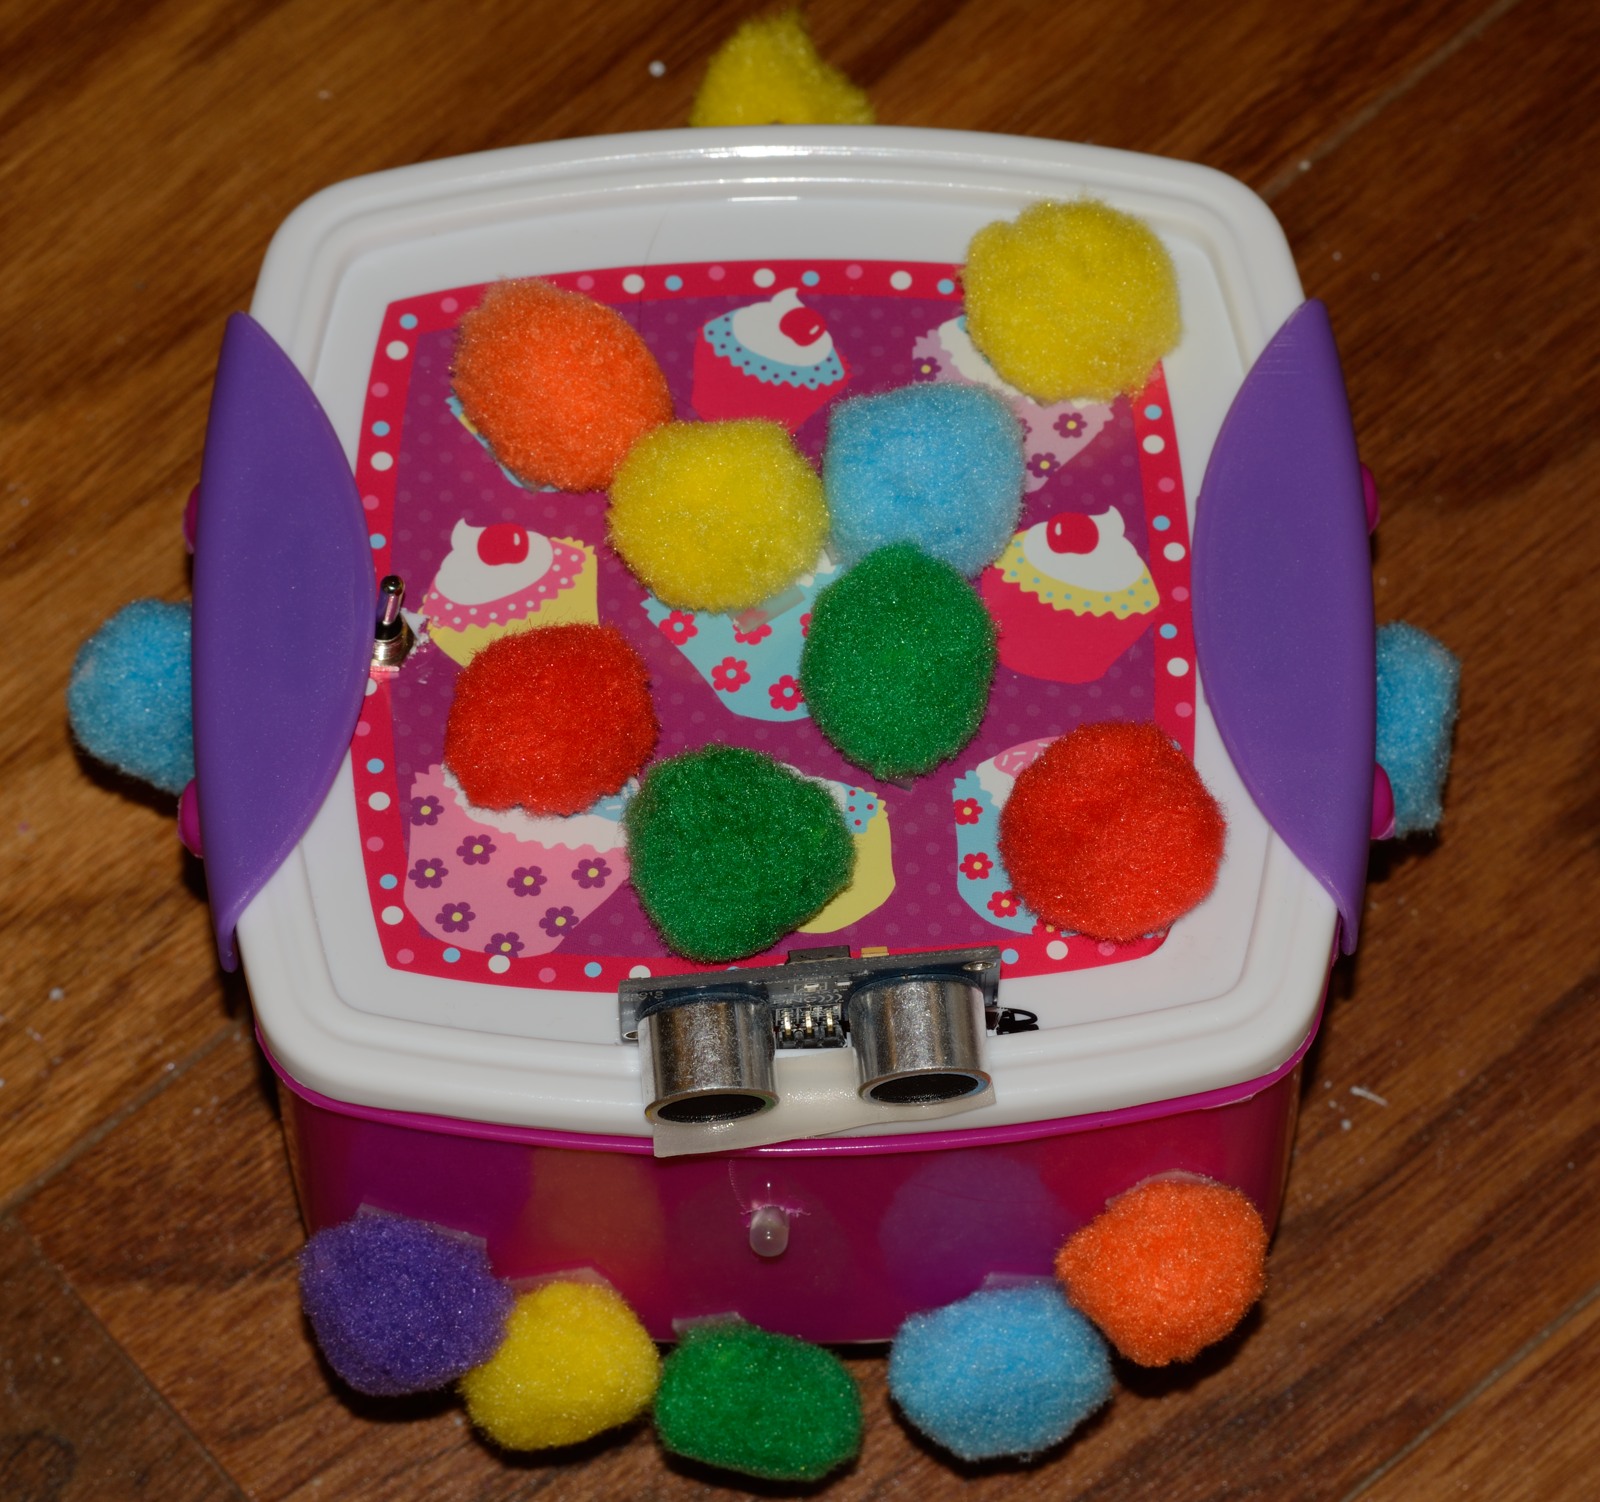
I also made Fluffy fluffy by adding the fluffy balls.
In addition I had the idea of adding an RGB LED for the nose and randomly chance the color which I really like and adds to the fluffy personality.
I also added the switch on top so I can easily turn it on or off.
I've got some mroe ideas for this robot but I think I will start over and build a new chassis without a box so I have more space for everything. I'm also goign to switch the DC motors for conrinous servo's. Because of these changes I will just build a new robot and keep Fluffy as is.
It's my first robot and I like it. Although some elements could be finished better but hey, you have to start somewhere :)
Some more pictures from the build:
Top side of Fluffy:
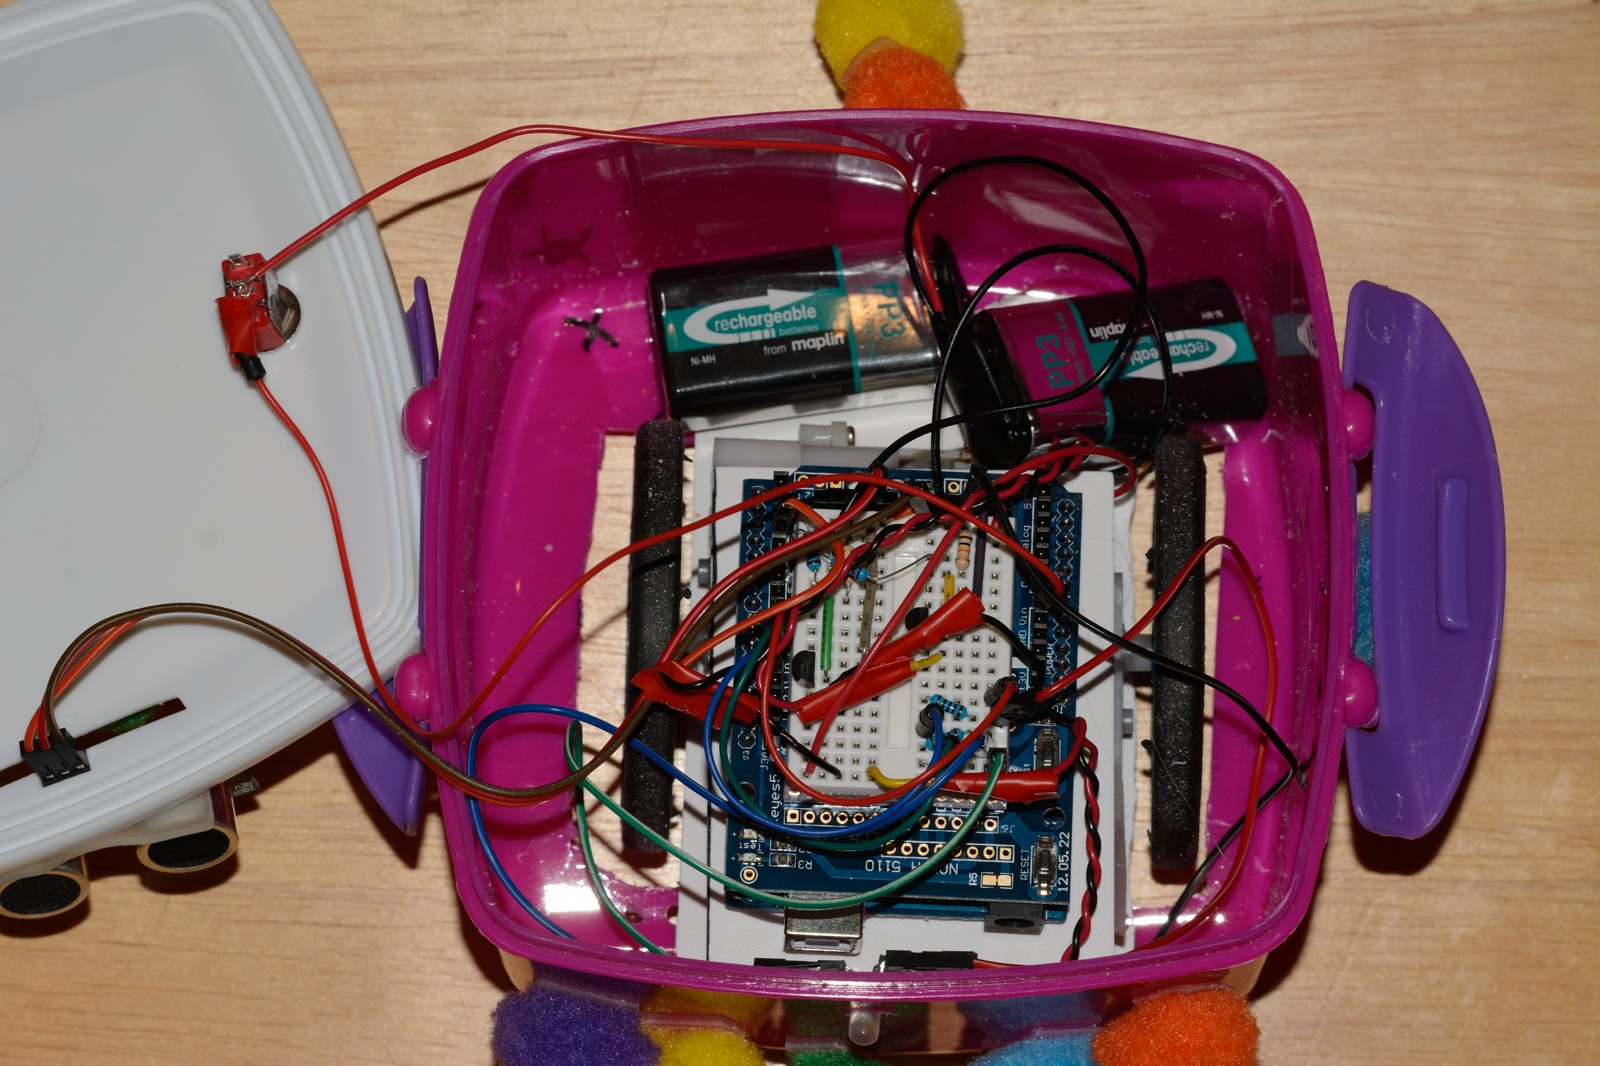
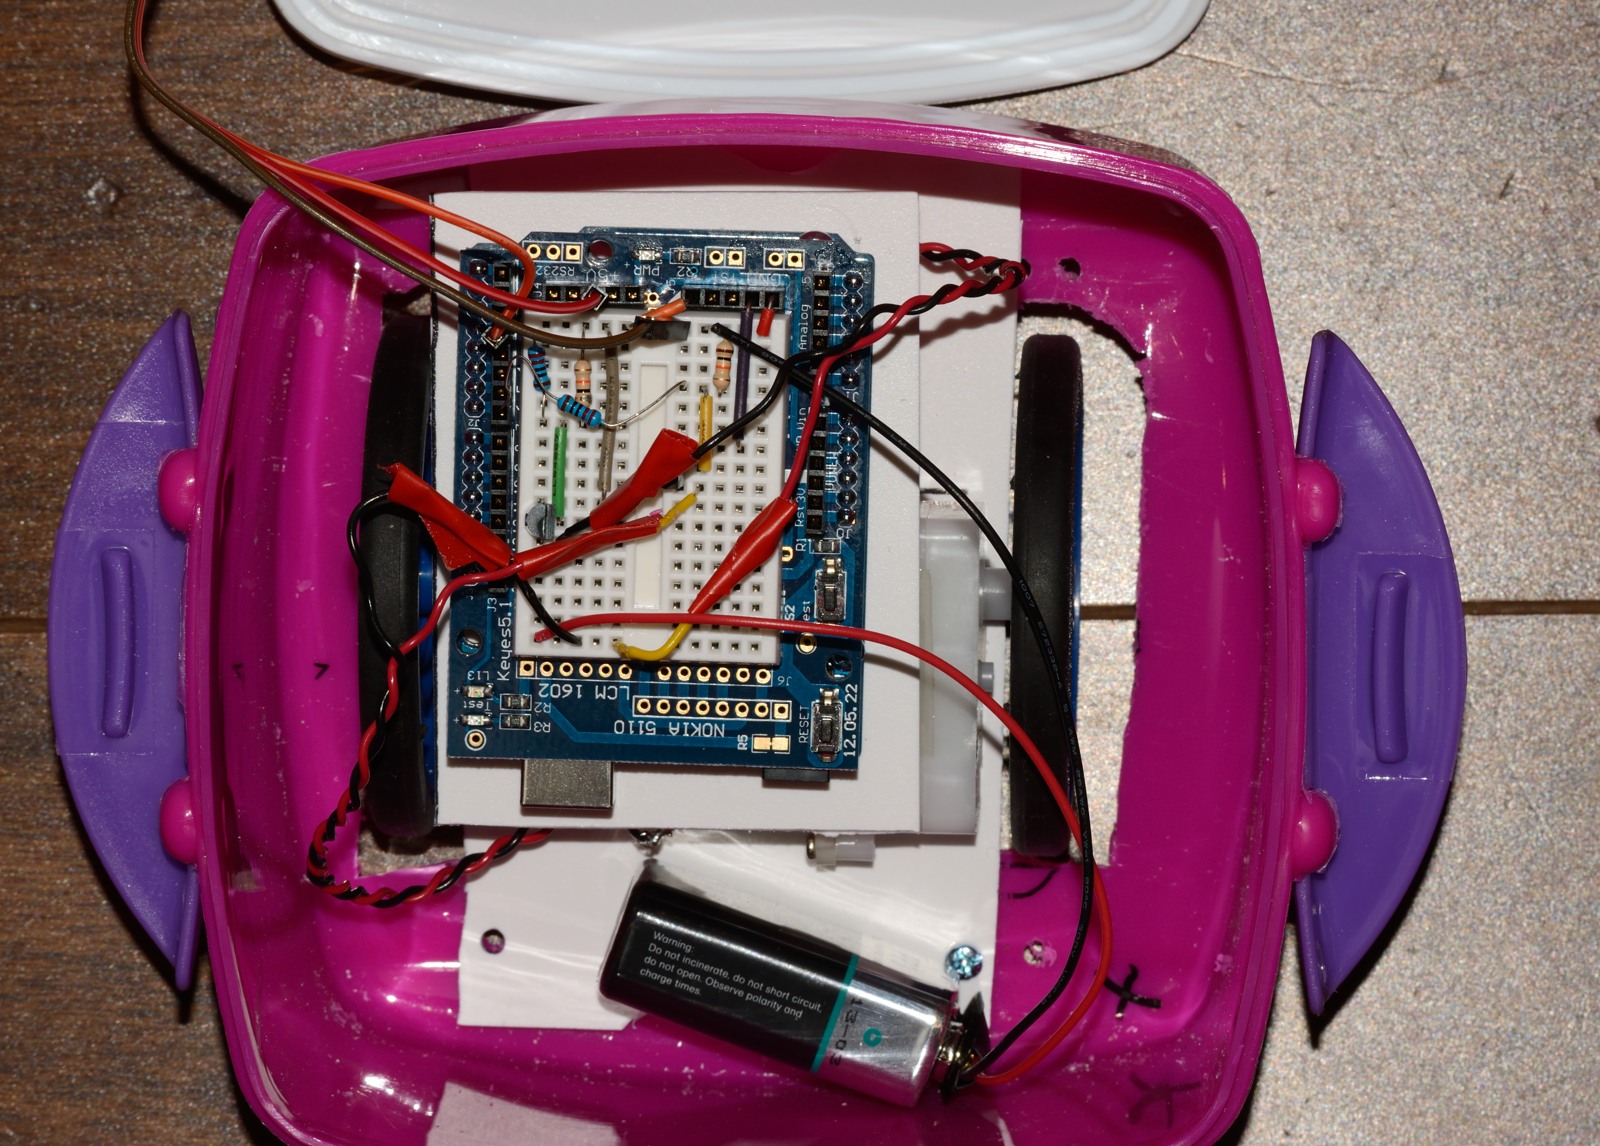
Fluffy's guts
Introduction
So this is my very first robot which is basically a learning exercise.
I did a lot of stuff that I never did before like soldering, working with tools like dremel and so on.
I'm not the most handy person around. I have to admit that my wife does all the stuff around the house. She drills holes in the wall for frames, put together furniture from IKEA and so on. She was kind of amazed when I told her I had plans to build a robot and needed to solder and work with tools.
So yes, I learned a lot in the last few days.
Fluffy is my first robot. Why pink you may ask? Well I was looking in the 99c store for a box which would fit my chassis and this pink box was the only thing they had. My wife was with me so she convinced me to go all the way and make it a nice fluffy robot. It's still a WIP but when it is finished I will finish it off with some fluffy balls so that's how I came up with the name...
Technical details
Now the more techy stuff. I am using 2 DC geared motors. They are controlled using a simple NPN transistor switch circuit. I'm also creating a circuit on 123D Circuits for Fluffy which you can find here: http://123d.circuits.io/circuits/53556# (this is also a WIP. At the moment it only has a single motor instead of 2).
The circuit is build on a protoshield with a mini breadboard attached to it:
I didn't build a complex circuit which allows the motors to run backwards so it can only drive forwards and for turning only the left or right motor is enabled.
I also wanted to reuse most of my components so I haven't attached anything permanent.
The Arduino is attached to some sintra board with screws and nuts. The DC motors are attached with doubles sided tape which I can easily remove.
The entire chassis can also be taken out of the box and put in another box which makes it usefull if I get fed up with the pink box :)
Later on I will add a picture from the chassis not in the box.
I wanted to make a model in SketchUp but I don't know how to do this yet..
Progress
So far the chassis is ready, the 9v battery for the DC motors is attached and works properly.
The circuit is ready and works according to plan.
Basic Arduino script is ready. The methods for moving forwards, left, right and stopping are ready as well as the method for calculating the distance which is coming from the Ping))) sensor.
Todo:
Finish the Arduino script so Fluffy can roam around the room and avoid obstacles.
I also have to attach another 9v battery to power the Arduino seperatly from the DC Motors. I also have a battery pack with 6 AA batteries but I'm afraid to attach that to the Arduino because the weight of those 6AA bateries is much more than the 9v batterie so just for weight purpose I am going to use the 9v battery.
I also have to attach the batterie because currently it is attached to the circuit but it does not have a physical attachment in the box.
Lessons learnt so far:
1) I learned how to solder which is cool. I noticed that when i strip wire I really don't need much bare wire. So far I have stripped way to much so I needed more solder and I had to cover up with some tape.
2) Cover up naked wire or solder with tape. I didn't do it from the beginning so when I tested my first version on the breadboard my transistor got very hot because the + and - from the motor were naked and touching. Transistor luckely survived!
3) Dremel is cool however cutting plastic is still a mysterie. Even on the slowest speed the plastic is melting. Cutting sintra is more easy to cut with a hobby knife than the dremel.
This could also be because of my unexperience with proper tools.
4) Messurements are really important: I believe I had to drill holes at least 3 or 4 times over and put my DC motors also 3 or 4 times before it would fit. First the sintra board I cut out was to small, than I didn't got enough room for the wheels, then the DC motors were positioned to far backwards,...
This will not happen in my next robot as I will messure eveything and make sure I have tested it before taping and cutting.
Future plans for Fluffy
When Fluffy is ready and works according to plan I have some ideas to improve its looks and functionality:
Add a flickering LED that will act as the nose of Fluffy.
Add some LED's at the top which will give feedback on which motor is running
Switch so I can easily switch Fluffy on or off. I might include this immediatly as this is more essential instead of nice to have.
Use a potentiometer for selecting the minimum distance before Fluffy turns.
Navigate around via ultrasound
- Actuators / output devices: 2 dc motors
- CPU: Arduino
- Power source: 2x9V
- Programming language: C++
- Sensors / input devices: Ultra Sound
- Target environment: indoor