


First Robot
This is my first robot project. I've had an interest in electronics for as long as I can remember and began playing with PICAXE about 5 years ago, but never really got beyond the basic lighting an LED etc. A few months ago I came across the Arduino platform and really enjoyed programming with it and so decided to try and make a robot.
The basic goals for the robot where to move around avoiding a collision in the first instance, then to investigate better programming techniques to avoid collisions and controlling motors.
End goals will be to maybe add some kind of arm to enable the picking up and placing of objects, but this is a long term goal for now.
As I mentioned before Arduino will be the microprocessor of choice. Over the past few months building the robot I discovered that the basic Uno / Duemilanove probably wouldn't have enough I/O and that a MEGA would be needed, more on that later on.
While I was looking at robot chassis, I discovered a wide range of kits and chassis, ranging from cheap to seriously expensive. I wanted something that wasn't too costly, but would allow any future projects to grow. I also wanted something quite sturdy with the possibilty of going outdoors if the project progressed to that. ( I've learnt my lessons in camera lens and the wasted money with not getting the lens you really wanted, and then a few months later getting that lens and selling the other 2nd choice lens for a significant loss).
A few of the kits i considered:
- DFRobot Tracked kit - with a review from RUG Community. This kit seemed to contain just about everything I'd need however it just didn't look durable enough. It also seemed to lack many expansion options. It may be been able to carry a sensor or to but nothing much. It also contained a customised Arduino board that I already had. On the plus side quite cheap :).
- DFRobot 4WD - with a review from RUG Community. This kit seemed a great kit to start with with quite a lot of expansion options should I need them. The only thing that put me off this kit was the fact the motors didn't seem too powerful and could be hard to replace if the need arose.
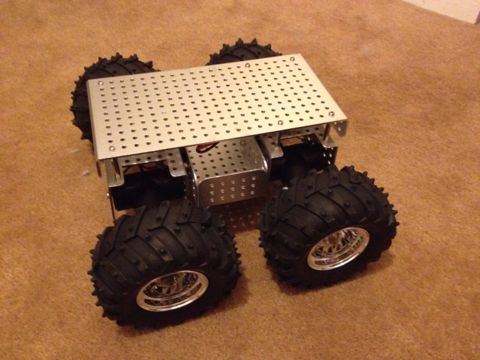
- Dagu Wild Thumper 4WD - with a review from RUG Community. The review from RUG was for the 6WD version but Dagu also do the smaller 4WD. This platform appears to have the power, expandability and the robustness required.
In the end I went with the Dagu Wild Thumper, mainly as it had the expansion options I required. However this brought about its own problems, mainly to do with the motors. The Wild Thumper uses 4 motors ( there are different gear ration options, 30:1 and 75:1), however each motor is quite powerful, requires between 2v and 7v and has a high stall current of 6A. In addition to this motors are wired in pairs, a potental 12A stall current. Most Arduino Motor shields are only rated between 2A and 5A.
Looking around Pololu's website I came across the VNH 5019 shield. A dual motor shield with a maximum continous current of 15A per channel. Perfect for what I was looking for! It also helped that it came with some pre prepared code in the form of an Arduino library to get me started.
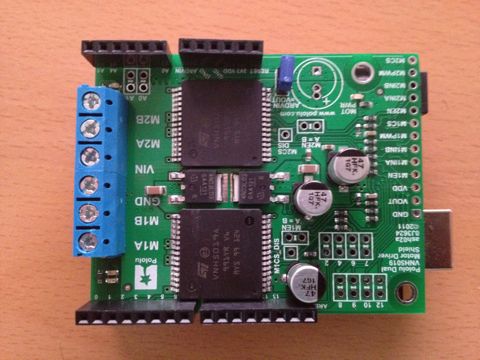
This is however were I saw my first problem. The Duemilanove has 14 digitals and 6 analogue pins, the VNH 5019 required the use of 8 digitals and 2 analogues which limited any expansion. Looking at the MEGA boards I took the plunge, I would never run out of pins with that :).
Doing some basic motor tests with the shield and the Wild Thumper showed that I would need robust mounting for the Arduino and shields along with the wiring and I began looking into screw shields. I couldn't find a single one on the market for the MEGA! So I set about making my own :).
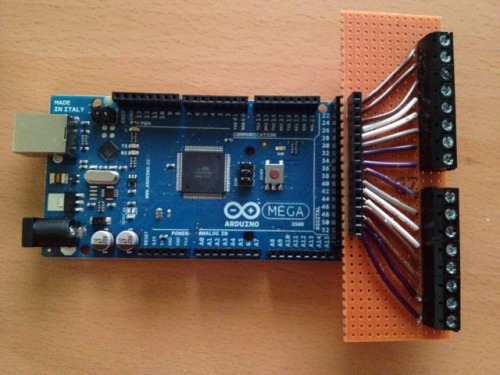
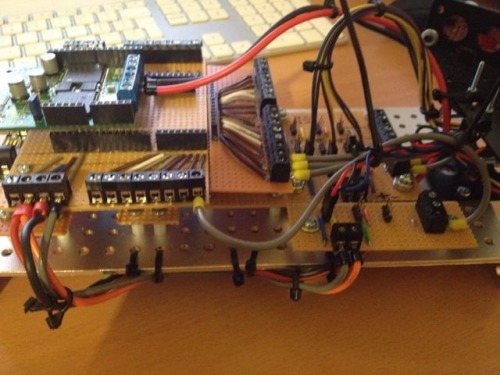
I did however run into a few problems. The first being that all the header pins on the Arduino line up perfectly with a standard stripboard, apart from the first set of digital pins ( Digital 8,9,10.., AREF) and the next hearder ( Digital 7, 6, 5...). I just cut those out as the VNH 5019 shield was making most use out of those. I scarficed the inner row of digitals at the back as I couldn't think of a neat way of getting those out and I doubted I would need all of them.

Power (5V and 3.3V) and both grounds were taken to screw terminals. The plan was to duplicate them across the other side of the shield but I couldn't find a neat and tidy way of doing it.
Sensors for the robot include 3 x ultrasonic ( Seeedstudio do a cheaper version of the Parallax PING ). These are mounted at the front of the robot, one facing forward and the others offset by 45 degrees. I bought a variety of brackets for mounting sensors and kind of mashed them together along with the help of a trusty needle file.
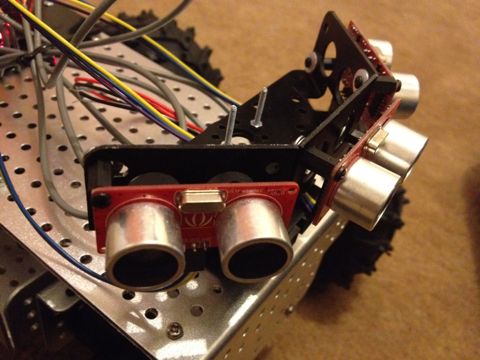
Using the 3 sensors would avoid the use of servo's for now and could provide some interesting experimentation with coding for them. In addition to this I also have mounted 2 Sharp IR sensors, 1 at the front and 1 at the back. The one at the front is probably an overkill, however I wanted to look into using interupts and thought this could be one way. I did buy some microswitches with "long" arms with the intesion of using those however they wouldn't clear the wheels when mounted.
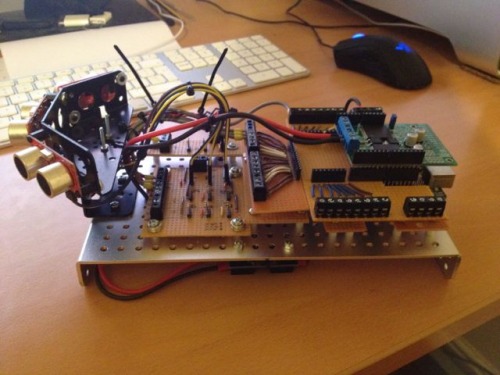
Arduino and shields all mounted with additional breakout boards for connecting the sensors. Each breakout board has a common 5v and GND connected to each header and the SIG is taken from the screw terminal to the screw teminal on the MEGA shield.
Sharp IR ( VCC, GND, SIG) sensors are wired slightly different to the Ultrasonics(GND, VCC, SIG), so I created 2 breakout boards, the IR one is the smaller of the two in the foreground of the photo above.
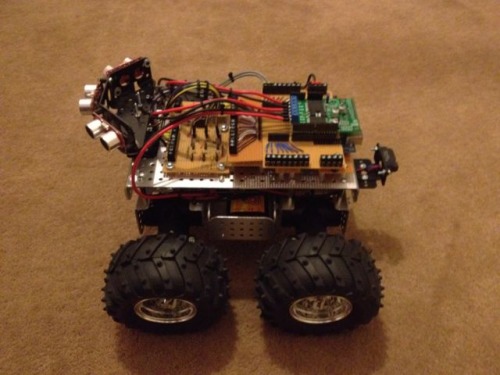
The robot all assembled and ready to go. Let the coding commence!
Update 1:
Wrote some code for collision avoidance. Its not the best as shown in the video but it kind of works as a first attempt.
//---------------------------------------------------------//
//                                                         //
//Scoutbot V0.1                                            //
//                                                         //
//Programmed by Chris83 2012                               //
//                                                         //
// Featuring code snippets from Arduino PING Tutorial      //
// IR Code with help from www.luckylarry.co.uk             //
//
//---------------------------------------------------------//

//---------------------------------------------
// Includes : Include all header files

#include "DualVNH5019MotorShield.h"

//---------------------------------------------
// Constants : Declare all constants

//Ultrasonics Pin Numbers
const int ultra_cen    = 53;
const int ultra_right  = 51;
const int ultra_left   = 49;

//IR Pin Numbers
const int ir_front     = 15;
const int ir_back       = 14;

//Anaolgue Resolution
const float analogue_5v =  0.0048828125; // (5V / 1024)
const float analogue_3v =  0.0032226563; // (3.3V / 1024)

//---------------------------------------------
// Variables : Declare all global variables

// Setup The motor shield with declaration md
DualVNH5019MotorShield md;

//Ultrasonic distance variables
int center_dist, right_dist, left_dist;

//IR distance variables
int IR_front_dist, IR_back_dist;

//---------------------------------------------
// Functions : Declare all Functions

float get_distance_IR(int IR_Pin)
{
  float volts = analogRead(IR_Pin) * analogue_5v;

  float distance = 27*pow(volts, -1.10);

  return distance -1;
}

long get_distance_ultra(int ultra_Pin)
{

  // Local Variables for get_distance
  long duration, distance;

  // Sensor Pre-set . Set pin LOW first for a clean signal. Then High to activate Ultrasonic senor
  pinMode(ultra_Pin, OUTPUT);
  digitalWrite(ultra_Pin, LOW);
  delayMicroseconds(2);
  digitalWrite(ultra_Pin, HIGH);
  delayMicroseconds(5);
  digitalWrite(ultra_Pin, LOW);

  // Sensor Center Detect
  pinMode(ultra_Pin, INPUT);
  duration = pulseIn(ultra_Pin, HIGH);

  //Convert Duration to CM
  distance = microsecondsToCentimeters(duration);

 //Return distance in CM
 return distance;
}

long microsecondsToCentimeters(long microseconds)
{
   // The speed of sound is 340 m/s or 29 microseconds per centimeter.
  // The ping travels out and back, so to find the distance of the
  // object we take half of the distance travelled.
  return microseconds / 29 / 2;
}
//---------------------------------------------
// Setup:

void setup()
{
  Serial.begin(9600);

  md.init(); // Init the Motor Shield md

}

//---------------------------------------------
// Main:

void loop()
{

 center_dist = get_distance_ultra(ultra_cen);
 right_dist  = get_distance_ultra(ultra_right);
 left_dist   = get_distance_ultra(ultra_left);

 IR_front_dist = get_distance_IR(ir_front);
 IR_back_dist = get_distance_IR(ir_back);


 Serial.print("Center: ");
 Serial.println(center_dist);

 Serial.print("Left: ");
 Serial.println(left_dist);

 Serial.print("Right: ");
 Serial.println(right_dist);

 Serial.print("IR Front: ");
 Serial.println(IR_front_dist);

 Serial.print("IR Back: ");
 Serial.println(IR_back_dist);

 Serial.println("");

 if (center_dist >= 25) // If Center Ultrasonic sees a distance greater than 25cm go forward
   {
      md.setSpeeds (90,90);
   }

 if (center_dist < 25 || IR_front_dist < 25) // If Center Ultrasonic sees a distance less than 25cm slow and compare
   {
      md.setBrakes (0,0);

      if (left_dist > right_dist) // Compare left and right ultrasonics. If Left is greater than right, GO LEFT
        {
           md.setSpeeds (-200, 200); // Start motors going LEFT
           delay (1000); // Run motors for 1 sec left
           md.setBrakes (0,0); // Stop motors
        }

        if (left_dist < right_dist) // Compare left and right ultrasonics. If Left is less than right, GO RIGHT
          {
           md.setSpeeds (200, -200); // Start motors going RIGHT
           delay (1000); // Run motors for 1 sec left
           md.setBrakes (0,0); // Stop motors
          }
   }

 if (center_dist < 10) // If Center Ultrasonic sees a distance less than 10cm STOP!
   {
     md.setBrakes (0,0); // STOP!

     if (IR_back_dist > 25) // If Room to reverse ( greater than 25cm )
     {
       md.setSpeeds (-90, -90); // Go backwards
      delay (1000); //Run Motors for 1 second
      md.setBrakes (0,0);
     }

     if (left_dist > right_dist) // Compare left and right ultrasonics. If Left is greater than right, GO LEFT
        {
           md.setSpeeds (-200, 200); // Start motors going LEFT
           delay (1000); // Run motors for 1 sec left
           md.setBrakes(0,0); // Stop motors
        }

        if (left_dist < right_dist) // Compare left and right ultrasonics. If Left is less than right, GO RIGHT
          {
           md.setSpeeds (200, -200); // Start motors going RIGHT
           delay (1000); // Run motors for 1 sec left
           md.setBrakes(0,0); // Stop motors
          }
   }
 delay(1000);
}
Collision Avoidance
- Control method: autonomous
- CPU: Arduino Mega
- Power source: 7.2V Tamiya-style racing pack
- Programming language: Arduino C
- Sensors / input devices: Sharp IR, Ping))) Ultrasonic
- Target environment: Indoors / Outdoors (dry)