


First Bot 1.1
I had been learning basic electronics and the use of Arduino in college this year to create musical instruments and interfaces. Now that summer is here and I have time on my hands I decided to put my new knowledge to use.
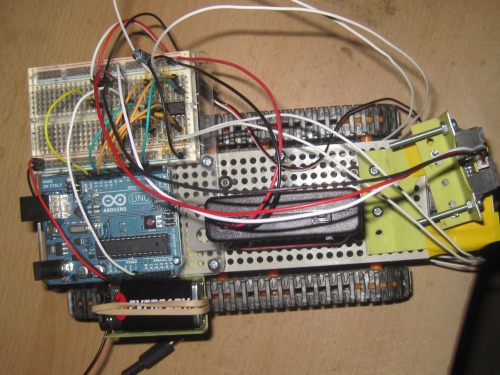
I started out by buying an Arduino beginner set from Oomlout which had a mini servo and toy motor included. Once I was comfortable with how those worked I started to look for the parts I needed to build my robot. I went with the tamiya tracks and gear box because of the price. Also it would allow me to use different track shapes and the base plate allows for easy attachment of other things. After buying these I then had to start buying some capacitors, H bridge motor controllers, hex spacers and lots of nuts and bolts. Due to my inexperience I ended up spending a lot more than I should have on things that I couldn't actually use or didn't need... but at least I wont be short of H bridge chips in the future as I currently have five...
My robot is essentially based on this one..
http://luckylarry.co.uk/arduino-projects/obstacle-avoidance-robot-build-your-own-larrybot/
Like him I swapped the motors that came with the gearbox for a pair of Solarbotics GM3 which draw less current and used the SN754410 H bridge which can supply more current to each channel than the L293D. I think...
At the moment the main thing holding this robot back is a lack of power, both for the motors and the arduino. The motors struggle when making turns on carpet and the 9V battery cannot supply the arduino with enough power to run itself, the H bridge logic supply, IR sensor and the mini servo. So for the time being the mini servo is not used. I think the motors will be fine if I give them 6 AA batteries instead of the 4 x 1.2V that they have at the moment. I am not so sure about how to supply everything else with power though so any suggestions would be appreciated. Should I use a battery to power the arduino and a seperate supply for all the other components?
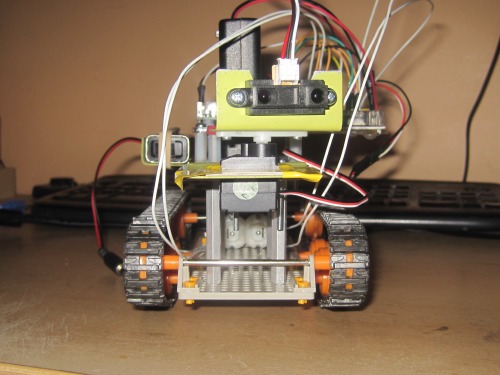
Unfortunately the centre of gravity is very high on this robot so it's ability to climb over things and deal with any rough terrain is pretty bad at the moment. I will try to fix that and the general messy wires situation once I have the power issues worked out.
I am also hoping to add some LED's and perhaps use the shift register, which came with my beginner kit, to do this. However it's workings are still confusing to me.
So there it is, my first robot. Still a work in progress but it's getting there.
First Bot 1.1 - Added a new project picture and video. The robot now has 12 AA batteries and the sensor and boards have been repositioned.
Navigate via infrared.
- Actuators / output devices: Tamiya dual gearbox 58:1 ratio, solarbotics GM3 motors, mini servo
- CPU: arduino uno
- Power source: Motors 4 AA, Arduino 9v
- Programming language: Arduino
- Sensors / input devices: Sharp IR
- Target environment: indoor, outdoor